Transaction Entry Overview
After completing the session form, click the Start button to display a transaction entry form. The transaction entry form is made up of two parts: the document information section and the transaction entry table.
Document Information
In this section, enter descriptive information about the document you are creating, such as a document number, date, and description. The document is associated with the session that was set up previously. The amount entered in the Amount box, must equal the net of debits and credits to all cash type accounts (or A/P type accounts, depending on what type of transactions your are entering). This total must be zero if no cash type accounts are entered. Additionally, you can enter zero to record transfers between bank accounts and banks.
Transaction Entry Table
In this table, enter actual transactions that make entries to the ledgers. The transaction line items contain segments, debits, credits, and so on. The total debit amount must equal the total credit amount. For Budget and Encumbrance documents, you will enter increase/decrease amounts.
There are a number of checks or edits the system performs before a particular entry can be saved or posted. Segment entries must balance a debit to a credit using the following:
- Effective Date,
- Fund (if Fund is designated as one of the account segments),
- Entry Type, and
- Balancing Segments (if any of the account segments are designated as balancing segments), except for sessions with a status of Batch-to Suspend.
Because an effective date can be indicated at the line item level, a single document can have line items that post to more than one fiscal period.
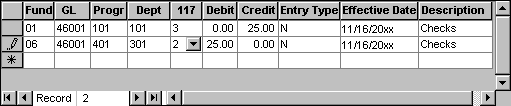
In order for an entry to be saved or posted, every line item must include all required account codes (segments) for the organization, a debit or credit amount (increase or decrease amount if appropriate), an effective date, an entry type, and a description. The following example displays the transaction entry table:
Transaction Entry Rules
The General Ledger account codes determine what other segment codes are required. For revenues and expenditures, all segment codes are required. For balance sheet accounts, the system verifies that segments designated as Fund and/or Balancing have codes. See the table below for complete information:
|
GL Account Type Entered |
Segments |
|||
|
Fund |
Balancing |
Non-Balancing |
Restrictions |
|
|
Revenue and Expense |
Required |
Required |
Required |
Required |
|
Net Assets/Equity |
Required |
Required |
Optional |
Required |
|
Other Balance Sheet Accounts |
Required |
Required |
Optional |
Optional |
Account Level Security is available for this form. This feature allows you to define the account codes and related amounts a user can view on transaction entry forms. Note that if you do not have Account Level Security enabled, the system displays all account codes.
Since all documents load when the session is selected, a user can select a document that contains accounts they do not have access to. However, with account level security activated by the Administrator for the organization (Security>Set Up Account Level Segments) and enabled for the user (Security>Set Up Account Level Security), the Transaction Entry Table only displays those accounts the user has access to. The user can still enter an account they do not have access to, but the system displays a warning and does not show the data.
If a user does not have rights to any accounts associated with this form, the user cannot delete any documents that contain those accounts. However, the user can display the document number in the search list, select it, and delete it.
If the transaction being entered exceeds the available budget, you are using online posting for the current organization, and the Check Available Budget During Posting check box is selected by the Administrator(Organization>Set Up Modules>Budget>Primary Budget Controls), the Over Budget form displays.
If a G/L Report Group Set was selected, the G/L Codes in the Group Set are the only codes the system verifies when posting. If a G/L Code is not in the group, no budget edits take place even if Check Available Budget During Posting is set to "Warn" or "Prevent."
The GL segment column only includes functional currency CSH accounts and CSH accounts whose currency is the same as the currency selected on the Session form. The functional currency was designated and the GL segment created by the Administrator using the File>New Organization wizard, while cash accounts were created using the Maintain>Chart of Accounts Codes form.
A transferred inventory session can be viewed, but the session and document fields cannot be copied, edited, or deleted.
Fund, General Ledger, and other segments: Enter a segment code, or select one from the drop-down list. The system displays all available segments in this table. Segments were set up when the organization was created by the Administrator (File>New Organization>Account Segments panel).
Debit, Credit/Increase, Decrease: Enter an amount in either the debit or credit (increase or decrease) column for each line, but not in both. This amount must be greater than or equal to zero. After the first transaction line is entered, the system automatically calculates and displays the offsetting debit or credit (increase or decrease) on the next line.
Entry Type: Enter an entry type or accept the default, Normal. All entry types are allowed; however, you cannot use Beginning Balance or Adjust Opening Balance if the General Ledger account is Revenue or Expense. Either change the entry type or the General Ledger account. Valid session types and their descriptions are shown below:
- Normal (N) - This entry type is used to indicate daily and month-end transactions.
- End of Year Adjustment (A) - This entry type is used to indicate adjustments made on the last day of the organization's fiscal year. It requires that the line's effective date is the last month and day of the fiscal year.
- Adjust Opening Balance (AO) - This entry type is used to indicate that an adjustment is being made to opening balances for an entry made to any fiscal year. It requires that the line's effective date is the first day and first month of the fiscal year you are adjusting.
- Beginning Balance (UO) - This entry type is used to indicate that opening balances are being entered for the first day and first month of the organization's fiscal year.
Effective Date: Accept the default effective date, or enter a new one for this line item. This is the effective date that posts to the ledgers.
Description: Accept the default description, or enter a new one for this line item.
- If you access any transaction entry form from the Activities>Display Balances>Account Balances or Available Budget Balances, Activities>Accounts Payable>Display Vendor Balances, Activities>Accounts Receivalbe>Display Customer Balances, or Activities>Display Encumbrance Balances forms, the selected document is read-only; you can only view the document, you cannot make changes.
- Once a session or document is posted (online or using Activities>Manage Sessions>Post Transactions), it cannot be edited. However, you can view (read-only) the session or document. Initially, the Session ID drop-down list only includes unposted sessions. To view posted sessions, select the posted Session by entering the ID or using the Find button.
- To have the system combine the detail transaction lines, have the Administrator select the Summarize Transaction Entries check box (Organization>Organization Preferences), and then click Use Offsets
 or Use Distribution Code
  and complete that process. The system automatically summarizes all system generated, fixed assets, and allocation transactions.
 - The transaction entry table contains an unlimited number of lines available to record the document. As you complete each line another becomes available. Use the scroll bars to move up and down in the table if the entry has too many lines to be seen at one time.
- Any transaction line having debits and credits equal zero is treated as a memo entry. Memo entries are related to the account code combination on their transaction line.
- Initially the transaction lines appear in the order in which they were entered; however, they can be moved to the order you want them to appear. Simply highlight the entire row, and then drag the row to the appropriate place using the mouse.
- By default, the system displays the same effective date and description in the transaction entry table as the document date and description, unless defaults were specified using Entry Defaults
 .
. - A transaction can be entered to a closed fiscal year. However, you might want to have the Administrator change entry dates (Organization>Organization Preferences>Entry Dates tab) to warn or prohibit the user from making an entry to the closed fiscal year.
- Below is a list of special function keys and other key combinations designed to help quickly enter transactions:
|
Key |
Action |
|
Tab |
Moves the cursor to the next cell. If the cursor is at the end of the line, it wraps to the next line. |
|
Shift+Tab |
Moves the cursor to the previous cell. When the cursor is at the beginning of the line, it goes to the last cell in the previous line. |
|
F2 |
Selects or deselects text. |
|
F4 |
In a drop-down list, F4 drops the list or pulls it up (if it is down). In a date or currency field, F4 displays the calendar or calculator. |
|
F5 |
Copies the contents of the cell immediately above it into the active cell. |
|
F6 |
Copies the contents of the row immediately above it into the active row. |
|
F7 |
Pulls in all the transaction entry line values, such as line entry type, line effective date, and line description from the Entry Defaults form. |