How Do I Create Custom Forms using Forms Designer?
The following is a checklist to help customize a layout and familiarize you with the forms and buttons used on the Forms Designer. If needed, review the checklist for Setting Up Forms Designer.
To Customize Your Layout
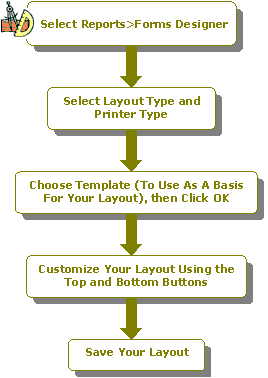
- Select Reports>Forms Designer, and then the Create New Layout form displays.
- Select the type of layout to create, such as Write Checks. The only types that are listed in the "Layout Type" box are those associated with the modules installed.
- Select a printer type of Laser or Continuous.
- Choose a template to use as a basis for the new layout, such as MIP Accounting Forms - Check. (Or select an existing layout using the "Open Existing" drop-down list.)
- Click OK, and then the system displays the Forms Designer.
- Make any necessary changes to the layout using the top and bottom buttons on this form. They help in customizing the design of the layout, so that it fits your needs.
- To insert a field, click the appropriate top toolbar button, and then draw a box on the layout.
- After selecting a box (such as text box or table), click Properties
 to enter data, format the box, change the font and background color, or add a border. Right-click or double-click in the box to also display the Properties form.
- Click Save
 after making all appropriate changes to display the Save Layout form. Assign a unique Name and Description to the layout, and then click OK.
 - Click Print Preview
 to review the layout. If any additional changes need to be made, do so now.
 - Click Print
 to review the printed layout. It will help with checking the alignment for the layout. (The printed version will look like an alignment form.)
To Print Your Documents
- When you are ready to process and print the documents (such as check, invoice, or purchase order) use the appropriate form in the Accounting, Electronic Requisitions, or Payroll systems.
A check, invoice, and so on, is not actually printed from the Forms Designer. Select the customized layout (with the name that it was assigned) from the "Format" drop-down list on the appropriate Load form in the system. Then, the check or invoice prints using the layout that was created with the Forms Designer. See the table below for a list of Layout Types and where to print each one in the Accounting, Electronic Requisitions, or Payroll systems. Some of the layout types may not be available, depending on which modules are installed:
- Select the customized layout from the "Format" drop-down list on the appropriate Load form, such as Load Checks or Load Invoices.
- Review the documents. They should be formatted according to the changes made using the Forms Designer.
|
Layout Type |
Menu Selection |
|
A/P Checks or A/P Vouchers |
Activities>Accounts Payable>Pay Selected A/P Invoices>Load Checks/Vouchers form |
|
A/R Invoices |
Activities>Accounts Receivable>Print/Email Calculated Invoices>Load Invoices form |
|
A/R Receipts |
Transactions>Accounts Receivable>Enter A/R Receipts>Print>Load A/R Receipts form |
|
Cash Receipts |
Activities>Receipt Writing>Load Receipts form |
|
Customer Statements |
Activities>Accounts Receivable>Customer Statements>Load Statements form |
|
Purchase Orders |
Activities>Purchase Orders>Create/Modify Purchase Orders>Load Purchase Orders form |
|
PO Receipts |
Activities>Purchase Orders>Process Receipts>Load Purchase Order Receipts form |
|
PO Receipt Adjustments |
Activities>Purchase Orders>Adjust Receipts>Load Purchase Order Receipt Adjustments form |
|
PO Cancellations |
Activities>Purchase Orders>Cancel Items>Load Purchase Order Cancellations form |
|
PO Vendor Returns |
Activities>Purchase Orders>Vendor Returns>Load Purchase Order Vendor Returns form |
|
Write Checks |
Activities>Check Writing>Write Checks>Write Checks Transaction Entry>Load Checks form |
|
Sales Order |
Activities>Accounts Receivable>Enter Orders>Load Sales Order form |
|
Sales Fulfillment Picking Ticket |
Activities>Accounts Receivable>Sales Order Fulfillment>Load Picking Ticket form |
|
Sales Fulfillment Packing Slip |
Activities>Accounts Receivable>Sales Order Fulfillment>Load Packing Slip form |
|
Customer Return Ticket |
Activities>Accounts Receivable>Customer Returns>Load Customer Return Ticket form |
|
Requisitions |
Activities>Requisitions>Create/Approve Requisitions>Load Requisitions form |
|
Payroll Checks or Payroll Vouchers |
Activities>Payroll>Print/Email Checks and Vouchers>Load Checks/Vouchers form |
