How Do I Create Financial Statement Formats?
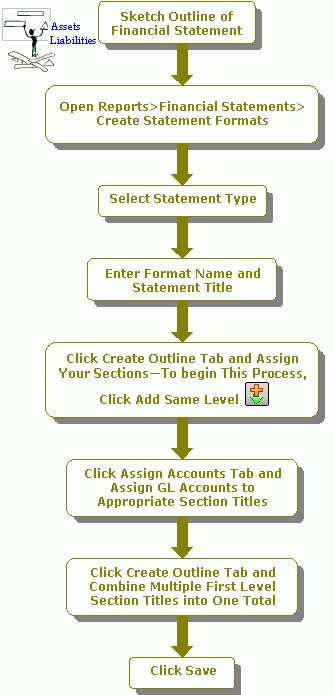
This checklist describes the steps to create a financial statement. It is a good idea to begin by sketching an outline of the financial statement on paper. Then, enter the data on the Reports>Financial Statements>Create Statement Formats form. Below is a description of the tabs for this form:
- Select Format tab - Use this tab to specify the type of financial statement, the name of the format, and the title that prints in the heading of the statement.
- Create Outline tab - Use this tab to create the format outline, including Section Titles. The Statement Outline displays the structure of the financial statement as it is designed. In order to begin this process, click Add Same Level
 .
. - Assign Accounts tab - Use this tab to assign specific general ledger accounts to the Section Title selected on the Create Outline tab. Each general ledger account may be selected for only one Section Title.
- Create Totals tab - Use this tab to combine multiple first level Section Titles into one total. Only first level Section Titles that are not already designated as Totals Sections are available to be included in a Total Section. Access this tab by selecting a Total Section on the Create Outline tab.
Sketch Outline
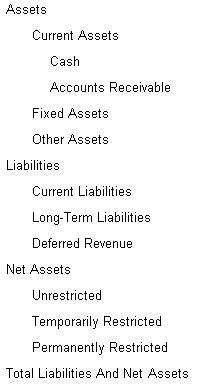
- To create a financial statement for the Statement of Financial Position, sketch an outline of the statement on paper as shown in the following example:

Select Format Tab
- Select S/P (Statement of Financial Position) as the Statement Type.
- Enter a Format Name description, such as Quarterly Report.
- Either accept Statement of Financial Position as the Statement Title, or change it to what needs to print on the statement.
Create Outline Tab
- Click the Create Outline tab. This is where the outline sketch from above is entered.
- Click Add Same Level
 on the top toolbar to set up the first Section. The system displays the Section Options form. (This form automatically appears when adding first level Sections.)
 - Enter the Title for the first Section in the statement outline, which is ASSETS. The attributes for the Title can also be specified.
- Click the Other button under Specify Section Type.
- Select Asset for Specify Section Account Categories.
- Accept the default for the other option buttons, and click OK to return to the outline.
- Click Add Lower Level
 , since there are defined second and third Section Titles under ASSETS in the statement outline.
 - Enter CURRENT ASSETS, as the Section Title, and press the Tab key.
- Click Add Lower Level
 again, since there is a third Section (or a Section beneath CURRENT ASSETS).
 - Enter CASH as the Title.
- Click Add Same Level
 (while still positioned at CASH) to add another third level Section Title, and enter ACCOUNTS RECEIVABLE.
 - Click CURRENT ASSETS to select that Section level, since the next Title is at the second Section level.
- Click Add Same Level
 again, and then enter FIXED ASSETS as the Title.
 - Continue this process to complete the remainder of the statement outline. (When creating the Section called "Total Liabilities and Net Assets," select Total for the Specify Section Type on the Section Options form.)
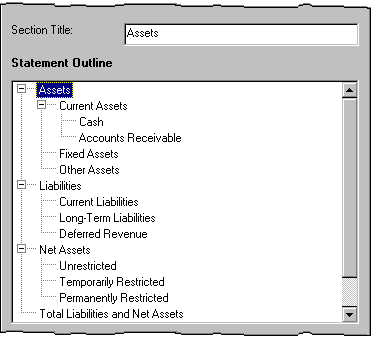
- The outline should look something like this.
Note: If creating a first level Section Title that represents a total of other first level Section Titles, such as Total Liabilities or Net Assets, for instance, select "Total" for Specify Section Type. All other first Section Titles should be specified as "Other." Edit these choices again at any time by selecting the first Section Title, and then clicking Section Options  .
.

Assign Accounts Tab
- Assign specific general ledger accounts to the appropriate Section Titles after completing the statement outline. To do this, first click the Section Title for which you want to assign general ledger accounts (on the Create Outline tab). Then, using the Assign Accounts tab, assign the General Ledger Account. (Accounts cannot be assigned to any but the lowest Section under each first level Section Title. For example, in the outline, general ledger accounts cannot be assigned to ASSETS or to CURRENT ASSETS. When assigning accounts to CASH or ACCOUNTS RECEIVABLE (the lowest level Sections under ASSETS) they are effectively assigned to ASSETS and CURRENT ASSETS.)
- Click Cash, and then click the Assign Accounts tab.
- Use this tab to select the general ledger accounts to appear beneath the Title "Cash" when the financial statement is printed. Each general ledger account may be assigned to only one Section Title. Previously selected general ledger accounts do not appear in the list.
- In order for the actual account code title and dollar balance to appear on the printed financial statement, move the general ledger account, and then click the Print Detail box. For the account balance to be combined with the other account balances assigned to this Section and the total dollar amount to appear next to the Section Title, do not select the Print Detail box for all accounts.
- Click the Create Outline tab, and then select the next title in which to assign accounts (in this case, Accounts Receivable).
- Click the Assign Accounts tab once again, and assign general ledger accounts to this title.
Create Totals Tab
- The system automatically totals each Section created when printing the financial statement. However, if you want totals of any combination of first Sections, use the Create Totals tab.
- For example, for the Statement of Financial Position, you may want a Section called TOTAL LIABILITIES AND NET ASSETS. (This title was created in Step 4.)
- Click on TOTAL LIABILITIES AND NET ASSETS in the statement outline, and then click the Create Totals tab.
- Use the Mover ( > ) to choose which first level Section Titles to include in the total. Since this is a total Section, general ledger accounts cannot be assigned to it.
- This completes our example of formatting the Statement of Financial Position. Use the same procedure to complete formats for all the other Statement Types.
