Automatic Bank Reconciliation
For automated reconciliations, use this form to balance the unmatched withdrawals and deposits, verify the matched withdrawals and deposits, and correct other suspense items using the Suspense Items tab.
Bank Reconciliation Summary
The top portion of the form features a summary of the various items included in the reconciliation.
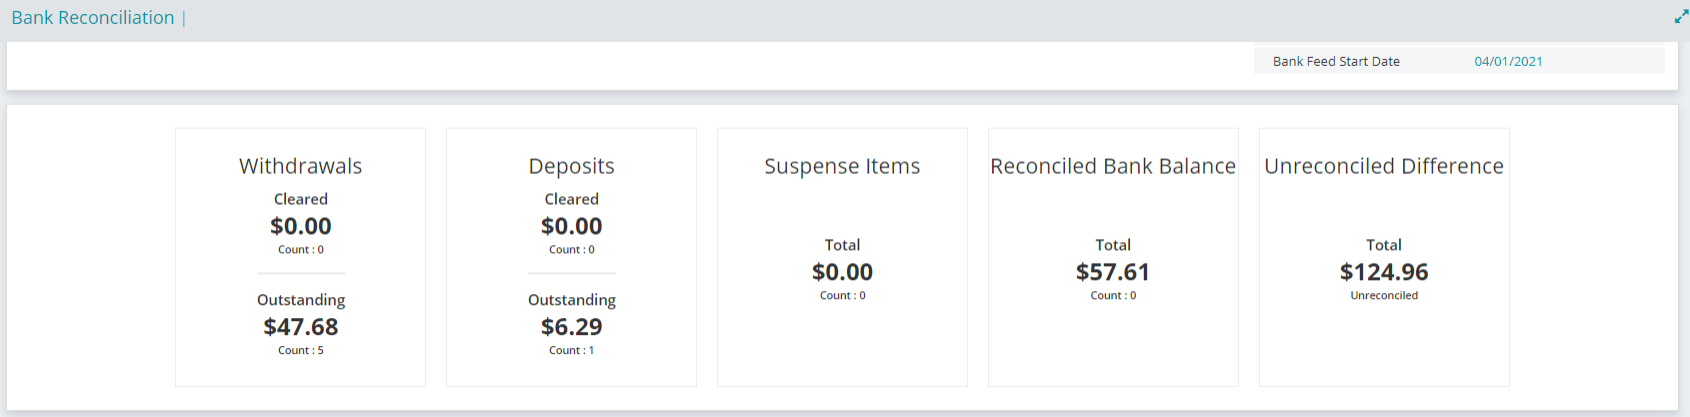
The Bank Statement Balance and Bank Feed Start Date fields can be edited by clicking the links under the Totals section in the upper right of the page. Locked reconciliations cannot be edited.

Unreconciled Difference
Once the Bank Balance is entered, the system calculates the unreconciled difference. The cash account is reconciled when this amount is 0.00. The Unreconciled Difference adjusts after each entry.
Bank Reconciliation Tabs
The lower portion of the form features individual tabs where you can select items that have cleared the bank statement. Click on a tab to see its details.
- Unmatched Withdrawals
- Matched Withdrawals
- Unmatched Deposits
- Matched Deposits
- Suspense Items
- All MIP Items
Unmatched Withdrawals Tab
The Unmatched Withdrawals tab displays withdrawals during the date range set for your bank reconciliation that were unable to be automatically matched. On this tab you can manually match the withdrawals in order to clear them from the tab. They will then appear on the Matched Withdrawals tab to be accepted.
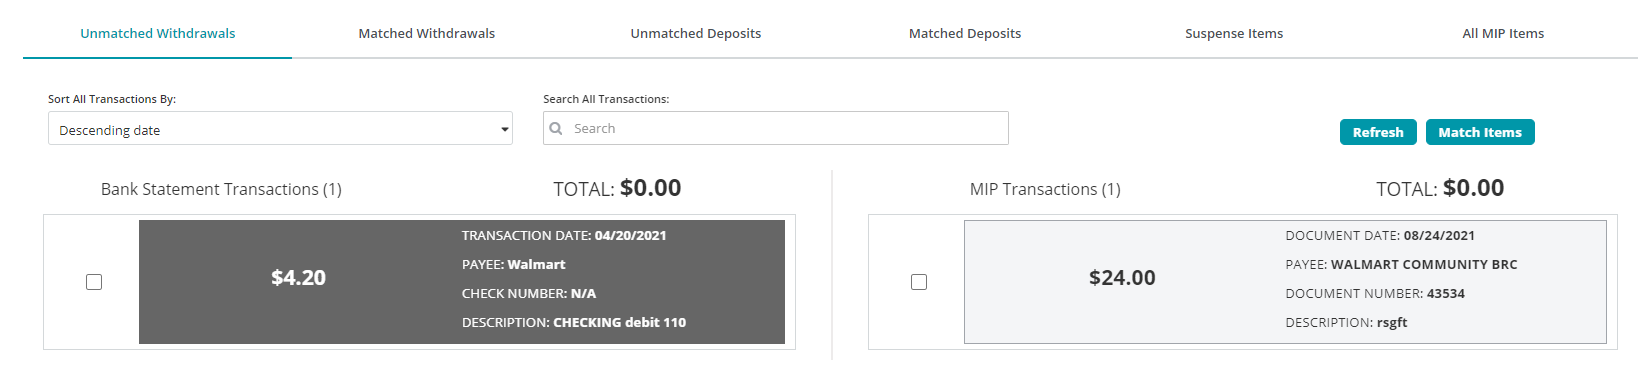
The withdrawals on this tab include checks, vouchers, cash disbursements, etc. They also will include voids and reversals.
Sort All Transactions: Use the Sort All Transactions By field to set how the matched withdrawals will appear. You can sort by Descending Date, Ascending Date, Descending Amount, or Ascending Amount.
Search All Transaction: Use the Search field to search for a specific transaction.
Bank Statement Transactions: Transactions pulled into MIP direct from your organization's connected bank account.
| Transaction Date | The date the bank recorded the transaction. |
| Payee | The recipient of the payment noted on the bank transaction. |
| Check Number | The check number as noted on the bank transaction. |
| Description | A description of the payment from the bank transaction. |
MIP Transactions: Transactions accounted for elsewhere in MIP.
| Document Date | The date the transaction was recorded in MIP. |
| Payee | The recipient of the payment noted in MIP. |
| Document Number | The document number of the payment from MIP. |
| Description | A description of the payment from MIP. |
Match Items: Click the Match Items button to clear selected transactions from the page and add them to the Matched Withdrawals page to accept.
Note: Bank Statement Transactions are added to MIP direct from your organization's connected bank and account for weekends and bank holidays so the transaction date may differ from the document date.
Matched Withdrawals Tab
The Matched Withdrawals tab displays withdrawals during the date range set for your bank reconciliation that were able to be automatically matched or were manually matched on the Unmatched Withdrawals tab. From this tab, you can either Accept or Reject the matches to clear them from the bank reconciliation.
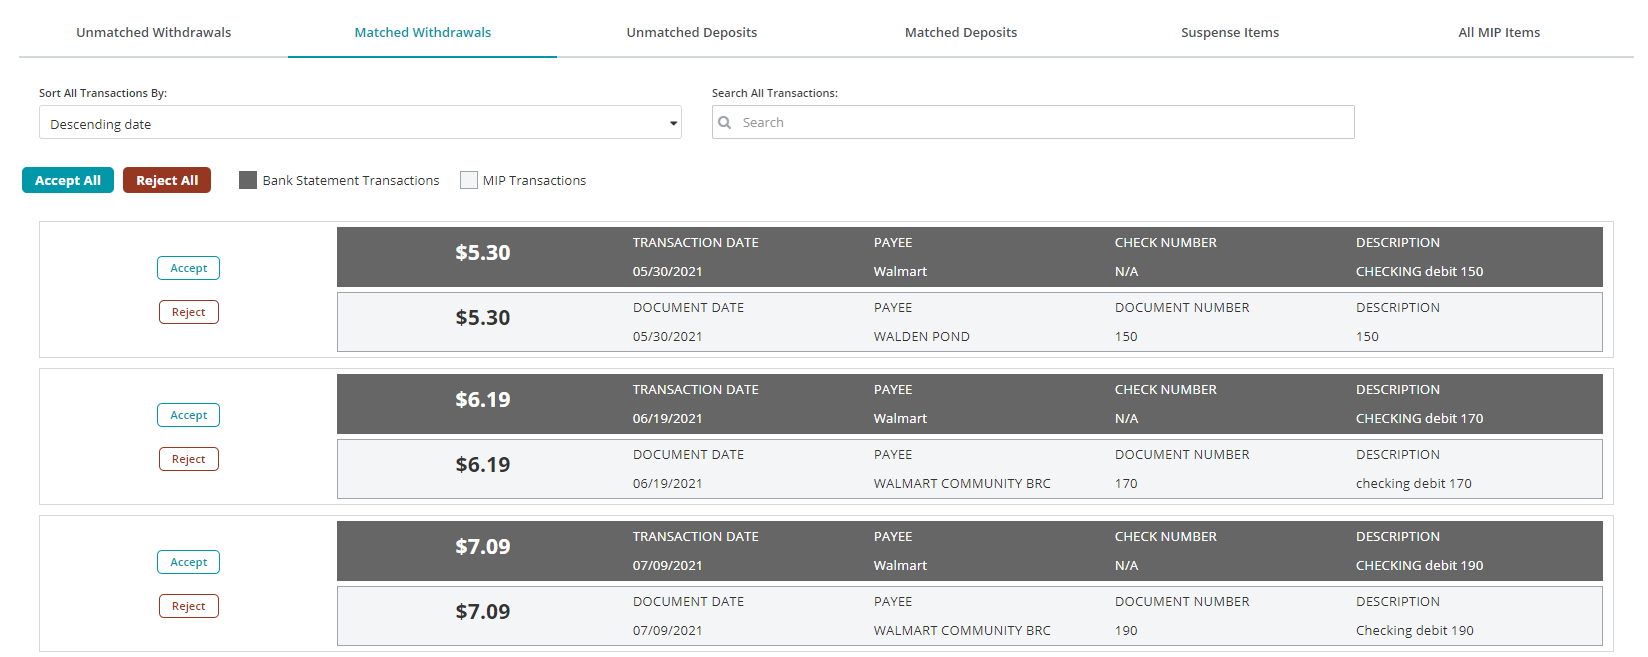
Sort All Transactions: Use the Sort All Transactions By field to set how the matched withdrawals will appear. You can sort by Descending Date, Ascending Date, Descending Amount, or Ascending Amount.
Search All Transaction: Use the Search field to search for a specific transaction.
Bank Statement Transactions: Transactions pulled into MIP direct from your organization's connected bank account.
| Transaction Date | The date the bank recorded the transaction. |
| Payee | The recipient of the payment noted on the bank transaction. |
| Check Number | The check number as noted on the bank transaction. |
| Description | A description of the payment from the bank transaction. |
MIP Transactions: Transactions accounted for elsewhere in MIP.
| Document Date | The date the transaction was recorded in MIP. |
| Payee | The recipient of the payment noted in MIP. |
| Document Number | The document number of the payment from MIP. |
| Description | A description of the payment from MIP. |
Accept: Click the Accept button next to a matched withdrawal to accept the match and clear it from the reconciliation. You can also click the Accept All button to accept all matched withdrawals and clear the entire page.
Reject: Click the Reject button next to a matched withdrawal to reject the match and move it back to the Unmatched Withdrawals tab for further review. You can also click the Reject All button to reject all withdrawals and review them again on the Unmatched Withdrawals tab.
Unmatched Deposits Tab
The Unmatched Deposits tab displays deposits made during the date range set for your bank reconciliation that were unable to be automatically matched. On this tab you can manually match the deposits in order to clear them from the tab. They will then appear on the Matched Deposits tab to be accepted.
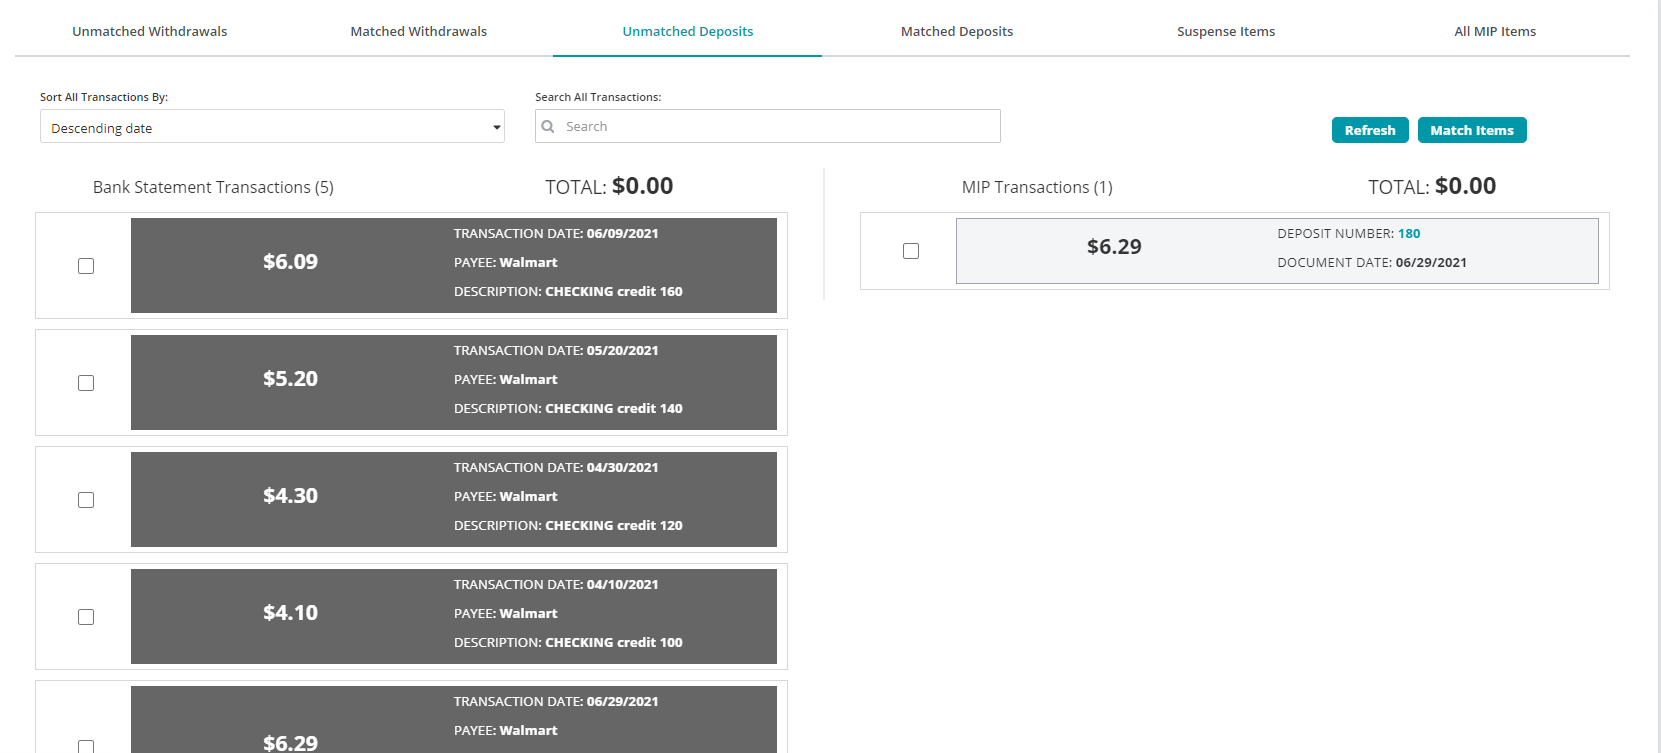
Sort All Transactions: Use the Sort All Transactions By field to set how the unmatched deposits will appear. You can sort by Descending Date, Ascending Date, Descending Amount, or Ascending Amount.
Search All Transaction: Use the Search field to search for a specific transaction.
Bank Statement Transactions: Transactions pulled into MIP direct from your organization's connected bank account.
| Transaction Date | The date the bank recorded the transaction. |
| Payee | The recipient of the payment noted on the bank transaction. |
| Description | A description of the payment from the bank transaction. |
MIP Transactions: Transactions accounted for elsewhere in MIP.
| Deposit Number | The deposit number for the deposit. Click the Deposit Number to view the Deposit Detail. |
| Document Date | The date the deposit was recorded in MIP. |
Match Items: Click the Match Items button to clear selected transactions from the page and add them to the Matched Deposits page to accept.
Note: Bank Statement Transactions are added to MIP direct from your organization's connected bank and account for weekends and bank holidays so the transaction date may differ from the document date.
Deposit Detail
Use this form to view the associated detail records for the deposit number selected on the Unmatched Deposits tab.
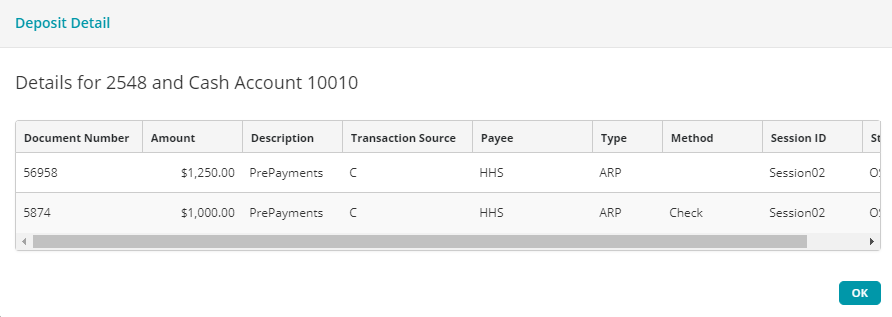
| Document Number | The document number entered during transaction entry. |
| Amount | The amount of the deposit entered during transaction entry. |
| Description | A description of the deposit. |
| Transaction Source |
The source of the deposit, such as Customer (C). Note that no source is identified for General Ledger type deposits. |
| Payee | The name of the recipient of the payment. |
| Type | The deposit type (Cash Disbursement (CD), Cash Receipts (CR), Accounts Receivable Receipts (ARC)). |
| Method | The payment method. |
| Session ID | The session ID assigned to this batch of deposits. |
| Status | The status of the deposit (Outstanding (OS) or Cleared (CL)). |
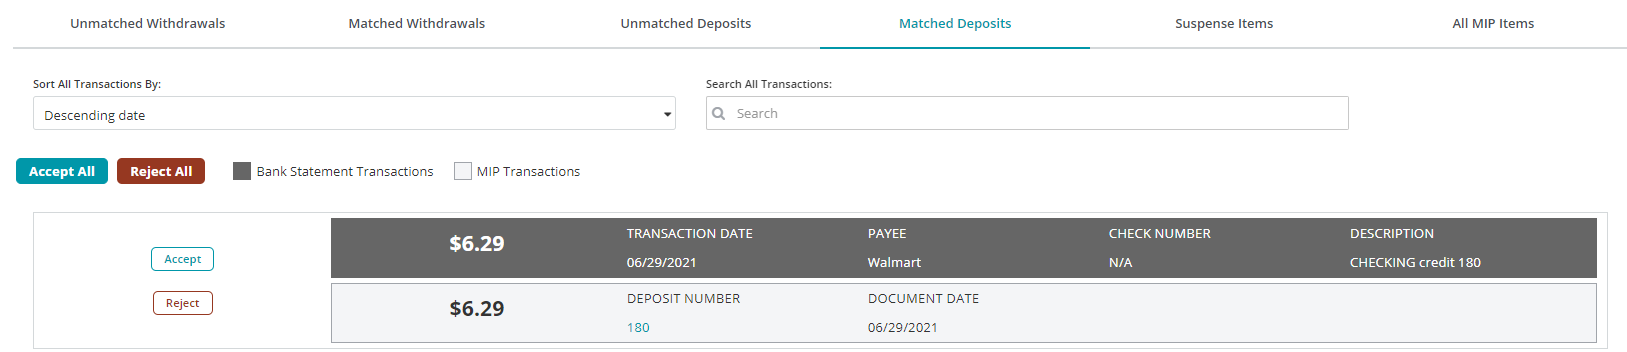
Matched Deposits Tab
The Matched Deposits tab displays deposits during the date range set for your bank reconciliation that were able to be automatically matched or were manually matched on the Unmatched Deposits tab. From this tab, you can either Accept or Reject the matches to clear them from the bank reconciliation.
Sort All Transactions: Use the Sort All Transactions By field to set how the matched deposits will appear. You can sort by Descending Date, Ascending Date, Descending Amount, or Ascending Amount.
Search All Transaction: Use the Search field to search for a specific transaction.
Bank Statement Transactions: Transactions pulled into MIP direct from your organization's connected bank account.
| Transaction Date | The date the bank recorded the transaction. |
| Payee | The recipient of the payment noted on the bank transaction. |
| Check Number | The check number as noted on the bank transaction. |
| Description | A description of the payment from the bank transaction. |
MIP Transactions: Transactions accounted for elsewhere in MIP.
| Deposit Number | The deposit number for the deposit. Click the Deposit Number to view the Deposit Detail. |
| Document Date | The date the deposit was recorded in MIP. |
Accept: Click the Accept button next to a matched deposit to accept the match and clear it from the reconciliation. You can also click the Accept All button to accept all matched deposits and clear the entire page.
Reject: Click the Reject button next to a matched deposit to reject the match and move it back to the Unmatched Deposits tab for further review. You can also click the Reject All button to reject all deposits and review them again on the Unmatched Deposits tab.
Deposit Detail
Use this form to view the associated detail records for the deposit number selected on the Matched Deposits tab.
s
| Document Number | The document number entered during transaction entry. |
| Amount | The amount of the deposit entered during transaction entry. |
| Description | A description of the deposit. |
| Transaction Source |
The source of the deposit, such as Customer (C). Note that no source is identified for General Ledger type deposits. |
| Payee | The name of the recipient of the payment. |
| Type | The deposit type (Cash Disbursement (CD), Cash Receipts (CR), Accounts Receivable Receipts (ARC)). |
| Method | The payment method. |
| Session ID | The session ID assigned to this batch of deposits. |
| Status | The status of the deposit (Outstanding (OS) or Cleared (CL)). |
Suspense Items Tab
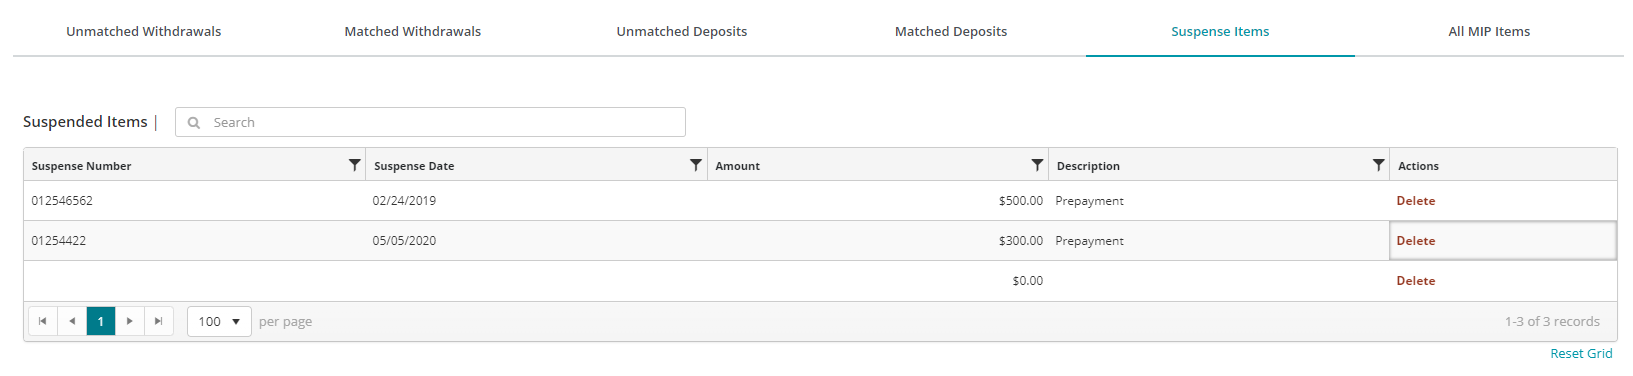
Use this tab to manually enter and delete suspense items. Suspense items are reconciling items that typically are not entered as a transaction—a bank error, for example. Since the bank error is a reconciling item, only enter it on this tab until it is corrected. Do not enter it as a transaction.
Later, in the subsequent reconciliation period, when the error is corrected and no longer a reconciling difference, manually delete it from this tab.
Suspense Items Table
| Search | To locate a specific existing document, use the Search box. Begin typing and the Suspense Items Table will begin narrowing the results. |
| Suspense Number | Enter a unique number for the suspense item for tracking purposes. |
| Suspense Date | Enter a unique number for the suspense item for tracking purposes. |
| Amount |
Enter the amount of the suspense item (positive or negative). |
| Description | Enter a description of the suspense item. |
| Actions | Click the Delete button to remove the suspend item when the error is corrected and is no longer a reconciling difference. |
Note: A Suspense Item cannot be entered or deleted if contained in a Locked Reconciliation ID.
List Records: Select how many items per page to display using the drop-down list. You can view items in the table in increments of 10, 20, 50, or 100.
Reset Grid: The Reset Grid button will reset the specific table to its default order. See the Tips and Shortcuts page for more information on reorganizing grids.
All Items Tab
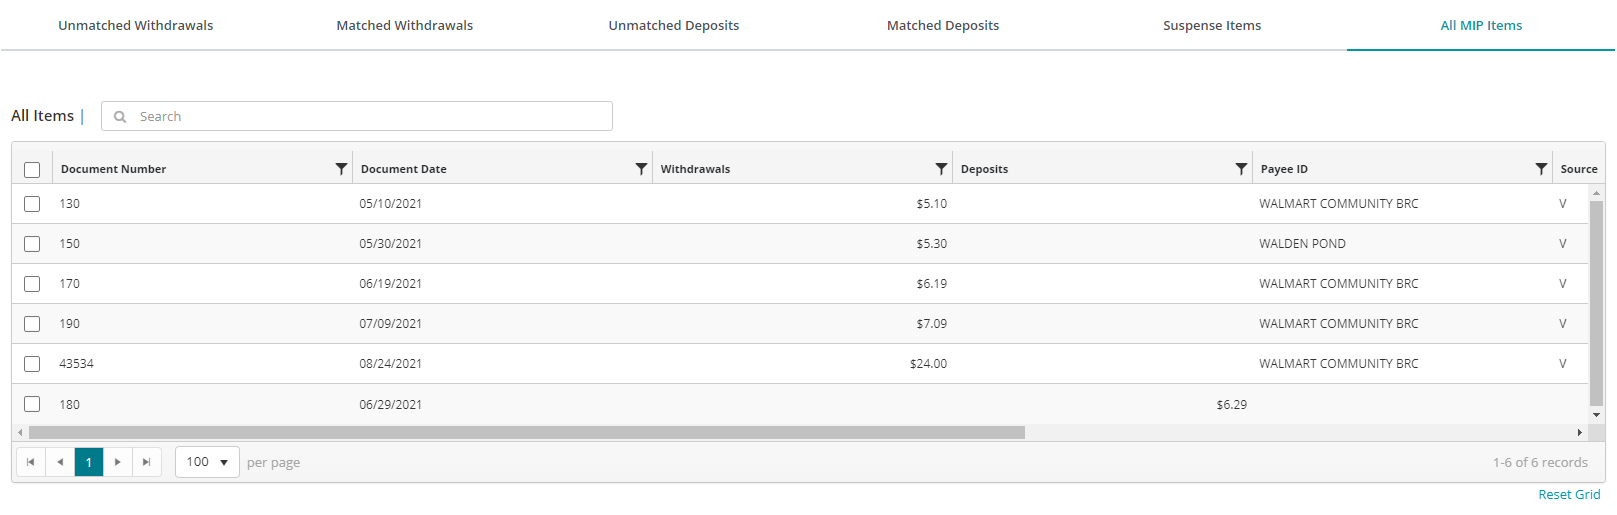
Use this tab to identify which withdrawals and deposits have cleared the bank and are therefore no longer reconciling items.
All Items Table
| Search | To locate a specific existing item, use the Search box. Begin typing and the All Items Table will begin narrowing the results. |
| Document Number | The document number. |
| Document Date |
The date of the document. |
| Withdrawals | The amount of withdrawals associated to the document. |
| Deposits | The amount of deposits associated to the document. |
| Payee ID | The unique ID that is assigned to this Payee. |
| Source | The source of the disbursement, such as Employee (E) or Vendor (V). Employee originates from Payroll and Vendor from Accounts Payable. Note that no source is identified for General Ledger type checks. |
| Type | The type of document, such as a Cash Disbursement (CD) or Voided Check (V). CD represents all posted checks/vouchers and could have been created using the Enter Cash Disbursements, Enter Manual AP Checks, Write Checks, or Pay Selected AP Invoices forms. CD could also represent a check created in the Payroll module. Keep in mind that once a cash disbursement is voided, its type changes from CD to V. |
| Payment Type | The payment type—either Check or Voucher. |
| Description | The description of the check/voucher. |
List Records: Select how many items per page to display using the drop-down list. You can view items in the table in increments of 10, 20, 50, or 100.
Reset Grid: The Reset Grid button will reset the specific table to its default order. See the Tips and Shortcuts page for more information on reorganizing grids.