Add Budget Worksheets
Create a budget worksheet to generate or enter budget amounts for specific budget versions and periods. You can build as many worksheets as needed, all of which can exist simultaneously or at different points in the fiscal year.
Note: The parameters entered in the Budget Worksheet cannot exceed the limit of 60,000 cells. If you receive an error message, decrease the size of the worksheet by adding filters or adjusting the budget cycles.
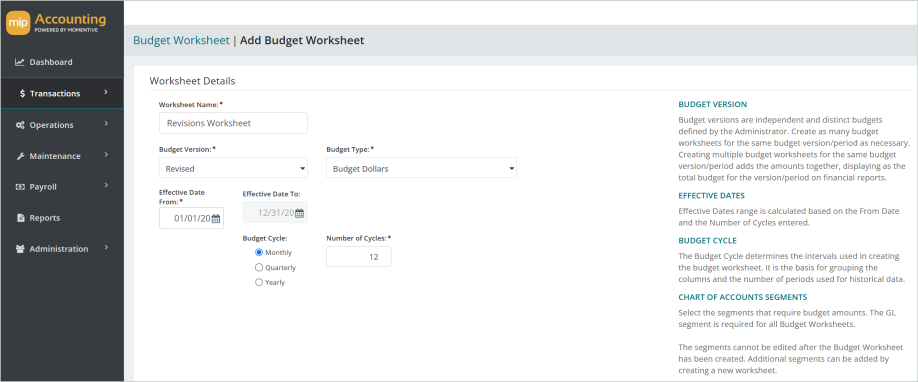
Worksheet Details
Enter the details for your new worksheet.
Worksheet Name: Enter a name for the worksheet. We recommend limiting your worksheet name to strictly alphabetic (A through Z) or numeric characters (0 through 9), and avoiding the use of symbols.
Budget Version: Select a budget version.
Budget Type: Select a budget type. Selections include the currency based Budget Dollars or Budget UDFs.
Effective Date From, To: Select an effective date range for the worksheet.
Budget Cycle: Select a Monthly, Quarterly, or Yearly budget cycle for the worksheet.
Number of Cycles: Enter the number of cycles for the worksheet. 12 is pre-populated by default.
Chart of Accounts Segments: Select the chart of accounts segments for the worksheet. The general ledger segment is required; therefore, it's selected by default. Add additional segments as required.
Budget Entries
Select the budget entries you'd like to include in your worksheet.
Account Type: Select either Expense Accounts, Revenue Accounts, both, or all available accounts.
Activity Basis: Select either Accounts with Activity, All Valid Accounts, or start with a Blank Worksheet.
Filter By Segment Code
Optionally, you can use filters to narrow down the data you want to include in your worksheet. You can double click or drag-and-drop individual segments to move them to the Selected Filters area.
Operators
When filtering data, select an operator and enter criteria to determine which data to display.
| Operator | Definition |
|---|---|
| Equal to (=) | Include the data equal to the value in Criteria 1. For example, if "Status" is the Selected Filter and "A (Active)" is the Criteria 1, then include all data with a Status of Active in the report. |
| Not Equal to (< >) | Include the data not equal to the value in Criteria 1. |
| Greater Than (>) | Include the data that is greater than the value in Criteria 1. |
| Less Than (<) | Include the data that is less than the value in Criteria 1. |
| Between | Include the data that is between Criteria 1 and Criteria 2. To display a range of dates, numbers, or currency fields, use the Between and Not Between operators. |
| Not Between | Include the data that is not between Criteria 1 and Criteria 2. |
| Like | Include the data that matches the value in Criteria 1. For instance, there are ten Vendors with the word Office as part of their Vendor ID (Office Max, Office Depot, Office Machines, etc.). You want to send them your change of address card, so you run a report that includes their addresses. Select Vendor ID as the Selected Filter, Like as the Operator, and enter "%office%" in Criteria 1. You cannot use this operator for dates, numbers, or currency fields. |
| Not Like | Include the data that does not match the value in Criteria 1. For instance, you want to run a report that excludes all Vendors with the word Office at the beginning of their Vendor ID. You would need to select Vendor ID as the Selected Filter, Not Like as the Operator, and enter "Office%" in Criteria 1. You cannot use this operator for dates, numbers, or currency fields. |
| In | Include the data that is equal to the values in Criteria 1. This allows you to include a non-sequential series of values in filter criteria. For example, type 123, 498, 301 in Criteria 1. (Do not use the drop-down list and make sure you type commas between the series.) The system then includes only those three values in your data. |
Criteria 1
Enter or select a value to compare with the item in the Selected Filter column. When using Like or Not Like, use "%" to represent any number of characters. For example, you want results showing the Accounts Receivable offset account assignments. Since you only want information on AR accounts and they all begin with "AR," you would complete the criteria as follows:
- Selected Filter: Transaction Source
- Operator: Like
- Criteria 1: AR%
This filter limits the results to only transaction source codes that begin with AR, while the rest of the code could have any characters.
Please note the results if you choose the Like operator and the following criteria:
| Criteria | Result |
| %AR% | Returns data with "AR" in any position |
| AR% | Returns data that begins with "AR" |
| %AR | Returns data that ends with "AR" |
Criteria 2
Enter or select a value for the end of a range if the Operator contains Between or Not Between.
Calculations
Select the worksheet calculation criteria.
Calculation Basis: Select the calculation basis to use for the budget entries, either Actual (actual account balances) or Budget (budgeted account balances).
Calculation Method: Select Average of History, Period Matching, or Zero Budget as the worksheet calculation method.
- Average of History - Calculates the average amount for all the periods included in the history and inserts the average into each budget period. The amounts in each budget period are equal, making this the best method if the budget activity is constant.
- Period Matching - Matches amounts from the corresponding history period. Each period will match history, making this method ideal if you have cyclical revenues and expenditures.
- Zero Budget - Creates a zero dollar budget line for each account combination that contains history (actual or budget depending on the basis selected). This method is usually used to generate the account combinations only.
Historical Data
Set the worksheet historical data in this section of the Budget Worksheet form.
Budget Cycle: Enter the number of budget cycles for the worksheet. 12 is pre-populated in the field by default.
Begin Date: Select a begin date for the worksheet.
Actual Activity | Beginning Date: Select an Actual Activity beginning date for the worksheet.
Actual Activity | Ending Date: Select an Actual Activity ending date for the worksheet.
Comparative Columns
Create up to two comparative columns in your worksheet using actual data or a Budget Version.
Column Type: Select a column type. The Begin Year and Column Heading fields are filled with suggested values. Options include actual activity or budget version.
Begin Year: Select to adjust the suggested Begin Year value. Must be a numerical value.
Column Heading: The text you enter here will become the heading on your worksheet.
Select Create to create the worksheet.
Note: The parameters entered in the Budget Worksheet cannot exceed the limit of 60,000 cells. If you receive an error message, decrease the size of the worksheet by adding filters or adjusting the budget cycles.