Customer Record
View & update details for a customer, including contact information, payment terms, and accounting codes.
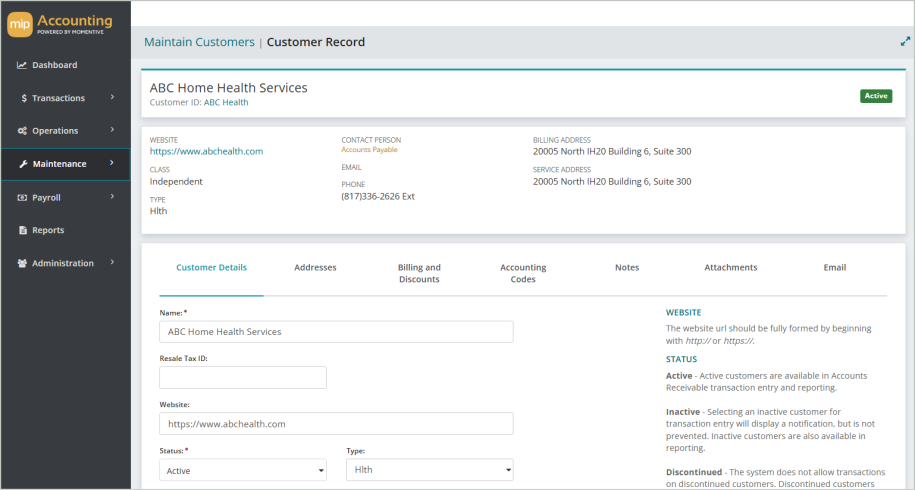
Select a link below to learn more about the details in each tab.
| Customer Name | The full name of the customer |
| Customer ID | The unique ID string for the customer. Click the Vendor ID to display the |
| Status | The current status of the customer, as a descriptive term rather than a code. Valid values for this field are Active, Inactive, and Discontinued |
| Website | The customer website |
| Class | The class of the customer |
| Type | The type of the customer |
| Contact Person | The name and title of the contact person associated with the customer address |
| The email address of the contact person associated with the customer address | |
| Phone | The phone number of the customer address |
| Billing Address | The billing address of the contact person |
| Shipping Address | The service address of the contact person |
Billing Address
| Address | The street or post office address where the customer is billed |
| City | The city of the customer address |
| State/Province | The state or province of the customer address |
| Postal Code | The ZIP or postal code of the customer address |
| Country | The country of the customer address |
| Phone | The phone number of the customer address |
|
Fax |
The fax number of the customer address |
| Contact Person | The name and contact information of the contact person associated with the customer address |
Service Address
If this is the same as the billing address, select "Billing" from the drop-down menu. If not, proceed to fill out the fields for the customer's service address.
Shipping Addresses
Select Add Address to open the Shipping Address form and complete the fields below
| Address Code | Select a code or enter a new one to identify the shipping address used on an invoice |
| Street Address | Enter the street address of the customer shipping address |
| City | Enter the city of the customer shipping address |
| State/Province | Enter the state or province of the customer shipping address |
| Postal Code | Enter the zip or postal code of the customer shipping address |
| Country | Enter the country of the customer shipping address |
| Phone | Enter the phone number of the customer shipping address |
| Fax | Enter the fax number of the customer shipping address |
| Sales Tax Code | Select the sales tax code from the drop-down list or enter the sales tax code in the text box |
| Title | Select the title of the contact person associated with the customer shipping address from the drop-down list |
| First Name | Enter the first name of the contact person associated with the customer shipping address |
| Last Name | Enter the last name of the contact person associated with the customer shipping address |
| Middle Initial | Enter the middle name of the contact person associated with the customer shipping address |
| Position | Enter the position of the contact person associated with the customer shipping address |
| Email Address | Enter the email address of the contact person associated with the customer shipping address |
| Cancel | Click to clear the Shipping Address form |
| Delete | Click to delete the Shipping Address form |
| Save | Click to save the Shipping Address form |
Use this tab to specify details about any credit holds and billing terms for this customer. This tab is named differently if you do not have the AR Billing module installed.
Billing Information
Credit Hold: Check this box to indicate a hold status for the customer. A warning message will display whenever an invoice or credit is entered for the customer, but you can still proceed with entries.
Taxable: Check this box if the customer is subject to sales tax. If this is selected, you must enter a Shipping Address on the tab and select a Sales Tax Code for this customer.
Apply Finance Charges: Check this box if the customer is subject to finance charges.
Default Shipping Address: If the "Taxable" check box is selected, select a default shipping address for the customer.
Billing Comments: You can also add any comments about the customer in the "Billing Comments" field.
Terms
First Discount, Days Available, Second Discount, Days Available: This is the percentage allowed as a discount by this customer and the number of days beyond the invoice date that the discount is allowed. Enter the customer's discount percentage followed by the number of days that the discount is available. Two discount intervals can be set up, such as a 2 percent discount if paid within 10 days, and a 1 percent discount if paid within 20 days.
Days Until Net Amount Due: After specifying the discount percents and the days available, enter the number of days until invoices are due to this customer. For example, if the customer's payment terms are Net 30, enter 30 in this box. When entering an invoice, the system uses this number and the invoice date to calculate the due date for the invoice. This calculated date appears as the default due date for the invoice. If you do not enter a response, the system assumes the number of days is 30. And if you leave this field blank, the system assumes that invoices are due immediately.
The Accounting Codes tab of the Customer Record consists of the default accounting codes for transactions. Enter the revenue account code, distribution code, and discount general ledger code related to this customer. The system applies this information for entries where this customer is used.
Revenue Account Code: Enter an existing revenue account code, or select one from the drop-down list.
Distribution Code: Enter an existing distribution code, or select one from the drop-down list. The distribution code entered here is the default distribution used during transaction entry for this customer; however, the distribution code can be changed for individual transactions.
Discount General Ledger Code: Enter an existing discount general ledger code, or select one from the drop-down list.
Prepayment Account: Enter an existing prepayment account, or select one from the drop-down list.
Enter any notes about the customer here.
Add any attachments to associate with the customer. This could include things like contracts or photos.
The Email tab of the Customer Record consists of two sections: Accounts Receivable Invoices and Customer Statements.
Accounts Receivable Invoices
Print Paper Invoice(s): Check this box to print paper invoices.
Email Invoice(s): Check this box to email invoices. If this box is checked, you must enter an email address where the invoice will be sent.
Email Addresses: Enter the email addresses where the invoice will be sent.
Invoice Process Template: Select an invoice process template from the drop-down list.
Customer Statements
Print Paper Statement(s): Check this box to print paper statements.
Email Statement(s): Check this box to email statements. If this box is checked, you must enter an email address where the statement will be sent.
Email Addresses: Enter the email addresses where the statement will be sent.
Statement Process Template: Select a statement process template from the drop-down list.