Generic Import Utility
This utility is designed to allow you to input data from external files into the Millennium database, bypassing the normal data entry procedures. Normally, data must be entered into each constituent's rows individually. Even with the use of prototype entry procedures, that could be time consuming if you had a very large amount of information to enter. This utility allows you to take data from an outside source such as a purchased mailing list, a new graduate class listing or a directory subscription list, and merge that data into the database, without entering it manually. Of course, the source data must be available as an electronic data file.
This utility will compare the data from the import source file to the data in existing Millennium rows and then, based on several parameters which you will identify, either create a new row or update existing ones or note that there are differences for you to examine and manually edit, if appropriate. All of these actions are documented in a log file which you may print to use for verification or manual editing.
A cautionary note: This utility can only be used with confidence if you also have confidence in the data you are receiving from the outside source. You have a very powerful data collection and maintenance tool in Millennium and you must be convinced that the information you are receiving is at least as good as your own so that you will not corrupt your database. It is imperative that you have a knowledge of the dates of validation of the imported data, and also a high level of confidence in the data-gathering procedures of the outside source.
The standard techniques for using this utility consists of opening the utility interface and then launching the import process from within that interface. There is an alternate mode for running the utility which is described as Unattended Mode. This allows you to use techniques such as the Command Prompt, the Run command, or third party scheduling software to execute the import.
Following the discussion of the behavior of this utility, you will find a chart showing the complete file specifications needed for the successful use of this utility with an imported data file.
The action of this utility alters the data in the database and therefore it is classified as a system administrator utility.
Preliminary Procedures
Before running the Generic Import Utility, there are several pre-conditions and several operations involved in setting up the utility for use at your institution. The following describes and discusses these procedures. Following the descriptions, you will be given a set of instructions for using the utility.
Before running this utility, you must back up all Millennium data tables. This will ensure that if a problem should occur during the import process, all data tables can be restored to their original state.
The final preliminary step is to verify that no users are logged into Millennium before you attempt to run the utility.
Workstation and Login
Some of the standard Millennium utilities make use of certain Microsoft applications and associated files. While we ensure that the required applications are present and registered on the IIS machine as part of the installation process, Millennium's thin-client architecture does not install them on every workstation at your institution. Therefore, to ensure success, certain utilities must be launched from the IIS machine, using the system administrator's login and password. The Import Utility is one such utility.
The Import Utility is run outside of the interface you use to access Millennium, in the utility's own application window. It must be activated by locating the program file (.exe) in the Tools directory, using the Windows Explorer or other appropriate tool, and then double clicking the program name.
You will first be prompted to login to the Millennium Database with ODBC, specifying Web SQL (or another data source that you may have set up). This utility does not use the SQL Views for the Millennium data tables. Therefore, you must be the database administrator (sa or MILLORA user ID) or a Millennium system administrator in order to execute this utility.
Import Utility Application Window
Following a successful login to ODBC, an application window for the Import utility will open showing many variables and options. Each area of this screen will be described individually in the description that follows.
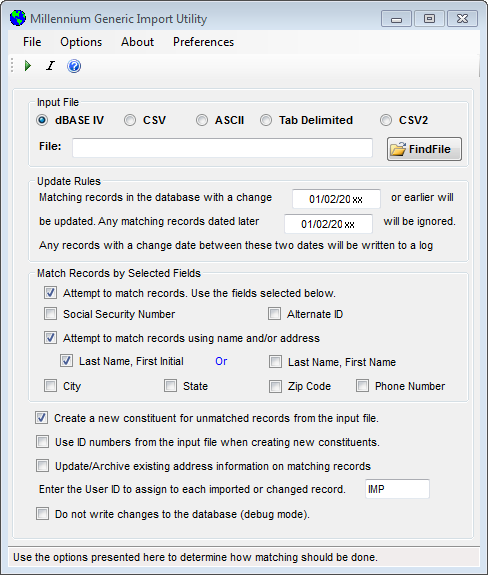
When the utility interface is launched, a dialog window will be shown. At the top of that window is a menu bar followed by a row of action buttons.
Menu Bar
File - The File pull-down menu includes the items Start, which launches the import of the data, Stop, which halts the import process, and Exit, which closes the utility interface.
Options - The Options pull-down menu includes the items Toolbar and Status Bar, which toggle to show or suppress the display of those elements of the utility interface, and Description, which opens a window with a summary textual description of the action that the utility will take, based on the current options that have been selected.
About - The About item opens a pop-up window with information about the utility, including a brief description of its purpose, copyright, module id (the path to the location where the executable is stored), the size of the program file, and the date of the program file's last update.
Preferences - The Preferences pull-down menu includes the items, Save Settings and Unattended Mode Settings. If you click on Save Settings, you will be asked to confirm that you want to save the utility settings as they appear at that moment, to use as the default settings the next time you open the utility interface. The Unattended Mode Settings item opens a dialog window which allows you to specify an ODBC DSN name (your Web SQL connection), a User Name, a Password, and a Log File Name (including the appropriate file extension for the log file). With these settings in place, it is possible to launch the import to run unattended, using techniques such as your own scheduling software which has been designed for that purpose, or from a command prompt. In unattended mode, the information that has been stored for these settings will be used automatically.
Action Buttons
Below the menu bar is a set of action buttons that mimic some of the functions of the menu bar. The first button toggles between allowing you to start or stop the import of data. The second button opens the summary textual description of the action that the utility will take, based on the current options that have been selected. The third button accesses the About information.
Input File Type
Below the Action buttons, the first item in the display area of the window is used to identify the import file you want to use. This utility will import from five different types of files. Each of the types has a radio button and you may click on the appropriate button for the file you will use. The setting you choose here determines two things. First, it affects which files will be listed in the Select File For Import screen which is presented when you click on the Find File button. Secondly, and more importantly, it lets the program know what set of rules to use to interpret the data it reads from that file.
This area of the main utility screen also contains the Find File button which allows you to search for and identify the file and path name you want. When that file is identified through use of the Select File for Import screen, its name and path will automatically be placed in the File text box to the left of the Find File button.
The screen below shows the result of setting the file type to dBASEIV and then clicking the Find File button.
You must be sure that the file you identify in the Select File For Import screen is of the same type as the setting you chose in the main, Generic Import Utility screen.
Characteristics of each of the file type options are described below. Note that blank fields in any of the input file types are used as placeholders. The utility does not overwrite existing data in a row to blank it out, if the corresponding field in the import file is blank.
dBASE IV - An empty dBASE IV database file, named IMPORT.DBF, is supplied with the software and will be found in the same directory as the import utility. This file may be used as a prototype which you might use to create a dbf or worktable to use with this utility. These files follow the standard dBASE IV format. They should consist of 124 columns, even if all 124 do not contain data.
CSV - (Comma Separated Values) These files have the following format: each field within a record is separated by a comma and each field is contained within double quotes. There must be 124 fields per record, even if all 124 do not contain data. If a field is blank, a pair of double quotes should still be used as a placeholder. The file should not include a header record (such as a record with the field labels). Each record is separated by a CR-LF (carriage return-line feed).
For example, a CSV record might appear as:
"1000", "N", "N", "", "19631226", "A", "I", "news", "m", "M", "", "1982" (and so on)
ASCII - These files have fixed length records. Each field in a record should be padded with spaces to the maximum length of the field. There must be 124 fields, even if all 124 do not contain data. Each record is separated by a CR-LF (carriage return-line feed). The file should not include a header record (such as a record with the field labels).
The same record in the previous example would appear in ASCII fixed record format as:
1000 NN 19631226A I newsmM 1982 (and so on)
Tab Delimited - These files have the following format: Each field within a record is separated by a TAB. There must be 124 fields per record, even if all 124 do not contain data. If a field is blank, a TAB should still be used as a placeholder. The file should not include a header record (such as a record with the field labels). Each record is separated by a CR-LF (carriage return-line feed).
For example, a tab delimited record might appear as:
1000
CSV2 - These files have the following format: Each field within a record is separated by a comma. This is the format typically produced by Excel when saving the file as a .CSV. The file must contain a header record as the first row will automatically be skipped. There must be 124 fields per record, even if all fields do not contain data. If a field is blank, the comma for that field must still be present as a placeholder.
For Example, a CSV2 record might appear as:
1000,N,N,,19631226,A,I,news,m,M,,1982 (and so on)
Update Rules
The second area of the main Generic Import Utility screen allows you to set date parameters to use in determining which Millennium rows will or will not be edited by the action of this utility. There are two date fields which are used to establish the rules for the system to use in editing rows. Although the procedures are not difficult, the decision making process involved in determining the dates to use requires more thought in order to be sure that this utility will not be "updating" a more recent row in your own data!
This utility will read the imported data and try to find a matching constituent within the Millennium database. That procedure is described in the next section, Match Records Options. When a matching constituent is found, the system will compare the data in the imported file to the existing rows for that constituent. If the system finds data in the import file that is different from that which is in the Millennium row, it must try to decide which of the two is the more current and correct. This is done by comparing the change date field in the Millennium row to the date parameters you identify for the imported data.
At first glance, it would seem that you simply compare the date on the import file to the change date on the row and then accept the information with the most current date. In reality however, there is a time period which is a "gray area" when it could be difficult to determine which data is newer. The two date fields allow you to define that gray area and have information that falls into that time period to be handled a little differently.
Therefore, these two date fields divide the Millennium rows in three groups based on their change dates.
Any Millennium row with a change date which falls before the earlier of your two dates is assumed to be older information and the Millennium row will be edited. Any row with a change date that falls after the later of your two dates will be assumed to be newer than the imported data and that row will not be edited. It will be ignored. Any row with a change date that falls between your two dates will be written to a change log file for you to examine and change manually, as you decide is appropriate.
The application of these date fields can be explained by use of an example.
You have received a file of information from Acme Publishing Company which prints a membership directory for your institution. As part of their work, they call and verify address rows for all of the constituents included in their directory. You know that the date that they produced the tape or disk with the address information is March 1.
You also know (because you have done your homework!) that their procedures are such that the phone calls they made to verify this address information began on February 1. Therefore, even though the date on the tape or disk may be March 1, you can't really be sure that the information is any more current than February 1.
That tape or disk is delivered to you on March 8 but you are on vacation, touring Colonial Williamsburg and don't get back in the office until March 30. When you return, it is April 15 before you find the tape or disk in your IN box and of course you are too depressed from doing your taxes to run this utility or do anything else. So, it is April 30 when you are finally ready to import the data from the tape or disk to your database!
Meanwhile, data entry has been going steadily onward and now you can be sure that some of the information on the import tape is older than some of the information you have on the system. In this situation it is very difficult to say absolutely, which set of data, the Millennium rows or the Acme records, is more recent.
In a perfect world, the data on Acme's tape would be 100% valid on March 1, it would be delivered to you on March 1, you would have all Millennium data entry caught up and current on March 1, and you would run the Generic Import Utility on March 1, using that date in both date fields! This utility assumes that you don't live in that perfect world and that the example described earlier is closer to reality.
Rather than define an arbitrary rule as to which data to accept, (knowing nothing about Acme or any other source you may be using or your schedule), these date parameters allow you to define the gray area to the best of your estimating ability. Any Millennium rows that have change dates that fall into the gray area that you define will be written into the log without being edited. The log file is described in the section, The Import Log File.
To enter a date in the date fields, click on either of the fields and you will be given a Calendar screen like the one shown below.
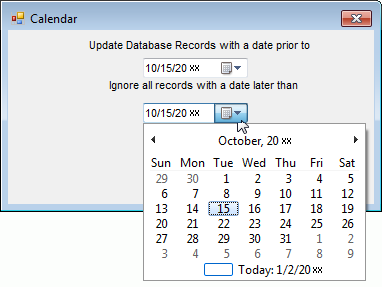
You may use the calendar to identify the date you want to have inserted into the field where the cursor is positioned. By highlighting the day and using the arrows to adjust the month and year, the date will be inserted into the date field at the top of the Calendar screen. You may also type in the date if you prefer. Use the Tab key to move to the second column.
Match Records Options
You may use the Generic Import Utility to create new constituent rows without attempting to match the imported information to existing constituents in Millennium. This is done by leaving the Attempt to match records box in the Match Records area unchecked. When you do so, the fields boxes below it will be grayed out and disabled. When the utility is run, it will ignore all settings in that area (even the ones that contain an X in the check box).
You may also instruct the utility to attempt to match records by clicking to place an X in that check box. This is a necessary step if you want to edit or update existing Millennium rows with the imported data. In order to do this, the utility must determine that a particular imported record belongs to a particular Millennium constituent. This is what is meant by the terminology, "matching records" in the main Generic Import Utility screen. All of the fields in the import record do not have to match all of the data in an Millennium row to be considered a "matching record". If all of the data were identical, there would be no need to update!
In order to determine that an imported record belongs to an existing, Millennium constituent, a hierarchy of tests has been established. Note that when the utility applies these tests, as soon as a match is established, NO FURTHER TESTS ARE PERFORMED. Thus, if name and address matching criteria are activated (as in Steps 7-9) but the utility determines a match based on ID Number (as in Step 1), neither the name nor address criteria will be examined.
|
1. Attempt to match records? |
No
|
Create new constituent and new data rows. No attempts to match. |
|
Yes |
|
|
|
|
|
|
|
2. Is there a matching ID Number? |
Yes
|
Match is established on ID and no further criteria are examined. Data rows are updated or created for existing constituent. |
|
No |
|
|
|
|
|
|
|
3. Is Alt ID option checked |
No
|
Go to Step 5. |
|
Yes |
|
|
|
|
|
|
|
4. Is there a matching Alt ID Number? |
Yes
|
Match is established on Alt ID and no further criteria are examined. Data rows are updated or created for existing constituent. |
|
No |
|
|
|
|
|
|
|
5. Is the SS# options checked? |
No
|
Go to Step 7. |
|
Yes |
|
|
|
|
|
|
|
6. Is there a matching SS#? |
Yes
|
Match is established on SS# and no further criteria are examined. Data rows are updated or created for existing constituent. See the note on SS Number Indexing. |
|
No |
|
|
|
|
|
|
|
7a. Is the 'Attempt to match records using name and/or address fields' option checked? |
No
|
Match cannot be established and no further criteria are examined. New constituent and new data rows will be created in accordance with the options that are activated in the next section of the utility form. |
|
Yes |
|
|
|
|
|
|
|
7b. Is there a matching Name row in the database for the selected Name Option (either Last Name, First Initial or Last Name, First Name)? |
No
|
Match cannot be established and no further criteria are examined. New constituent and new data rows will be created in accordance with the options that are activated in the next section of the utility form. |
|
Yes |
|
|
|
|
|
|
|
8. The utility keeps a list of all of the matching name rows from Step 7b. The process continues with the next name row from that list. Does the SS# information in the constituent's Basic Data conflict with the SS# in the input file? |
Yes
|
Return to Step 8 and repeat the process for the next available name in the list. If there are no remaining Name rows to be checked, then a match cannot be established and no further criteria are examined. New constituent and new data rows will be created in accordance with the options that are activated in the next section of the utility form. |
|
No |
|
|
|
|
|
|
|
9. Are any of the Address options checked? |
No
|
Match is established on Name and no further criteria are examined. Data rows are updated or created for existing constituent. |
|
Yes |
|
|
|
|
|
|
|
10. Utility attempts to find matching data for all activated Address options, that also belong to the constituent whose Name information was matched in Step 7b and whose Name is being examined from the list in Step 8. For more information on the matching process, see Address Record Comparison. Address match found? |
No
|
Return to Step 8 and repeat the process for the next available name in the list. If there are no remaining Name rows to be checked, then a match cannot be established and no further criteria are examined. New constituent and new data rows will be created in accordance with the options that are activated in the next section of the utility form. |
|
Yes |
|
|
|
|
|
|
|
11. Match is established on combination of Name and Address options. Data rows are updated or created for existing constituent. |
|
|


When a matching name has been found in Step 7b, the system will examine that constituent's address rows to look for one with a matching City, State, ZIP Code and/or Phone Number in accordance with any check boxes for Address elements that you have activated. Note that these four fields can be turned on or off in any combination with each other and they must be found in the same Address row to be considered a match. If no address match is found for the name match, the system determines that this is not the same constituent who already exists in the database and the record is handled according to the options you select in the next area of the utility screen and also written accordingly in the Import Log file.
You will notice that step 1 does not appear with a check box in this screen area because that step is not optional. If the Attempt to match records option is activated, the ID Number match option is automatic and takes precedence over any other match criteria.
Miscellaneous Options
The next area of the main utility screen contains several options or settings.
The first, Create a new constituent for unmatched records from the input file, tells the system whether or not you want to take any import records that could not be matched to an existing Millennium constituent and create Basic Data rows for them.
The second option is used in connection with the
first. If you check the first option On so
that new constituent rows are created, you may either let Millennium assign
the next available ID number by leaving the Use ID
numbers from the input file when creating new constituents unchecked
OR you may use the ID number found in the imported file as the ID number
by checking this box.
Remember that if the ID number in the imported file duplicated one in the Millennium tables, the constituent would be considered a match and you
would never get to this point in the process. Also be aware that if no
ID number is found in the Input file, the process will default to the
next available Millennium ID.
When activated, the Update/Archive existing address information on matching records option instructs the utility on the method of handling Address rows to be updated. Standard updating procedures of Addresses through the Millennium interface offers two options. You may manually edit the existing row, or you may use the archive/update feature which preserves a copy of the old Address information and creates a new one with the updated information. The utility offers the same option regarding Addresses.
If this option is cleared, when a matching Address row is identified, the existing row will be edited with the information in the input file, overwriting individual data fields as appropriate.
If this option is checked, when a matching Address row is identified, the existing row will be edited with the information in the input file, overwriting as appropriate, AND the Start Date will be set to the current date. The Utilizations and Type will be maintained as they were in the existing data row (unless data in the input file alters that information). Then, the utility will also create a new data row (the archive) which will contain a copy of the Address information from the existing Address row, with the Utilizations unchecked, the Stop Date set to the current date, and the Type set to the comparable 'Former' Type (Former Home, Former Business, Former Permanent, etc.)
The next line in this area of the screen asks you to Enter the User ID to assign to each imported or changed record that you want to have assigned to the automatically edited or created rows affected by the action of this utility. You will want to identify these changes with a User ID other than one that actually belongs to an Millennium operator. If you do not enter a User ID, the system will default to, "IMP". (Note that the action of editing or creating data rows by the utility may result in certain additional data changes made by the system triggers. If so, the changes that were trigger-generated will use the ODBC User ID login for the 'Last User to Update' field.
The next option in this area allows you to run the utility in a debug mode. This means that the utility will execute all steps and procedures, except writing the data to the Millennium tables. It will produce the Import Log which you may use to review the action that the utility would produce in a "trial run" without altering the rows in the database. After reviewing the Log to verify that the behavior will produce the results you want, you may rerun the utility with the Do not write changes to Millennium files item unchecked.
Executing the Import
The ![]() Start Button or
the Start item on the File
Menu controls the launch of the action of the utility. While it is running,
you will be given the screen shown below.
Start Button or
the Start item on the File
Menu controls the launch of the action of the utility. While it is running,
you will be given the screen shown below.
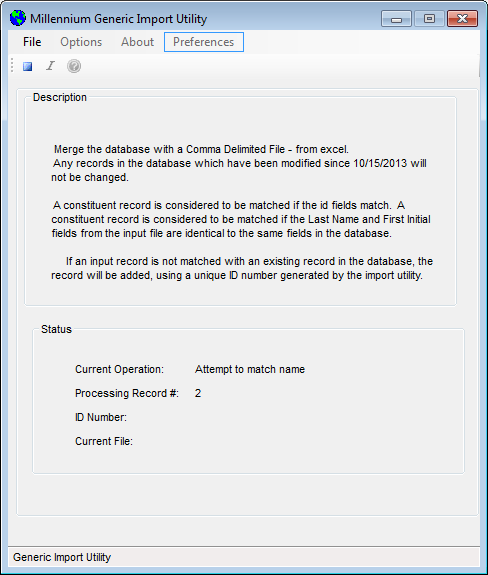
You are told what the current operation is, the number of the import record being processed, its ID Number, and the File being used.
Stopping the Utility
You may stop the run of the utility by clicking the ![]() Stop Button in this screen but you should understand what
happens in that case. The utility will have made the edits to the Millennium
rows up to the point where it was when you clicked Stop. The Log file
will list all the changes that were or were not made based on the import
records that it had read to that point.
Stop Button in this screen but you should understand what
happens in that case. The utility will have made the edits to the Millennium
rows up to the point where it was when you clicked Stop. The Log file
will list all the changes that were or were not made based on the import
records that it had read to that point.
If you were to rerun this utility using the same import file and options, the Log file would be overwritten with the information and statistics from the new run. That means that the original Millennium data that was edited to match the imported data during the first, halted, run of the utility, would not appear in the Log file. That information could be captured by printing the Log file before rerunning the utility (before the Log file is overwritten).
On the File menu, click Exit to close the utility program without running it.
The Import Log File
As part of the action of this utility, information from and about each record in the Import file is automatically written to a log file. It is named, IMPORT.LOG and is found in the same directory where the Generic Import Utility executable is located. It is in ASCII format and it can be viewed on the screen or printed out through word processing.
The Import Log file begins with a header that contains information similar to the description of the settings and options you identified in the main utility screen.
Following the header will be an entry for each record contained in the import file. This entry consists of the record number and the ID number from the import file (for cross referencing) and the results of the matching process. In addition, a notation is made telling which Millennium tables had rows added (a new row was created), updated (an existing row was edited) or ignored (because of the date parameters). A file notation might be:
- ADDRESS (type a) - updated
That line may or may not be followed by specific information about the fields of data within that table that were updated or which should be considered for manual updating (due to the date parameters). Such a line might be:
- Address Line 1 was RD#2, and was changed to P.O. Box 419.
Note that it is possible for a table to have been designated as having been updated and yet there be no field specific information listed showing the changes. This will occur if the record and row are compared and found to contain identical information.
If the data in the import file is to be written to a table driven field and the Millennium table does not contain the appropriate entry for the import data, a table entry will be created. The Code for the new table entry will match the code in the import file and the Value will be the same as the Code. This information is put into the Log file. Therefore, you should expect to use the Log file to manually update the affected tables. The entries will have been created but you will want to change the Values to be more descriptive than the Code.
Important! The Import Log file will automatically be written or overwritten, each time this utility is run. Therefore, you will want to be sure that you have a printed copy (if you want one) of the previous log before running the utility again.
Address Record Comparisons
When an address table contains more than one address row of the same Type (Home, Business, etc.) for a constituent, and an import record is of the same Type, it is difficult to determine which of the address rows should be edited to conform to the imported data. For instance, a constituent might have two home addresses in different parts of the same state. If the import file contains a home address for the constituent with a single address line, state and phone number, it is puzzling to know which of the existing address rows should be changed, or whether this is yet another home address!
The following is a summary of the rules that the utility will use to match addresses.
- Only address rows that have the same Type as the imported record will be compared.
- If no address rows having the same Type are found, a new address row is created.
- If a single address row having the same Type is found, it is the one that will be updated or update/archived according to your options.
- If more than one address row of the same Type is found, they are each compared to the import record. The address row with most fields matching the import record is the one that is updated. If each row matches equally, the older of the two (based on change date) will be updated.
This is just a summary of the comparison process. It is somewhat more complex in reality. There is a hierarchy for evaluating the address rows and the process does its best to pick the appropriate row to update. Obviously, any such system will not be able to anticipate every circumstance.
Education Record Comparisons
The utility looks for an Education row to update by doing an exact comparison on the institution, degree, concentration 1, degree month, degree day, and degree year columns. An Education row is considered to match imported data only if all of the aforementioned fields match exactly. For example, if your imported data matches an Education row on all fields except degree day (such could be the case if the degree day field in the existing Education row is '01', and your imported data has a blank for its degree day field), then the system does not consider the imported data to match this particular Education row.
If a match is found, then the imported data will overwrite the existing Education information. If no exact match is found, then the utility will create a new Education record.
Creating and Updating Name Rows
When the utility creates new Name rows, it automatically sets the Name lookup flag (indicating whether the name should or should not be considered in standard constituent searches) to 'Y'.
If the system locates an existing Name row of the same Name Type as the one that you are importing, the imported data will overwrite the existing information.
Creating Attribute Rows
If you choose to create attributes as a part of this utility, when the utility creates a new attribute, it will be considered a Basic Data Attribute and will be inserted as a linked Attribute to the Basic Data row. If you want to create attributes for other than Basic Data, you must use the Add Attribute Utility.
Social Security Number Indexing
When the Match Option, Social Security Number is selected, the Import utility will automatically add an index to the Basic Data (corebio) table for the social security number. This can be a time consuming project as the corebio will also be re-indexed but this step is only necessary the first time the utility is run at your site.
Once the index is in place, the utility will run much more efficiently and each time it is used, the utility will check to see that the index is in place and then proceed immediately into the import process.
Using the Import Utility
The following instructions assume that you have created a backup of the Millennium data tables, and that no other users are logged onto the system at the time that you are running the utility. For more information about any procedure, see the linked subject.
- Use the Windows Explorer or other tool to locate the Generic Import Utility.exe program file and double click on it to launch the utility.
- As prompted, login to your Millennium database with ODBC. Use either the database administrator (sa or MILLORA ) or a Millennium system administrator User ID and password.
- Select Web SQL (or another data source you may have set up) as the data source. After a successful login, an application window will be presented. If you have previously saved the settings (via the Preferences/Save Settings in the menu bar) then the application window will contain the saved information. You may skip any of the following steps if the desired information is already in place.
- Select the type of Input File you want to use for the run of the utility.
- Set the dates for the Update Rules. Tab or click in one of the two date text boxes. Use the resulting calendar window, click in one of the text boxes and then click on the desired date in the calendar, using the arrows above to display a different month or year. Note that dates are entered, using the format MM/DD/YYYY. Repeat for the second date text box and click on OK in the Calendar window.
- Set the Match Records by Selected Fields options. If you want to create new data rows without comparing the source data to the existing data, leave the Attempt to match records box unchecked and skip to the next step. If you want to have the utility attempt to match the source data to existing rows, click to activate the Attempt to match records box. When you do so, you must also click to activate the set of check boxes that you want to use in that comparison. Activate any combination of the remaining field name check boxes in the Match Records by Selected Fields area of the window.
- Set the New Constituent options. Click to activate the Create a new constituent for unmatched records from the input file if you want to have the utility do so. If so, you may then click to activate the Use ID numbers from the input file (if you want to have the utility do so). You may leave the first and second option blank if you do not want to create the new constituents, or you may leave the second option blank if you want to create new constituents but allow Millennium to assign new ID Numbers.
- Set the User ID Options. If you want, edit the User ID (up to three characters) that will be used to identify the last user to edit the data rows, OR accept the system default (IMP).
- Set the debug mode option. If you want to execute the run of the utility and create the Import Log WITHOUT making any changes to the Millennium data tables, click to activate the Do not write changes to the Millennium files (debug mode) box. This mode allows you to perform a 'dry run' of the utility and view the Import Log to verify that the utility will perform as you anticipate. If you want to allow the utility to make the changes to the database, leave this box unchecked.
- When all variables
are set as you want, execute
the run of the utility by clicking the
 Start Button
.
Or on the File menu, click Start.
Start Button
.
Or on the File menu, click Start. - If you want to
Stop the utility
while it is processing, click on the Stop
Button
 . Or, on the File menu, click Stop. (If you do so, we recommend that you immediately
save the Import
Log
with a new name and/or print it, so that if the utility is re-started,
the new Import Log that would then be created would not overwrite the
previous one showing the edits that had been made to that point.)
. Or, on the File menu, click Stop. (If you do so, we recommend that you immediately
save the Import
Log
with a new name and/or print it, so that if the utility is re-started,
the new Import Log that would then be created would not overwrite the
previous one showing the edits that had been made to that point.)
OR
On the File menu, click Exit to close the Import Utility main window without executing its run.
Unattended Mode
It is possible to execute this utility on the IIS machine in Unattended Mode, rather than using the standard techniques described above. This means that as the utility runs, instead of prompting for user input for certain variables, those settings will be taken from a set that you have defined prior to the execution of the utility. The utility stores those settings in a file named GenericImport.ini, located in the same folder where the utility's executable is stored. These settings are based on the information you enter via the Preferences item in the menu bar of the utility interface.
The GenericImport.ini file contains the definitions for two types of variables.
The first set are the variables from the utility interface screen. They are saved by first setting each as desired (Input File Type, Input File Name, Update Rule Start Date, Update Rule End Date, Match Records Indicator, Match SSN, Match Alternate ID, Match Name/Address Field Indicator, Match Name Type, Match City, Match State, Match ZIP, Match Phone Number, Create new unmatched record, Use ID numbers from input file, Update/Archive address records, Import User ID, Debug Mode). When the screen displays the desired values, click on Preferences/Save Settings.
The second set of variables consist of the login information and they are set by clicking Preferences/Unattended Mode Settings and then entering information for the ODBC DSN, User Name, Password, and the Log File Name.
Important! If the password is changed for the User Name, the new password must be entered in the Unattended Mode Settings form before the utility can be successfully executed in Unattended Mode again.
There are any number of possible techniques for launching the utility in this mode. You might type the expression shown above into a Command Prompt or into a Windows Start/Run Command, or you might use third party scheduling software to initiate the run at a particular time. Whatever technique you choose, in addition to any appropriate navigation or path information required by the software you are using to launch the utility, the file name for the utility must be entered as shown below:
Generic Import Utility.exe/u
- Without the /u at the end of the expression, the utility interface will launch, rather than the import process itself.
- If the utility is launched but no valid GenericImport.ini is found (either because the settings were never saved or because the file is damaged or missing) the utility interface will be launched.
- The log file that is created when the utility executes will be placed in the same folder where the utility executable file is located.
Input File Data Layout
Record Length: 1164
| Field Name | Millennium Table | dBase Name | Start | Length | Comments |
|---|---|---|---|---|---|
| ID Number | All | ID | 1 | 10 | If this is a new record, this will be the ID number used by Millennium. |
| Spouse Follows Flag | Relations | SPOUSE | 11 | 1 | Set to "Y" if a "Spouse" relationship should be created between this record and the next, otherwise, set to 'N'. |
| Address Link Flag | Address | ADDLINK | 12 | 1 | Set to "Y" if the record following this one should have the first address from this record copied into it and linked, otherwise, set to 'N'. See notes above. |
| Social Security Number | Basic Data | SSN | 13 | 9 | |
| Birth Date | Basic Data | BDAY | 22 | 8 | yyyymmdd |
| CFAE Category | Basic Data | CFAE | 30 | 6 | Not used by non-educational institutions. Values inserted here should conform to values in the "CFAE" table in Millennium |
| Constituent Type | Basic Data | CATEGORY | 36 | 6 | Values inserted here should conform to values in the "Constituent" table in Millennium |
| Source | Basic Data | SOURCE | 42 | 6 | Values inserted here should conform to values in the "Source" table in Millennium |
| Marital Status | Basic Data | MARITAL | 48 | 6 | Values inserted here should conform to values in the "Marital Status" table in Millennium. |
| Sex | Basic Data | SEX | 54 | 1 | |
| Ethnic Group | Basic Data | ETHNIC | 55 | 6 | |
| Alternate ID | Basic Data | ALTID | 61 | 20 | Often this is the Student Records System ID Number |
| Preferred Year | Basic Data | PREFYEAR | 71 | 4 | |
| Parent Year | Basic Data | PARYEAR | 75 | 4 | |
| First Name | Name | FIRST | 79 | 30 | |
| Middle Name | Name | MIDDLE | 109 | 30 | |
| Last Name | Name | LAST | 139 | 55 | |
| Title | Name | TITLE | 194 | 30 | |
| Suffix | Name | SUFFIX | 224 | 30 | |
| Name Type | Name | NAMETYPE | 254 | 6 | |
| MailCode 1 | Address | MAIL1 | 260 | 1 | Must be Y or N |
| Street Address 1 | Address | LINE1 | 261 | 40 | |
| Street Address 2 | Address | LINE2 | 301 | 40 | |
| Street Address 3 | Address | LINE3 | 341 | 40 | |
| City | Address | CITY | 381 | 30 | |
| State | Address | STATE | 411 | 6 | Use Postal Abbreviations, these values should all be in the Millennium Places table. |
| Zip code | Address | ZIPCODE | 417 | 15 | Format: xxxxxxxxx (Data is not manipulated by the utility but accepted as it appears in the import file.) |
| Country | Address | COUNTRY | 432 | 6 | |
| Address Type | Address | ADDTYPE | 438 | 6 | Values inserted here should conform to values in the "Address Type" table in Millennium |
| Locator | Address | LOCATOR | 444 | 6 | |
| Phone Number | Address | PHONE | 450 | 30 | Format: xxxxxxxxxx (Data is not manipulated by the utility but accepted as it appears in the import file.) |
| Extension | Address | EXTENSION | 480 | 4 | |
| MailCode2 | Address | MAIL2 | 484 | 1 | Must be Y or N |
| MailCode3 | Address | MAIL3 | 485 | 1 | Must be Y or N |
| MailCode4 | Address | MAIL4 | 486 | 1 | Must be Y or N |
| MailCode5 | Address | MAIL5 | 487 | 1 | Must be Y or N |
| MailCode6 | Address | MAIL6 | 488 | 1 | Must be Y or N |
| MailCode7 | Address | MAIL7 | 489 | 1 | Must be Y or N |
| MailCode8 | Address | MAIL8 | 490 | 1 | Must be Y or N |
| MailCode9 | Address | MAIL9 | 491 | 1 | Must be Y or N |
| MailCode10 | Address | MAIL10 | 492 | 1 | Must be Y or N |
| MailCode11 | Address | MAIL11 | 493 | 1 | Must be Y or N |
| MailCode12 | Address | MAIL12 | 494 | 1 | Must be Y or N |
| MailCode13 | Address | MAIL13 | 495 | 1 | Must be Y or N |
| MailCode14 | Address | MAIL14 | 496 | 1 | Must be Y or N |
| MailCode15 | Address | MAIL15 | 497 | 1 | Must be Y or N |
| MailCode16 | Address | MAIL16 | 498 | 1 | Must be Y or N |
| MailCode17 | Address | MAIL17 | 499 | 1 | Must be Y or N |
| MailCode18 | Address | MAIL18 | 500 | 1 | Must be Y or N |
| MailCode19 | Address | MAIL19 | 501 | 1 | Must be Y or N |
| MailCode20 | Address | MAIL20 | 502 | 1 | Must be Y or N |
| Institution | School | INSTITUT | 503 | 8 | Values inserted here should conform to values in the "Institution" table in Millennium. |
| School | School | SCHOOL | 509 | 6 | Values inserted here should conform to values in the "School" table in Millennium. |
| Concentration 1 | School | CONCEN1 | 515 | 6 | Values inserted here should conform to values in the "Concentration" table in Millennium. |
| Concentration 2 | School | CONCEN2 | 521 | 6 | Values inserted here should conform to values in the "Concentration" table in Millennium. |
| Concentration 3 | School | CONCEN3 | 527 | 6 | |
| Concentration 4 | School | CONCEN4 | 533 | 6 | |
| Campus | School | CAMPUS | 539 | 6 | Not currently active. |
| Degree | School | DEGREE | 545 | 6 | Values inserted here should conform to values in the "Degree" table in Millennium. |
| Department | School | DEPARTMENT | 551 | 6 | |
| Day Granted | School | DEGDAY | 557 | 2 | |
| Month Granted | School | DEGMONTH | 559 | 2 | Month that degree was awarded. |
| Year Granted | School | DEGYEAR | 561 | 4 | Year that the degree was awarded. |
| Preferred Day | School | DEGPDAY | 565 | 2 | |
| Preferred Month | School | DEGPMONTH | 567 | 2 | |
| Preferred Year | School | DEGPYEAR | 569 | 4 | |
| School Source | School | SSOURCE | 573 | 6 | Source of school information |
| School2 Institution | School | INSTITUT_2 | 579 | 8 | Values inserted here should conform to values in the "Institution" table in Millennium. |
| School2 School | School | SCHOOL_2 | 585 | 6 | Values inserted here should conform to values in the "School" table in Millennium. |
| School2 Concentration 1 | School | CONCEN1_2 | 591 | 6 | Values inserted here should conform to values in the "Concentration" table in Millennium. |
| School2 Concentration 2 | School | CONCEN2_2 | 597 | 6 | Values inserted here should conform to values in the "Concentration" table in Millennium. |
| School2 Concentration 3 | School | CONCEN3_2 | 603 | 6 | Values inserted here should conform to values in the "Concentration" table in Millennium. |
| School2 Concentration 4 | School | CONCEN4_2 | 609 | 6 | Values inserted here should conform to values in the "Concentration" table in Millennium. |
| School2 Campus | School | CAMPUS_2 | 615 | Not currently active. | |
| School2 Degree | School | DEGREE_2 | 621 | 6 | Values inserted here should conform to values in the "Degree" table in Millennium. |
| School2 Department | School | DEPT_2 | 627 | 6 | |
| School2 Day Granted | School | DEGDAY_2 | 633 | 2 | |
| School2 Month Granted | School | DEGMONTH_2 | 635 | 2 | Month that degree was awarded. |
| School2 Year Granted | School | DEGYEAR_2 | 637 | 4 | Year that the degree was awarded. |
| School2 Preferred Day | School | DEGPDAY_2 | 641 | 2 | |
| School2 Preferred Month | School | DEGMON_2 | 643 | 2 | |
| School2 Preferred Year | School | DEGPYEAR_2 | 645 | 4 | |
| School2 Source | School | SSOURCE_2 | 649 | 6 | Source of school information. |
| Employer ID | Jobs | COMPID | 655 | 10 | Not normally known. |
| Employer Name | Jobs | CONAME | 665 | 55 | If the Employer ID field is filled in and is found on the system, then the Employer Name will be assumed to be the name currently on Millennium. If the Employer ID field is not filled in, then this name will be used to match against names in the Millennium database to determine if this record currently exists. In either case, if the Employer ID is found to exist on Millennium, an employer/employee relationship will be created, employee counts on corporate records will be updated, and match and industry fields will be embedded in the jobs record. |
| Job Title | Jobs | JOBTITLE | 720 | 50 | |
| Business Street Address 1 | Address | BLINE1 | 770 | 40 | |
| Business Street Address 2 | Address | BLINE2 | 810 | 40 | |
| Business Street Address 3 | Address | BLINE3 | 850 | 40 | |
| Business City | Address | BCITY | 890 | 30 | |
| Business State | Address | BSTATE | 920 | 6 | Use Postal Abbreviations, these values should all be in the Millennium Places table. |
| Business Zip Code | Address | BZIPCODE | 926 | 15 | |
| Business Country | Address | BCOUNTRY | 941 | 6 | |
| Business Address Type | Address | BADDTYPE | 947 | 6 | Values inserted here should conform to values in the "Address Type" table in Millennium |
| Business Locator | Address | BLOCATOR | 953 | 6 | |
| Business Phone Number | Address | BPHNUM | 959 | 30 | Format: xxxxxxxxxx (Data is not manipulated by the utility but accepted as it appears in the import file.) |
| Business Fax | Address | BFAX | 989 | 30 | Format: xxxxxxxxxx (Data is not manipulated by the utility but accepted as it appears in the import file.) |
| Business MailCode1 | Address | BMAIL1 | 1019 | 1 | Must be Y or N |
| Business MailCode2 | Address | BMAIL2 | 1020 | 1 | Must be Y or N |
| Business MailCode3 | Address | BMAIL3 | 1021 | 1 | Must be Y or N |
| Business MailCode4 | Address | BMAIL4 | 1022 | 1 | Must be Y or N |
| Business MailCode5 | Address | BMAIL5 | 1023 | 1 | Must be Y or N |
| Business MailCode6 | Address | BMAIL6 | 1024 | 1 | Must be Y or N |
| Business MailCode7 | Address | BMAIL7 | 1025 | 1 | Must be Y or N |
| Business MailCode8 | Address | BMAIL8 | 1026 | 1 | Must be Y or N |
| Business MailCode9 | Address | BMAIL9 | 1027 | 1 | Must be Y or N |
| Business MailCode10 | Address | BMAIL10 | 1028 | 1 | Must be Y or N |
| Business MailCode11 | Address | BMAIL11 | 1029 | 1 | Must be Y or N |
| Business MailCode12 | Address | BMAIL12 | 1030 | 1 | Must be Y or N |
| Business MailCode13 | Address | BMAIL13 | 1031 | 1 | Must be Y or N |
| Business MailCode14 | Address | BMAIL14 | 1032 | 1 | Must be Y or N |
| Business MailCode15 | Address | BMAIL15 | 1033 | 1 | Must be Y or N |
| Business MailCode16 | Address | BMAIL16 | 1034 | 1 | Must be Y or N |
| Business MailCode17 | Address | BMAIL17 | 1035 | 1 | Must be Y or N |
| Business MailCode18 | Address | BMAIL18 | 1036 | 1 | Must be Y or N |
| Business MailCode19 | Address | BMAIL19 | 1037 | 1 | Must be Y or N |
| Business MailCode20 | Address | BMAIL20 | 1038 | 1 | Must be Y or N |
| Attribute Type | Attribute | ATTRTYPE | 1039 | 6 | Values inserted here should conform to values in the "Attribute Type" table in Millennium |
| Attribute Group | Attribute | GROUP | 1045 | 6 | Values inserted here should conform to values in the "Group" table in Millennium |
| Attribute Start Date | Attribute | STDATE | 1051 | 8 | yyyymmdd |
| Attribute Stop Date | Attribute | STOPDATE | 1059 | 8 | yyyymmdd |
| Deceased Date | Death | DTHDECDATE | 1067 | 8 | yyyymmdd |
| Death Cause | Death | DTHCAUSE | 1075 | 50 | |
| Death Notify | Death | DTHNOTIFY | 1125 | 40 |
Note: All fields are of type "Text" if the dBase format is chosen. The dBase field name should be that indicated in the chart. An empty dBase file with these exact specifications is supplied with the utility and named "Import.dbf".