Prospect Management Workflow
The following information is covered in this topic:
- Introduction
- Creating a Prospect Management Workflow
- Creating a Prospect Management Workflow by Using an Existing Workflow as a Template
- Editing a Prospect Management Workflow
- Renaming a Prospect Management Workflow
- Deactivating a Prospect Management Workflow
- Deleting a Prospect Management Workflow
- Using Prospect Management Workflows
- Actions and Tasks Common Fields
Introduction
A Prospect Management workflow is a one-screen data entry page that can be used to enter new prospects, proposals, planned gifts, or actions into Millennium. You can enter data for the primary table (Actions, Planned Giving, Proposals, or Tracking), and also enter linked items, secondary items, and related items on the same data entry page. For example you may want to link multiple actions and their tasks, and an attachment to a new planned gift. Or you may want to link a prospect management relationship, enter ratings and research source data, and several actions at the same time that you are entering the tracking row for a new prospect. Using a workflow to enter this information allows you to insert data into multiple tables without having to navigate to several screens in order to do so.
A Prospect Management workflow is only used to insert data. Data edits must still be completed on each individual data row.

The sections that are shown on this one-screen data entry page have been set up to display on the page by using Prospect Management Workflow Setup. Prospect Management Workflow Setup allows system administrators to quickly set up workflows for entering Actions, Planned Giving, Proposals, and Tracking information. Each workflow can contain an unlimited number of secondary, related and linked items (tables), along with default insert forms (also known as defined defaults) for each item. Each item that represents data entry into a data table can have one or more linked Attachments.
Creating a Prospect Management Workflow
A system administrator can set up multiple workflows in each area. Within each area, each workflow is given a unique name to assist in easy identification. Workflows can be marked as Active or Inactive.
Complete the following steps to set up a new workflow:
-
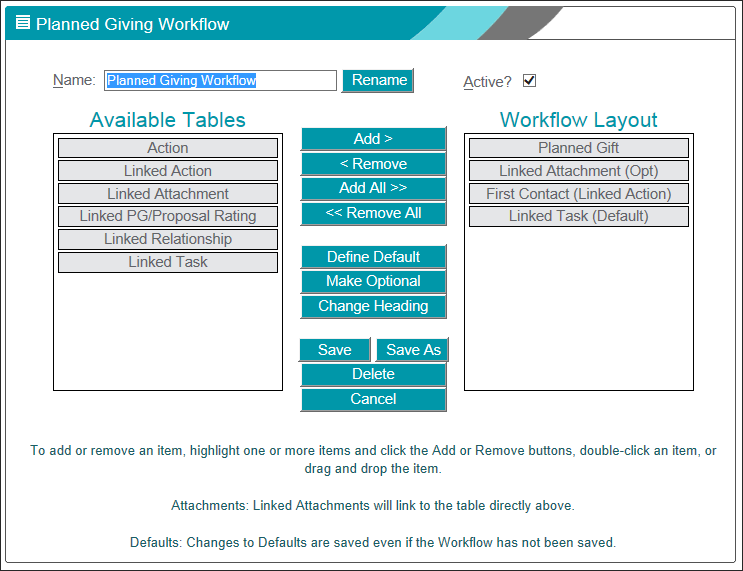
Log on as a system administrator, and, using the Millennium Explorer, navigate to > > . The start page for setting up a workflow is shown.

-
Point to the Edit Button
 located in
the Section Header of the preferred workflow, and click the Insert
menu item. The workflow setup form displays.
located in
the Section Header of the preferred workflow, and click the Insert
menu item. The workflow setup form displays. The primary table for the workflow already displays in Workflow Layout. For example, for a Planned Giving workflow, Planned Giving is the primary table.
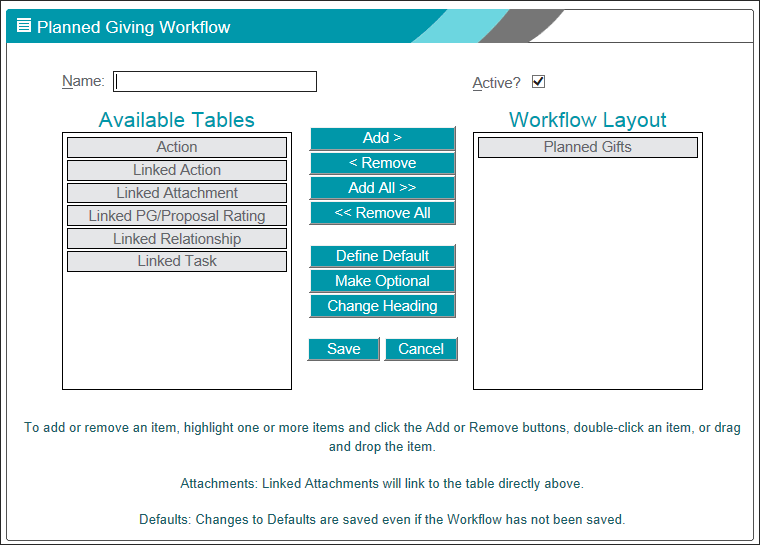
- Enter a name for the workflow into the Name field. The name must be unique within the Prospect Management area in which you are defining the workflow.
- The Active box is selected by default. To create an inactive workflow, then de-select it.
-
To add items (tables) to the Workflow Layout:
-
Click the name of the specific item in Available Tables.
-
Click Add. It then displays in Workflow Layout.
-
Use the Add All button to add every item in Available Tables to the Workflow Layout.
-
To add the same item to the Workflow Layout multiple times, (1) click on the desired item and (2) click Add - repeat (1) and (2) for each copy of the item that you want.
 For
example...
For
example... -
Items can also be added by Drag and Drop. Drag the item(s) from Available Tables to Workflow Layout.
-
-
To change the order of the items within Workflow Layout:
-
Use Drag and Drop. Click to activate the item, pick it up and move it to the desired position within the Workflow Layout list, and then Drop.
The workflow's primary table must remain the first item within Workflow Layout.
-
-
To remove items (tables) from the Workflow Layout:
- Click the name of the specific item in Workflow Layout.
- Click Remove.
- Items can also be removed by Drag and Drop. Drag the items from Workflow Layout back to Available Tables.
- Use the Remove All button to remove all items (except for the primary table) at one time.
The workflow's primary table cannot be removed from the Workflow Layout.
-
To define a default insert form on a Workflow Layout item:
- Click the name of the item in Workflow Layout.
- Click the Define Default button. The default insert form for the item displays.
-
If you want a Date field on the form to default to the day that you will be inserting the data into Millennium:
- Click the Calendar control located next to the date field.
- Click Default to Today. The value in the date field will now show <TODAY>.
- If you do not want to use the Calendar control, you can type the word "today" (without the quotes) into the Date field instead.
- Enter other data and set other options as you desire.
-
Click Insert
Or
Click Cancel to halt the process without creating a new default insert form.
- An asterisk (*) will display next to the table name, to indicate that a default insert form has been defined.
Review the Define Default Insert Forms topic for general information about default insert forms.
-
To make a Workflow Layout item optional (the user does not have to create a data row for the item):
- Click the name of the item in Workflow Layout.
- Click the Make Optional button.
- (Opt) will display next to the name to indicate that entering data into the table is optional.
You cannot make the workflow's primary table optional.
-
To undo the optional flag on a Workflow Layout item:
- Click the name of the item in Workflow Layout.
- Click the Make Optional button.
- (Opt) no longer displays next to the item name.
-
To change the Section Header label for a Workflow Layout item:
- Click the name of the item in Workflow Layout.
- Click the Change Heading button.
- Enter the new label for the heading.
- Click OK.
- The standard label for the heading displays in parentheses, next to the new heading label.
- Click Save. The newly created workflow now displays on the workflow setup start page.
Creating a Prospect Management Workflow by Using an Existing Workflow as a Template
To create a new workflow from one that already exists, complete the following steps:
- Log on as a system administrator, and, using the Millennium Explorer, navigate to . The start page for setting up a workflow displays.
- Click the Maintenance button
 to the left of the workflow that you will
be using as a template. The Workflow setup form displays.
to the left of the workflow that you will
be using as a template. The Workflow setup form displays. - Make changes as needed. Refer to the steps in the Creating a Prospect Management Workflow section of this topic for information about adding and removing items, setting default insert forms, changing Section headers, and marking data entry optional for a workflow item.
- Click Save As.
- Enter the name of the new workflow. This name must be unique within the Prospect Management area in which you are defining the workflow.
- Click OK.
- You will be asked to confirm your intentions to create the new workflow. Click OK.
- A confirmation message is shown. Click OK. The newly created workflow now displays on the workflow setup start page.
Editing a Prospect Management Workflow
To edit an existing workflow, complete the following steps:
- Log on as a system administrator, and, using the Millennium Explorer, navigate to . The start page for setting up a workflow displays.
- Click the Maintenance button to the left of the workflow to be edited.
The Workflow setup form displays.
- Make your changes as needed. Refer to the steps in the Creating a Prospect Management Workflow section of this topic for information about adding and removing items, setting default insert forms, changing Section headers, and marking data entry optional for a workflow item.
- Click Save to save your changes.
- Your changes are saved, and a confirmation message is shown. Click OK to return to the workflow setup start page.
Renaming a Prospect Management Workflow
To rename an existing workflow, complete the following steps:
- Log on as a system administrator, and, using the Millennium Explorer, navigate to . The start page for setting up a workflow displays.
- Click the Maintenance button to the left of the workflow that you want
to rename. The Workflow Setup form displays.
- Click Rename.
- Enter a new name for the workflow. This name must be unique within the Prospect Management area in which you are defining the workflow.
- Click OK.
- You will be asked to confirm your intentions to rename the workflow. Click OK.
- The workflow has been renamed and a confirmation message is shown. Click OK.
-
Click Cancel to return to the workflow setup start page.
Or
You can make other changes to the workflow at the same time that you rename it. Once additional changes have been made, click Save to return to the workflow setup start page.
Deactivating a Prospect Management Workflow
To deactivate an active workflow, complete the following steps:
- Log on as a system administrator, and, using the Millennium Explorer, navigate to . The start page for setting up a workflow displays.
- Click the Maintenance button to the left of the workflow that you want
to deactivate. The Workflow Setup form displays.
- Deselect the Active? check box.
- Click Save.
- The workflow is now inactive, and a confirmation message is shown. Click OK to return to the workflow setup start page.
Note: When a workflow is no longer active, then it is no longer available when entering Prospect Management data.
Deleting a Prospect Management Workflow
To delete an existing workflow, complete the following steps:
- Log on as a system administrator, and, using the Millennium Explorer, navigate to . The start page for setting up a workflow displays.
- Click the Maintenance button to the left of the workflow that you want
to delete. The Workflow Setup form displays.
- Click Delete.
- You will be asked to confirm your intentions to delete the workflow. Click OK.
- The workflow is deleted, and a confirmation message is shown. Click OK to return to the workflow setup start page.
Using Prospect Management Workflows
Prospect Management Workflows can be used during data entry for Actions, Tracking, Proposals, and Planned Giving. A user can access workflows that have been previously set up by a system administrator.
- If a workflow
for a data table exists, then the Section Header Edit
Button menu will
have the Insert via Workflow menu item available.
-
If there is more than one active workflow for a table, a user can choose which workflow to use by pointing to the Insert via Workflow item and then clicking the name of the workflow that he or she wants to use.
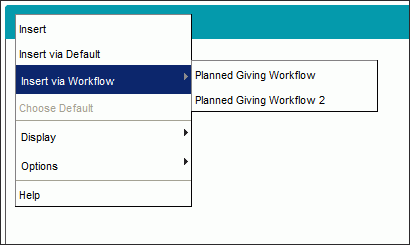
- If there is no active workflow for a data table, then the Insert via Workflow menu item is grayed out (not available).
- Using a Prospect Management workflow is not mandatory. A user has the option to enter data on each table that is represented on the workflow, without using the workflow. But, he or she will have to navigate to each table separately in order to do so. And, default insert forms that have been defined specifically for the workflow will not be available to use when entering data without the workflow.
- Workflows are used for inserting data only. Edits must still be completed on each individual data row.
Complete the following steps to use a Workflow to insert data:
-
Locate the desired constituent and navigate to the display page for the specific Prospect Management table by using one of the following Millennium Explorer sequences:
- Point to the Edit Button in the Section Header, point to
Insert via Workflow, and then click on the
name of the workflow that you want to use (shown in the figure above).
- The selected workflow's one-screen data entry page is shown. It will have one section for each item that was added to the page during the Workflow Setup process. Fill out each section as required and desired.
- If a default insert form was defined for a workflow item, then some data fields within that item's section on the data entry page will be pre-populated. You can leave the values as they are, or edit them as you choose.
-
If a workflow item was set to optional during the Workflow Setup, then the Omit this Section check box is included in that item's section on the data entry page.

If you do want to create a data row for this item, then check this box.
-
For Planned Giving and Proposals (only): if the constituent has a spousal relationship, the Planned Gift or Proposal section on a Workflow one-screen data entry page includes the Link to Spouse check box.

Check this box to tell the system to also create a copy of this Planned Gift or Proposal data row for the constituent's spouse/life partner, and then link the two rows together.
- For Linked Relationship sections: you will have the opportunity to create either a Constituent relationship or a Non-Constituent relationship directly from the one-screen data entry page.
- For Actions with Linked Tasks sections:(on any Prospect Management workflow data entry page - Actions, Planned Giving, Proposals, Tracking): Actions and Tasks have several fields in common. These fields are Type, Priority, Due Date and Completed On. When using workflow data entry pages to entering Action data into one of the common fields, the corresponding common field in all of the linked Tasks will be populated automatically (by the system) with the same data that was entered into the Action. For more information, refer to the Actions and Tasks Common Fields section of this topic.
- Once you have completed each section on the data entry page, click Insert to insert all data into the database.
Actions and Tasks Common Fields
There is special system functionality for the fields that Actions and Tasks have in common. These fields are Type, Priority, Due Date and Completed On. When utilizing a workflow data entry page to enter Action data into one of the common fields, the corresponding common field in all of the linked Tasks will be populated automatically with the same data that was entered into the Action.
What if I want to make changes to the data that the system automatically entered into a common field in a linked Task?
- Edit the Tasks data as you want. Edits that you make to a common field in a linked Task will not change any data that you've entered into the corresponding common field in the Action.
What if I have defined a default insert form for a linked Task, and a common field in that definition already has a default value?
- The default value in the common field will not persist if you enter a value (or in some way edit a value that is already there) in the corresponding common field in the Action. The data in the linked Task's common field will be overwritten with the data that you entered in the Action.
What happens when I change the data in a common field in a linked Task?
- The data in the corresponding common field in the Action will not change. You must update the data in the Action yourself if you want the common fields to have identical data.
Note: The special system functionality for the fields that Actions and Tasks have in common only applies when you are using a Prospect Management workflow data entry page to insert Actions and linked Tasks. Once the Action and linked Task have been inserted into the database, changing the data in a common field in the Action will not automatically change the data in the corresponding common field in the linked Task. You must update the common field in the linked Task yourself if you want the fields to have identical data.