Running the Report
After you set up Report Details and Report Criteria, you can run the report. Use the Run Options in the Report form to specify the output format, location and other run-time options for the report. The values initially shown in this form are set in the Default Options form.
If you access this page from the Run Criteria section of Millennium Explorer, only the Report Details and Run Options pages will be available. If you access this page from the New Criteria or Edit Criteria sections of Millennium Explorer, the Criteria and Options will also be available.
Note: If you have not saved the report criteria before you click Run, Millennium prompts you to save the report. See Save the Report Criteria for more information. After you save the report, the system automatically saves any changes to the criteria when you click Run.
To complete the run-time options for a report, use the following steps. See Report Form Fields-Run Options for more information about each option.
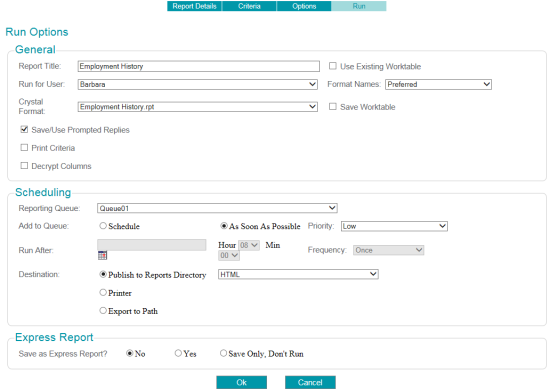
- In the Report form, click Run.
- If you are prompted to save the report, enter the appropriate Save Criteria, and click Save to save the report criteria. See Save the Report for more information.
- Complete the options in the General section.
- Enter a Report Title to appear at the top of the report. If you entered a title in the Report Details page, this field shows the title you entered. You can edit the title for this run of the report.
- In the Run for User field, select a user ID under whose permissions the report will run. This option allows your organization to set security around running reports and to limit access to the reporting server. If you choose an ID other than your own, the system prompts you to enter a password when you run the report.
- Select a Crystal Format (rpt file) to format the report data. If you selected a Format on the Report Details page, this field shows that selection. You can change the format file for this run of the report.
- Select whether to save and use the prompted replies from the report criteria. This option is selected by default. You can clear the check box if you do not want the responses to the prompts to be saved.
- Select whether to Print Criteria used for the report on a separate page. By default, this option is not selected. If you choose this option and the report destination is also Printer, the criteria will automatically be sent to the same printer you specify for the report. If the report destination is not a printer, the criteria will be printed at the default printer for selected report queue.
- Select the Decrypt Columns option to decrypt and show data in the report that is encrypted, such as social security numbers or credit card numbers. This option is not selected by default. For more information, see Decryption in Reports.
- Select the Use Existing Worktable option if you have a generic worktable from a previous report or search, or if you have run this report before, and you want to reuse the worktable. This option is not selected by default.
- Choose the Format Names option if necessary. If you specified the Address & Name options on the Report Options page, that selection appears here. You can override the option for this run of the report.
- Select the Save Worktable option if you want to save the worktable created for this report run for future use.
- Complete the options in the Scheduling section as follows.
- Select a Reporting Queue or accept the default value.
- Use the Add to Queue options to schedule the report to run at a later time, or accept the default value As Soon As Possible. If you choose the Schedule option, the Run After date and Hour options become active. Set the date and time for the report using these options.
- Set the report Priority. The default priority is Low. If you schedule the report for a later time, you cannot change this setting.
- Use the Frequency option to run the report at intervals without resending it to the queue. The report will remain on the queue until it is removed using Queue ManagementEdit techniques. The default frequency is Once.
- Set the Destination options for this run of the report. The output formats shown on this page depend on the Report Form Fields-Default Options settings for the report.
- If you select Publish to Reports Directory, choose whether the output format is HTML or PDF.
- If you select Printer, choose a printer from the list and select a the number of Copies for the report.
- If you select Export to Path, choose an output format.
- Set the Express Reports options as follows:
- Select No for the Save as Express Report option to send the report to the queue without saving it as an Express Report. This is the default selection.
- Select Yes to save the criteria to the Express Reports list and send the report to the queue for processing. If you choose this option, you also need to select one or more users who can access the report in the Express Reports list.
- Choose the Save Only, Don't Run option to save the criteria to the Express Reports list without sending it to the queue for processing. If you choose this option, you also need to select one or more users who can access the report in the Express Reports list.
- Click Ok to submit the report to the queue or Cancel to close the Run tab without submitting the report.
- You will next
be shown a list of all parameters and prompts that are part of the report:
- Accept the default parameter values or choose different options.
- Supply a value for each prompt, or check the box to indicate that the statement does not apply to the current run of the report. (It will be ignored in the selection process.)
Tip: For prompts that require In the List of values, you might have a large number of entries (for example, graduation years or constituent ID numbers). You can copy a list of values from a text or document file and paste them into the prompt text entry field. The system captures the values and moves them into the displayed list of replies on the right side of the Prompt form.