Email Setup
Use the Email Setup section in Organization Settings to configure how emails are sent from MIP. We recommend referring to your IT Technician or System Administrator for help in completing the SMTP configuration.
MIP supports sending emails through the following methods:
-
SMTP - Required for automated emails generated by MIP, such as alerts and scheduled reports.
-
Office 365 - Optional and used for manual, user-initiated emails, such as sending vouchers and invoices.
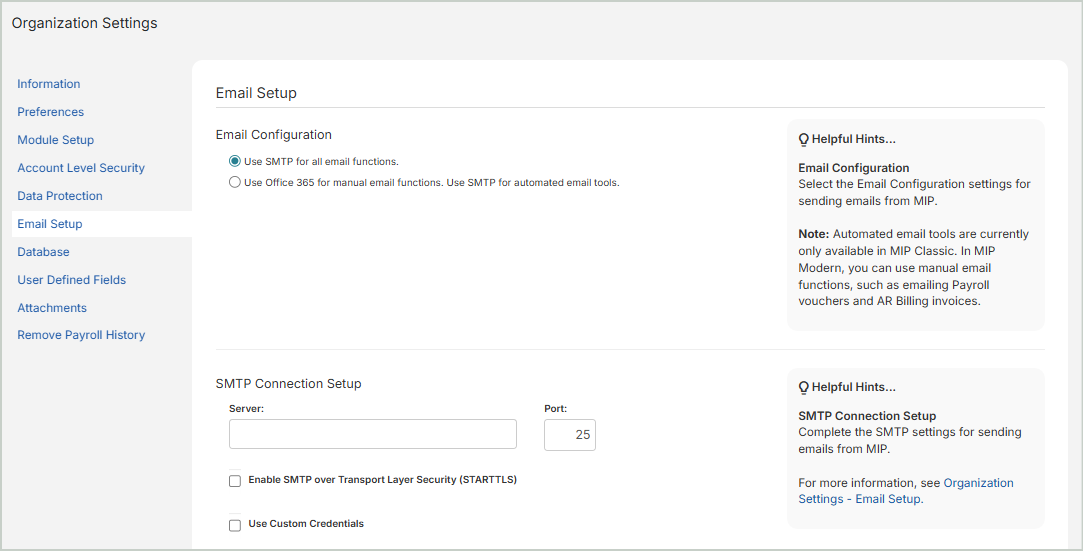
Step 1 - Choose Your Email Configuration
Select one of the following email configuration options:
Use SMTP for all email functions - Select this option if you want all emails - both automated and manual - to be sent through SMTP.
Use Office 365 for manual email functions. Use SMTP for automated email tools - Select this option if you want users to send manual emails through Office 365, and automated emails (if used) to be sent through SMTP.
If you do not use automated email tools in MIP, you can send emails directly through your Office 365 account without configuring SMTP.
Under SMTP Connection Setup:
-
Select Use Custom Credentials
- Username: Enter your full Office 365 email address
-
Password: Enter your Office 365 email password
-
Save your changes
Test Your Email Connection:
-
Sender: Enter the email address the test email will be sent from
-
This email must match the Office 365 Username you entered above
-
-
Recipient: Enter the email address that will receive the test email
-
Use an address you can easily access to confirm delivery
-
-
Select Send Test Email
-
A window will appear for you to login to your Office 365 account
-
If successful, the recipient will receive a test message
-
-
Once you've connected your Office 365 account, see Next Steps
Step 2 - Set Up an SMTP Connection
If your selected email configuration requires SMTP, complete the steps below. If you encounter issues, contact your IT Technician or System Administrator.
Select the appropriate tab below based on your email provider:
- Standard SMTP Settings
- Gmail Settings
- Yahoo Settings
- Office 365 Settings
Use this option for internal mail servers or third-party SMTP providers.
-
Server: Provided by your IT team or email provider
-
Port: 25, 465, or 587
-
Enable SMTP over Transport Layer Security (STARTTLS): Select if using port 587
-
Use Custom Credentials: Select if authentication is required
-
Username / Password: Provided by your IT team
-
Save your changes
Gmail requires an App Password for SMTP authentication, which is available only when 2-Step Verification is enabled on the Google account. The App Password is used in place of your normal Gmail password and allows MIP to send emails securely on your behalf.
-
Server: smtp.gmail.com
-
Port: 587
-
Select Enable SMTP over Transport Layer Security (STARTTLS)
-
Select Use Custom Credentials
-
Username: Enter your full Gmail email address
-
Password: Enter your Gmail App Password
 How do I create a Gmail App Password?
-
Go to myaccount.google.com
-
Sign in using the Gmail account that will send emails from MIP
-
Select Security
-
Under How you sign in to Google, select 2-Step Verification
-
Follow the prompts to turn on 2-Step Verification
-
In Security, select App passwords (you may have to search for it)
-
Enter an App name of your choosing (such as MIP SMTP)
-
Select Generate
-
Copy the password exactly as shown
-
Paste the password in the Password field in MIP
-
-
Save your changes
Yahoo requires an App Password for SMTP authentication, which is available only when 2-Step Verification is enabled on the Yahoo account. The App Password is used in place of your normal Yahoo password and allows MIP to send emails securely on your behalf.
-
Server: smtp.mail.yahoo.com
-
Port: 587
-
Do NOT select Enable SMTP over Transport Layer Security (STARTTLS)
-
Select Use Custom Credentials
-
Username: Enter your full Yahoo email address
-
Password: Enter your Yahoo App Password
How do I create a Yahoo App Password?
-
Go to login.yahoo.com
-
Sign in using the Yahoo email account that will send emails from MIP
-
Select your profile icon in the upper-right corner
-
Select Account Info > Account Security
-
Ensure that Account Key or Two-step verification is turned on
-
Follow the prompts to enable it if necessary
-
In Account Security, select Generate app password
-
Choose Other app
-
Enter an App name of your choosing (such as MIP SMTP)
-
Select Generate password
-
Copy the password exactly as shown
-
Paste the password in the Password field in MIP
-
-
Save your changes
Due to Microsoft security policies, App Passwords are not available in many Microsoft 365 environments. For reliable SMTP authentication, we recommend using a dedicated SMTP mailbox with SMTP AUTH enabled and Multi-Factor Authentication (MFA) disabled.
-
Server: smtp.office365.com
-
Port: 587
-
Select Enable SMTP over Transport Layer Security (STARTTLS)
-
Select Use Custom Credentials
-
Username: Enter your full dedicated mailbox email address
-
Password: Enter your mailbox password
-
Save your changes
Step 3 - Test Your Email Connection
After saving your SMTP settings, test the connection.
-
Sender: Enter the email address the test email will be sent from
-
This email must match the SMTP Username
-
If the test fails, this address will receive the failure notification
-
-
Recipient: Enter the email address that will receive the test email
-
Use an address you can easily access to confirm delivery
-
-
Select Send Test Email
-
If successful, the recipient will receive a test message
-
If unsuccessful, confirm:
-
The correct port is used
-
STARTTLS is enabled (if required)
-
The correct password or App Password was entered
-
-
Next Steps
Once you’ve finished setting up your configuration, Save your changes.
-
After setting up the SMTP connection, use AR Email Templates or Payroll Email Templates to create default email preferences for AR Billing invoices, customer statements, and payroll vouchers.
-
You can then decided which customers you want to receive AR invoices and customer statements by email on the Customer Record - Email tab (Maintenance > Accounts Receivable > Customers).
-
You can also send automated email notifications to vendors to notify them of ACH payments. See ACH File for more information.
-
You can also select the processing groups you want to receive Payroll vouchers by email through Payroll > Processing > Process Payroll > Print & Email Checks and Vouchers.