Manual Payments
Select the invoices or credits to pay and print the associated checks or vouchers for each.

Select Invoices / Credits to Pay
The Pending Invoices and Credits grid displays all posted invoices / credits available to select for payment.
Invoice/Credit Number: All open invoices and credit memos
Select an Invoice/Credit Number to display the details for each open line item.
-
To apply a partial payment - Scroll to the Amount to Pay column and enter an amount, then select Update to save your changes.
-
To apply a discount - Scroll to the Discount Amount column and enter an amount, then select Update to save your changes.

The grid includes the following columns:
{Segments}: The system displays all available segments for your organization.
1099 Box: If a 1099 box number was entered for this vendor on the Vendor Record (1099 Information tab), it defaults here.
Unpaid Balance: The unpaid balance for each transaction row. The sum of all rows displays in the Unpaid/Credit Balance column.
Amount to Pay: The dollar amount for the partial payment. The sum of all rows minus any Available Discounts displays in the Amount to Pay column. Note that any changes to this value will not reflect the Discount Available or the Discount Date columns.
Discount Amount: The dollar amount for the discount. The sum of all rows displays in the Discount Amount column. This column is not available for the APM transaction source (Accounts Payable Credit).
Discount Available: The total calculated discount. The sum of all rows displays in the Discount Available column. The amount does not include any adjustments you made using partial payment or Discount Amounts.
Vendor Name: The name of the vendor
Vendor ID: The ID of the vendor
Auto Payments: "Yes" or "No" depending on if this vendor is allowed to receive auto payments. On the Vendor Record (Payments and Discounts > Automated Payments tab), there's an option to Exclude this Vendor from Receiving Automated Payments. If this option is selected, you won't be able to submit invoices for auto pay if they're associated with this vendor.
Street Address: The vendor's street address
City: The vendor's city
State: The vendor's state
Zip Code: The vendor's zip code
Description: The description that you entered on the invoice
Vendor Information: Helpful information about the vendor such as Hold Payments and Print Separate Checks for Each Payable. This was set up on the Vendor Record (Payments and Discounts tab). Vendors with a Hold Payments status cannot be selected for payments.
Unpaid/Credit Balance: The total balance for the open invoices, including partial payments. An amount that contains ( ) denotes that a credit balance exists for the vendor.
Amount to Pay: The scheduled amount to be paid to the vendor. The amount defaults to zero when an invoice is not selected. Once you select an invoice, this amount changes to the Unpaid Balance minus any calculated Discounts. If a partial payment is made to the invoice, it reflects that amount. Note that this column represents the total for each invoice, not each individual line item. Any changes to this amount using Partial Payments will not reflect the Discount Available or the Discount Date.
Discount Amount: The discount amount allocated to the payment. This amount defaults to zero when an invoice is not selected. If a discount amount is applied to the invoice using Partial Payments, it reflects that amount.
Due Date: The due date entered for the invoice. ( You entered this date when you entered your invoice through Transactions > Accounts Payable > Invoices.
Discount Available: The total calculated discount. The amount does not include any adjustments you made using Partial Payment or Discount Amounts.
Discount Date: The last date the discount can be applied for the invoice. (This date is calculated based on the number of days available, which you entered on the Vendor Record (Payments and Discounts tab).
Check Address: The system displays the Check Address selected through Transactions > Accounts Payable > Invoices.
Invoice/Credit Date: The document date
EFTs: The system displays a blank
Invoice/Credit Session: The Session ID for the Invoice/Credit Document
Pending Check/Credit Session: The session information if the invoice or credit memo including partial payments is currently saved to an Unposted AP Pay Invoices session
Pending Check/Credit: The check number if the invoices and credit memos that were previously selected for payment and printed but have not been posted
Summary
At the bottom of the page, the system displays the details of the invoices selected for payment.
- Vendors: The number of vendors selected for payment
- Invoices and Credits: The number of invoices and credits selected in the session
- Total Amount to Pay: The total amount selected for payment in the session
Print Checks or Vouchers
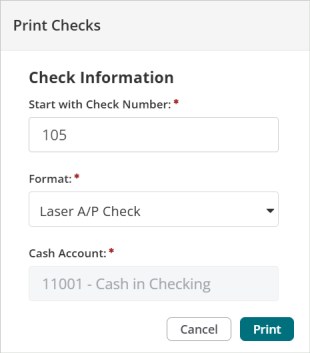
Once you've selected your invoices and credits, select Manual Payment to print the checks or vouchers.
-
Enter a starting check number.
-
Select Print.
-
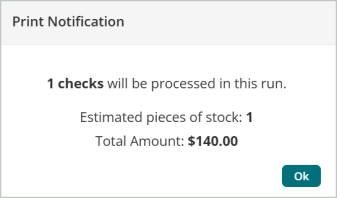
Review the print notification that lists the number of checks or vouchers that will be processed.
-
Select OK to continue.
-
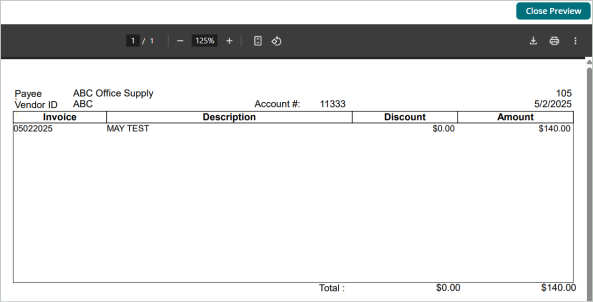
Review the check preview and confirm that the checks printed correctly. You can download the check preview here.
-
Select Close Preview.
-
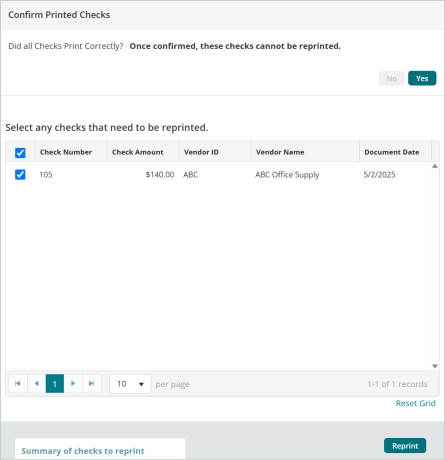
If the checks that you previewed above printed correctly, select Yes.
-
If any checks need to be corrected, select No to reprint the checks.

-
If you selected No above, select the checks that need to be reprinted, then Reprint.
-
Once you've printed all of the checks, you'll be directed back to the Pay Invoice Sessions page where you can view and post your session.