DonorSearch Integration
Millennium supports integration with the DonorSearch API. DonorSearch is a prospect research service that provides access to donor intelligence data through their API. If your organization has access to DonorSearch, use your organization's credentials to connect the service to your Millennium account.
Note: Ask your IT administrator for your DonorSearch API credentials.
Step 1: Grant permissions to use DonorSearch
To begin using DonorSearch, users must be granted permissions by a system administrator. To grant DonorSearch permissions to a user, go to Tools > System Upkeep > System Options > DonorSearch and click Setup  .
.
Note: Only your system administrator can grant DonorSearch permissions to a user.
Sign in as a system administrator and click "Grant permissions to another user". You can give users permission to import DonorSearch information, search it, or both.

Step 2: Set Up DonorSearch
After you have been granted permissions to use DonorSearch, proceed to Tools > DonorSearch > Setup.
Select which data fields to import from the DonorSearch service.
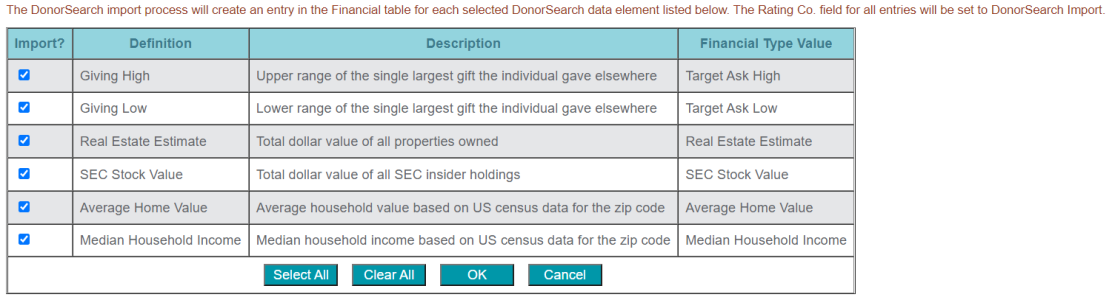
These are the definitions for the fields and columns on the Tools > DonorSearch > Setup page:
| Field/button | Description |
| Import Column | Specifies whether you want to import DonorSearch data for the DonorSearch data element. |
| Definition Column | Displays the definition of the DonorSearch data element. |
| Description Column | Displays the description of the DonorSearch data element |
| Demographic Type Value Column | Displays the value that Millennium will display for the DonorSearch data element in the Demographic table. |
| Financial Type Value Column | Displays the value that Millennium will display for the DonorSearch data element in the Financial table. |
| Select All Button | Selects all the DonorSearch data elements on the form. Click this button when you want to import DonorSearch data for all data elements listed on the form. |
| Clear All Button | Clears all DonorSearch data elements on the form. Click this button when you want to clear DonorSearch imports for all data elements listed on the form. |
| OK Button | Confirms the specified DonorSearch setup settings. |
| Cancel Button | Cancels any changes made to DonorSearch setup settings. |
Click OK to save your selections.
Note: The data fields imported from DonorSearch are split between the "Demographic" table and the "Financial" table (both under the "Prospect" category of tables). The image above does not display all the available fields from DonorSearch.
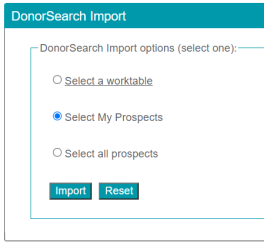
Step 3: Import from DonorSearch
You can choose from three options to import DonorSearch data:
1. Import based on an existing worktable
2. Import based on "My Prospects" (those assigned to you)
3. Import based on all prospects in the system
These are the definitions for the fields and columns on the Tools > DonorSearch > Import page:
| Field/button | Description |
| Select a worktable |
Specifies that you want to import DonorSearch data
for constituents listed in a worktable table. The worktable must be Worktables that a User owns are created when
|
| Select My Prospects | Specifies that you want to import DonorSearch data for prospects in your My Prospects Favorites view. For more information about My Prospects Favorites, see My Prospects Favorites. |
| Select all prospects | Specifies that you want to import DonorSearch data for all prospects. |
| Import Button | Imports the DonorSearch data elements specified on the DonorSearch Import Setup Form. |
| Reset Button | Clears the specified DonorSearch import option. |
Make your selection, then click Import. The imported data will now appear in the Demographic and Financial tables for the donor.
Importing DonorSearch data for a specific donor
If you only need to import data for a handful of donors, you can do so by going to Profiles > Next Search, opening the profile page of the donor, and clicking the DS Import button at the top of the donor's profile page.

You can also go directly to their DonorSearch profile by clicking DS Profile. This will take you to the DonorSearch website.