Report Builder
Use the Report Builder to configure and customize the data in your report. The report you select will display the fields and parameters specific to that report type.
There are two ways to enter the Report Builder:
-
By creating a New Report
-
By editing an existing report
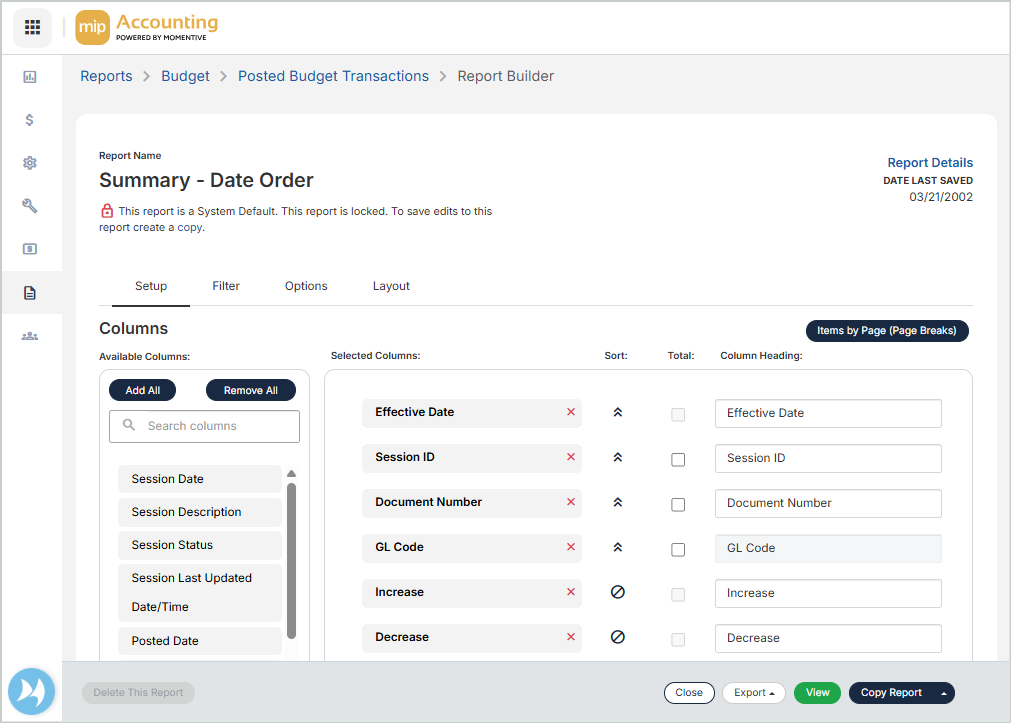
Report Name
-
For a new report, enter a name for the report.
-
For an existing report, the Report Name contains the existing report name. System Default report names can't be changed. To rename it, you'll have to create a copy.
Setup, Filter, Options, Layout
The Report Builder has four tabs used to configure reports:
- Setup
- Filter
- Options
- Layout
Use the Setup tab to modify columns included in your report.
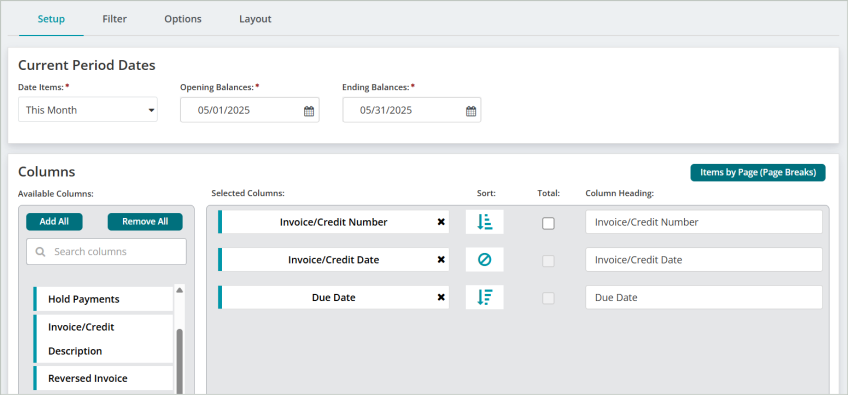
Dates
The date fields at the top of the page depend on the type of report you're working in.
Examples include:
-
Balances Dates
-
Current Period Dates
-
Current Transaction Dates
Financial Statement Formats
What displays in the Financial Statement Formats section (when available) depends on the report you're working in.
Note: Use the Available Formats drop-down list to select a Financial Statement Formats for the report.
Columns
The Selected Columns are what data will appear in the report. You can double click or drag-and-drop individual columns to move them to the Selected Columns area.
You can also use Add All | Remove All to quickly add or remove all of the Available Columns to the Selected Columns area.
Sort
There are three ways you can sort your columns:
-
Ascending - Sorts the columns in ascending order.
-
Descending - Sorts the columns in descending order.
-
No Sort - Does not apply any sorting to the columns.
Total
Check the Total box to create a total for that column in the report.
Column Heading
Edit the text in the column heading to customize how it will display in your report.
Items by Page (Page Breaks)
Use Items by Page to control how report data is divided onto separate pages. When you move an item to Selected Items, the report starts a new page for each unique value of that item, and prints the item’s value in the page header. You can also set how the item prints, how pages are sorted, and whether to include totals. If you select multiple items, the report will create a new page for each unique combination of those items.
Select how certain items will display as page headers in the report.
Use the Filter tab to set parameters for your report data.
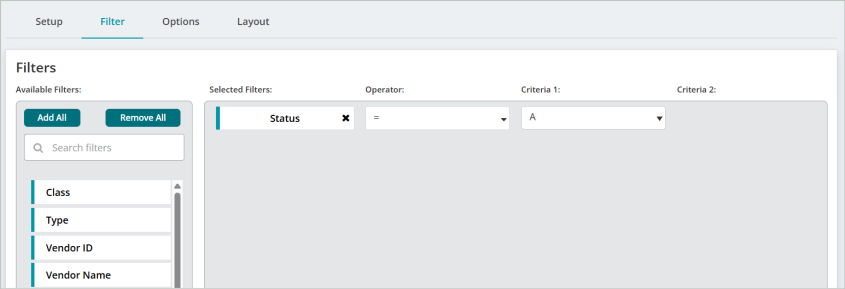
Set Filters
Operators
When filtering data, select an operator and enter criteria to determine which data to display.
| Operator | Definition |
|---|---|
| Equal to (=) | Include the data equal to the value in Criteria 1. For example, if "Status" is the Selected Filter and "A (Active)" is the Criteria 1, then include all data with a Status of Active in the report. |
| Not Equal to (< >) | Include the data not equal to the value in Criteria 1. |
| Greater Than (>) | Include the data that is greater than the value in Criteria 1. |
| Less Than (<) | Include the data that is less than the value in Criteria 1. |
| Between | Include the data that is between Criteria 1 and Criteria 2. To display a range of dates, numbers, or currency fields, use the Between and Not Between operators. |
| Not Between | Include the data that is not between Criteria 1 and Criteria 2. |
| Like | Include the data that matches the value in Criteria 1. For instance, there are ten Vendors with the word Office as part of their Vendor ID (Office Max, Office Depot, Office Machines, etc.). You want to send them your change of address card, so you run a report that includes their addresses. Select Vendor ID as the Selected Filter, Like as the Operator, and enter "%office%" in Criteria 1. You cannot use this operator for dates, numbers, or currency fields. |
| Not Like | Include the data that does not match the value in Criteria 1. For instance, you want to run a report that excludes all Vendors with the word Office at the beginning of their Vendor ID. You would need to select Vendor ID as the Selected Filter, Not Like as the Operator, and enter "Office%" in Criteria 1. You cannot use this operator for dates, numbers, or currency fields. |
| In | Include the data that is equal to the values in Criteria 1. This allows you to include a non-sequential series of values in filter criteria. For example, type 123, 498, 301 in Criteria 1. (Do not use the drop-down list and make sure you type commas between the series.) The system then includes only those three values in your data. |
Criteria 1
Enter or select a value to compare with the item in the Selected Filter column. When using Like or Not Like, use "%" to represent any number of characters. For example, you want results showing the Accounts Receivable offset account assignments. Since you only want information on AR accounts and they all begin with "AR," you would complete the criteria as follows:
- Selected Filter: Transaction Source
- Operator: Like
- Criteria 1: AR%
This filter limits the results to only transaction source codes that begin with AR, while the rest of the code could have any characters.
Please note the results if you choose the Like operator and the following criteria:
| Criteria | Result |
| %AR% | Returns data with "AR" in any position |
| AR% | Returns data that begins with "AR" |
| %AR | Returns data that ends with "AR" |
Criteria 2
Enter or select a value for the end of a range if the Compares To contains the Between or Not Between operators.
- If you filter on an item that has not been selected in the Report Body on the Content tab, the data will not appear on the report.
- When printing a report, items are filtered in numeric/alphabetic order.
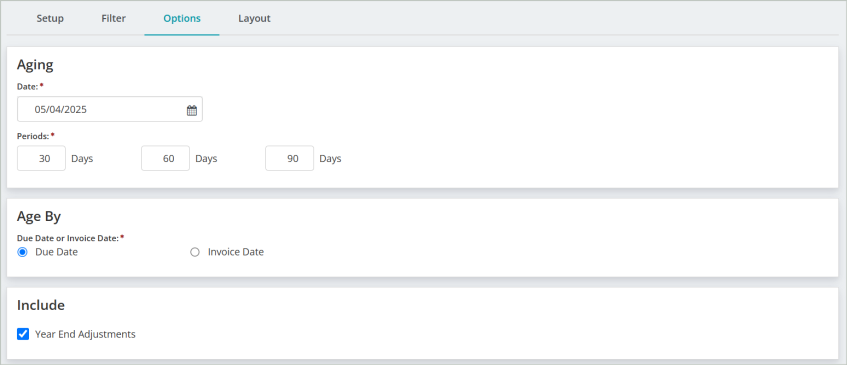
Use the Options tab to set specific rules for rendering your report. Different reports have different options available.
Below are all the possible options and their descriptions. Your report will not include every option identified.
| Option | Description |
|---|---|
|
Age By Due Date or Age By Invoice Date |
Select the date by which to age the transactions. To have them considered past due on the Due Date, select the Due Date option button. Otherwise, select the Invoice Date option. |
|
Aging Date |
This is the date to age the encumbrances or invoices. It is the actual date of the encumbrance, or the date the invoice should be paid. The Aging Date defaults to today's date when creating a report. However, once the report is saved, the next time it is opened, the aging date does not change to the current date. It is saved as the date the report was created (or whatever date was entered), and remains as that date until it is changed. |
|
Budget Version ID |
Select a budget version in which to base the budget amounts. Budget versions are created by the Administrator using Organization>Set Up Modules>Budget>Budget Versions. If the Budget module is not installed, "Revised" is the default budget version. |
|
Currency |
Select a non-functional currency type from the drop-down list to translate the financial statement to another currency that was previously set up by the Administrator (Organization>Currency Setup). Alternatively, select None to run the report in the functional currency. |
| Do Not Allow Changes to this Report | Select this option to lock the report and disallow changes. |
|
Employer Amounts |
Select this option to print employer amounts on the report. |
|
Encumbrance Amounts |
Select this option to have the EN (Encumbrance) and RV (Reserve for Encumbrance) accounts display in your format with the appropriate amounts. Whether the box is checked or not, this Encumbrance information is only available if you have set up the report format to include Encumbrance amounts. The report format setup is found at Reports>Financial Statements>Create Statement Format>Select Format tab. |
|
Encumbrances as Expenditures |
Select this option to include (when the box is checked) or exclude (when the box is not checked) the encumbrances as expenditures. This option is only available if the Encumbrances module is installed. |
|
Equity Section |
Select this option to include (when the box is checked) or exclude (when the box is not checked) the Equity Section on the printed report. Whether the box is checked or not, this Equity information is only available if you have set up the report format to include Equity. The report format setup is found at Reports>Financial Statements>Create Statement Format>Create Outline tab. |
|
Exchange Rate Override |
Enter the exchange rate of the currency selected. This overrides the Rate displayed. The system multiplies this new rate times the functional amount of the financial statement to translate the statement into the selected currency. |
|
First Aging Period |
Three different aging periods can be entered. The system uses this number and counts back from the Aging Date. The first aging period prints amounts with a date of 1 to the Aging Date. If you enter 30 here, the report includes amounts that are from 1 to 30 days from the Aging Date. |
|
Include GL Details |
Select this option to display account codes and account totals on this report. |
|
Only Revenue and Expense Type Codes |
Clear this option to show all account types on the report (except Cash, AP, and AR); otherwise, the report displays only revenue and expense accounts. |
|
Opening Entries in Detail |
Select this option to include opening balances (system or user opening entries) in detail. This entry type was designated during transaction entry. |
|
Rate |
The system displays the exchange rate for the selected currency based on the rate type and report Ending Balances. This was entered on the Maintain>Multicurrency>Exchange Rates form. The system multiplies the Rate times the functional amount of the financial statement to translate the statement into the selected currency. |
|
Rate Type |
Select an existing exchange rate type from the drop-down list. The system lists any custom types you created, along with two predefined rate types—Daily Spot Rate and Monthly Average Rate. Custom rate types were created using Maintain>Multicurrency>Exchange Rate Types. |
|
Replace total debits and credits with Balance |
Select this option to shows the net amount for each segment where totals have been requested. Otherwise, the report displays the total debits and total credits for each segment. |
|
Reporting Period |
Select how to display the reporting period amounts—Monthly, Quarterly, or Yearly. This period is based on the dates selected for the Opening and Ending Balances on the Setup tab. The reporting period amounts display in the Reporting Period Amount column on the Content tab. |
|
Rounding |
Select this option to round the amounts to the nearest whole number when printing the report. Select "None" to not round the amounts. |
|
Second Aging Period |
The second aging period includes amounts with a date of First Aging Period plus 1 day to Second Aging Period. If you enter 60 here, the report includes amounts that are from 31 to 60 days from the Aging Date. |
|
Segment to Substitute for GL Segment |
Select a segment to substitute for the General Ledger segment, or leave it at the default, None. The GL Code or GL Group Code must be selected in the Report Body in order to use this option. Selecting a group code is the same as filtering by group code on the entire report. |
|
Statement Level |
Select this option to determine the statement level to print to. These levels (1-3) were created when the section titles were entered using the Reports>Financial Statements>Create Statement Formats>Create Outline tab. |
|
Subtotal Detail by Calendar Month |
Select this option to subtotal the detail by a calendar month. This subtotal always calculates according to calendar month end, (1-31) not the month end of the Fiscal Year. For instance, if the Fiscal Year-End is February 28, the system generates totals through the last calendar day of each month: 1-31, 2-28, 3-31, or 4-30. The system does not generate totals as of the 28th of each month: 1-28, 2-28, 3-28, or 4-28. In order for this option to work, the Show Totals check box must be selected for at least one column (on the Content tab). |
|
Summarize Amounts |
Select this option to add amounts together and display one line item with the total amount. All document information must be identical for the system to add items together. |
|
Suppress Columns When the Column is Zero for the Entire Report |
Select this option to suppress columns that have all zeros. Please note that this only applies to columns that have a zero value throughout the entire report. For example, suppose there is a page break on the report by "Fund" and the columnar segment is "Program." The column may be zero for a Program Code on the first page, but that same column may NOT be zero for the Fund on page two. Therefore, the column will not be suppressed at all because there are values associated with it somewhere in the report that are not zero. |
|
Suppress Lines with All Zeros |
Select this option so that documents with zero amounts do not print. This eliminates records having zero in all amount columns. If it is not selected, every line prints, even if it has a zero value. |
|
Third Aging Period |
The third aging period includes amounts with a date of Second Aging Period plus 1 day to Third Aging Period. If you enter 90 here, the report includes amounts from 61 to 90 days from the Aging Date. |
|
Total Budget |
Select the start and end date you want to use to calculate and print total budget amounts. This range can exceed a 12 month interval. |
|
Total by Payroll |
Select this option to total processing group information. |
|
Unfavorable Balance Only |
Select this option to report only accounts showing unfavorable balances. For example, if the budget for an expenditure type account is $20,000 (USD) and the actual expenditures equal $21,000 (USD), there would be an unfavorable balance of $1,000 (USD). Revenue accounts are not shown. |
|
Unposted Actual Amounts |
Select this option to include unposted actual amounts. You can view how unposted transactions affect the detail balance information. |
|
Unposted Transactions |
Select this option to include unposted transaction sessions. You can view how unposted transactions affect the detail balance information. When this option is selected, "Unposted Transactions Included in Report" prints in the report header. |
|
Year-End Adjustments |
Select this option to include year-end adjustments on the report. This entry type (A Year End Adjustments) was designated during transaction entry. The entry is posted to the last day of the fiscal year. It allows the user to make year-end adjustments and print reports including or excluding an adjustment. |
Use the Layout tab to configure visual aspects of your report.
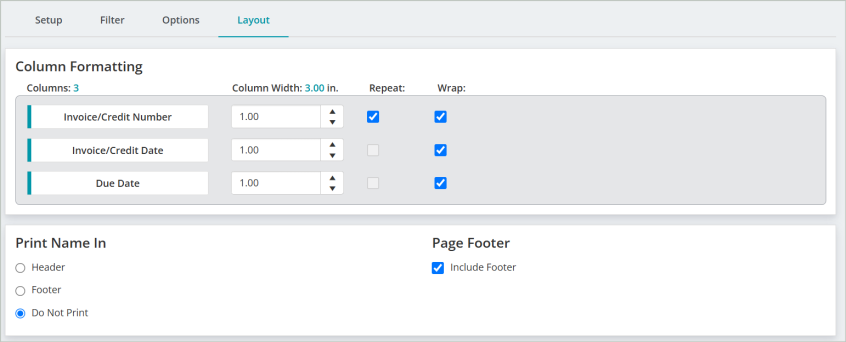
Column Formatting
Columns: Displays the type and number of columns in the report.
Column Width (inches): Use the input boxes to adjust the report column widths.
Repeat: Check the box to repeat the column in the report.
Wrap: Check the box to wrap the column in the report.
Print Name In
Select to print the report name in either the header, footer, or to not print the report name.
Page Footer
Include Footer: Check the box to include a footer in the report.
Font Setup
Adjust the fonts used in the report.
Page Section: The name of the report page section
Current Settings: The current font settings
Actions: Select Edit to edit the fonts.
Page Margins
Use the Top/Bottom/Left/Right input boxes to adjust the report margins.
Page Size
Use the Page Layout Size drop-down to select an available page size for the report.
Orientation
Select either a Portrait or Landscape orientation for the report.
Save & View Options
The Report Builder has the following actions available at the bottom of the screen. Some report actions are not available for default reports.

- Export - Select to export the report in PDF or XLS format.
- View - Select to generate a preview of the report.
- Copy Report - Select to save a copy of a default report.
- Save - Select to save any changes to an existing report or to make a copy of the report for further modifications.
- Delete This Report - Click to delete the report. System Default reports cannot be deleted.