Set Up the Payroll Module
Follow the steps below to set up the Payroll module in MIP.
Step 1: Add the Module
Navigate to Module Setup and select Add Module. From here, the Add Module Wizard will walk you through setup for the Payroll module.
For more information on setting up a module in MIP Cloud, see Add a Module.
Step 2: Set Up Default Information
Once you’ve added the module, use Module Setup to continue the setup. The Payroll tab displays the payroll disbursing accounts and interfund accounts, along with additional customization options.
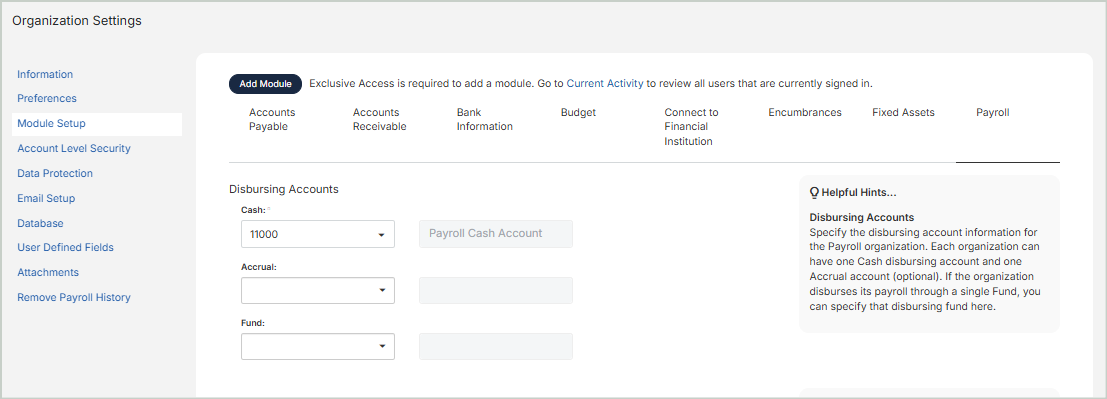
Disbursing Accounts
Cash: Enter an existing General Ledger "Cash" type account. You must select a cash account with a USD currency type.
-
If your organization uses more than one fund code to disburse payroll, this is the only field you need to fill in this section.
-
Each Payroll organization can have one Cash disbursing account, and one (optional) Accrual account.
-
You must have previously added at least one account in your Chart of Accounts to make a selection.
Accrual: Enter an existing APO (Accounts Payable), OA (Other Assets), or OL (Other Liabilities) GL account for the current organization.
Fund: Enter an existing fund disbursing account.
-
If the organization disburses its payroll through a single Fund, you can specify that disbursing fund here. In this case, credits in your payroll entries (to various liability accounts and cash for net pay) are recorded to this fund, even though payroll expenses may be allocated to multiple funds.
-
If you enter a disbursing Fund, then you must also enter the Interfund Accounts, "Due To" and "Due From", in the next section of this form. If payroll expense is allocated to funds other than the disbursing fund, the system can balance the payroll entries between funds using these interfund accounts.
-
If you use more than one disbursing fund for your payroll, you can skip the Fund field, as well as the Interfund Accounts fields in the next section of this form. In this case, credits in your payroll entries (to various liability accounts and cash for net pay) are recorded in each fund to which payroll expense is recorded.
Interfund Accounts
Enter the interfund account numbers. The accounts must be existing General Ledger accounts with an account type of Interfund Receivable (IFR), Interfund Payable (IFP), or Interfund Transfers (IFT).
Fraud Prevention Options
Lock Employee ID and User ID Association: Select this checkbox to change the User ID field through Payroll > System Setup > Employee Information to be displayed only after a User ID is selected and the form is saved.
Enable Deactivation of User ID Upon Employee Termination: Select this checkbox to enable the system to change the associated system User ID status to "Inactive" upon employment termination.
Note: The association between the Employee ID and system User ID is set up through Payroll > System Setup > Employee Information. The system User ID is set up by the Administrator through Administration > Users > Manage Users. It's recommended to use unique User IDs; otherwise, if the User ID is shared and one of the associated Employee IDs is terminated, the User ID will be set to "Inactive" and the remaining Users will be locked out of the system.
Warn Upon Employee Termination Linked User ID Deactivation: Select this checkbox to display a warning message about the Employee ID and system User ID association when that Employee ID's status is changed to "Terminated".
Note: This option is only available if the "Enable Deactivation of User ID Upon Employee Termination" checkbox is selected.
Hide Earning Code Rates and Amounts During Timesheet Processing: Select this checkbox to hide rates and amounts when entering timesheet information through Payroll > Processing > Process Payroll > Add Timesheets (visible on the "Summary" tab of the timesheet).
Note: The Rates and Amounts will display when reviewing calculated payroll (Payroll > Processing > Process Payroll > Calculate & Print Checks). Otherwise, to view earning code rates and amounts during timesheet entry, clear this checkbox. See Employee Timesheets for more details.
Include Historical Pay Code Information on Stubs: Select this checkbox to include pay codes that do not have current activity on a stub when you print checks and vouchers (see Print & Email Checks and Vouchers), or to include the pay codes that do not have current activity on a stub when reprinting pay stubs.
Step 3: Set Up Accounts & Codes
Follow the diagram below to set up the accounts and codes your organization will be using with the Payroll module. These accounts and codes must be set up before you can start processing payroll.
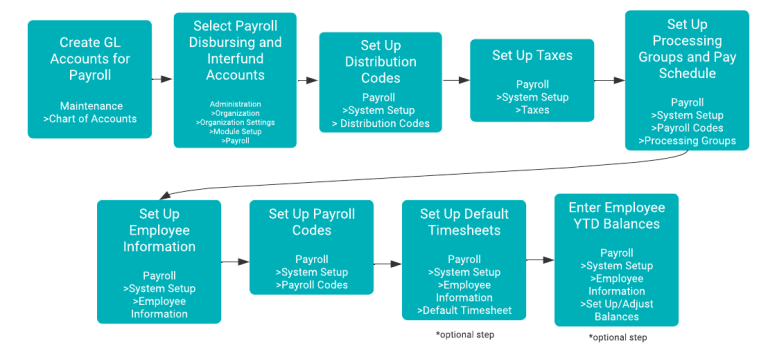
See the following help topics for each step outlined above:
-
To create GL accounts for payroll, see Chart of Accounts.
-
To set up distribution codes, see Distribution Codes.
-
To set up Payroll Taxes, see Taxes.
-
To set up processing groups and pay schedules, see Processing Groups.
-
To add employees to the system and update their information, see Employee Information.
-
To set up Payroll Codes, see Payroll Codes.
-
To set up default timesheets, see Default Timesheet.
-
To enter employee YTD balance information, see Set Up / Adjust Balances.
Step 4: System Setup
After installing the Payroll module and setting up your accounts and default module information, proceed to System Setup (Payroll > System Setup) to finish personalizing the Payroll module for your organization's needs.