Advanced Data Examiner Import Tool
This utility can also be launched from a machine that is not the IIS machine. You must first run the installation program included in the X:\Inetpub\wwwroot\mill\tools\ADE Install Files directory. The default installation directory is C:\ Millennium\Import Tools\Data Examiner Import Tool for all users, and for all operating systems.
Windows 2008, Windows Vista, or Windows 7 users: The ADE Import Tool will not run if it is installed in the C:\Program Files or in the C:\Windows directory.
The following information is covered in this topic:
- The ADE Import Tool Input File Layout
- Connecting to the ADE Import Tool
- Create a New Mapping Plan
- Edit a Mapping Plan
- Delete a Mapping Plan
- Import Data into the Pending Tables
- Use the Unattended Mode to Import Data
- Launch the Advanced Data Examiner in Automatic Update Mode After Import
- Advanced Data Mapping Features
- Additional Notes
- Validation Rules
The Advanced Data Examiner (ADE) Import Tool is designed to import data from an external input file into Millennium's pending tables. The utility is used to access the components that are used to create and save a Millennium to Input File Mapping Plan (Mapping Plan). Then, the utility is executed to import each record in the external input file into one or more pending tables. Once the input file is imported, then the Advanced Data Examiner is used to process the data and either insert new rows into, or update existing data rows in, these corresponding data tables. The Advanced Data Examiner can process the pending data all at one time, or it can process it in data sets if an import sources is assigned to the pending data when it is imported.
Sites with a license to use the Advanced Data Examiner will also have for their use the ADE Import Tool. All Data Examiner sites can import data into the pending tables that correspond to Millennium's Basic Data, Name, Address, Attribute, Relation, Giving, Jobs, School, Comments, Phone, Internet Address, Custom Bio, and Correspondence data tables.
Sites with a license to use the Prospect Tracking component of the Advanced Data Examiner can also use the ADE Import Tool to import data into the pending tables that correspond to the Tracking, Demographic, Finance, Media, Ratings, Research Source and Custom Prospect data tables.
Sites licensed to use the Membership component can also use the ADE Import Tool to import data into the pending table that corresponds to the Dues data table. When the Advanced Data Examiner processes the dues pending data, they will become transactions in the dues table and prompt the user to create Membership rows based on the imported data.
Sites licensed to use the Events component of the Advanced Data Examiner can use the ADE Import Tool to import data into the pending tables that correspond to the Registration, Event Guest, Event Income, Attendance, and Guest Items data tables.
The ADE Import Tool and Events topic discusses the particulars that are involved in importing Event data into the pending tables.
For details on operating the Advanced Data Examiner, refer to the Advanced Data Examiner topic.
The ADE Import Tool Input File Layout
The ADE Import Tool will accept files in standard dBase IV (DBF) or CSV formats.
The CSV file format is the one that is typically produced by Excel when saving a file as .CSV. Each field within a record must be separated by a comma. If the field value contains one or more commas, then that field is surrounded by quotes. If a field does not have any data, the comma must still be included as a placeholder for that field.
A CSV formatted file may or may not have a header record.
There are no specific requirements for the layout of the input file. It can contain as many fields as you want, or as few as one. The valid size of each field is limited only by the size of the corresponding field in Millennium. For example, if you have a field in your file and you want it to map to the namefirst field, then your input file field must be no larger than 30 characters.
If the input file includes dates, they must be formatted as yyyymmdd, or mm/dd/yyyy or mm-dd-yyyy. The year must include the century.
If the input file includes numbers, the number formatting can not include $ (dollar) signs or , (commas).
Connecting to the ADE Import Tool
Locating the ADE Import Tool
Millennium will install DataExaminerImport.exe on the IIS machine inetpub\wwwroot\mill\tools directory. You can also run the import tool on your own workstation, but you must first run the installation in order to install the program and install and register all required components. The installation is located on the IIS machine: inetpub\wwwroot\mill\tools\ADE Install Files.
Security and Permissions
You do not have to be a system administrator to run the ADE Import Tool, but you must have the following permissions.
- select permissions on the Millennium data tables that are involved in the import
- select, update and insert permissions on the pending tables
- select, update, insert, and delete permissions on the online_import_mapping system table.
The necessary permissions are granted by your system administrator, via User Security, Group Maintenance.
You must also have permissions to navigate to and open the external input file that you want to import, and permissions to delete files from the location of the program (DataExaminerImport.exe) file itself.
Concurrent Log On to Millennium
Important! Do not log on to Millennium while the import tool is running. If you log on to Millennium while the import tool is running, you may be immediately logged out of the import tool. Logging out of the utility will also log you out of Millennium.
Other users can remain logged on to Millennium while the ADE Import Tool runs.
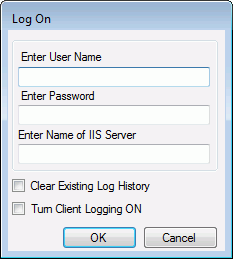
Logging On to the ADE Import Tool
Complete the following steps to log on to the ADE Import Tool:
- Log out of Millennium if you are currently logged on.
-
Navigate to the location of DataExaminerImport.exe and double-click on DataExaminerImport.exe.
-
On the Log On dialog, enter your User Name (User ID), password, the name of the IIS Server computer.
Note: If this is the first time that you are running the import tool from this location, then the fields on the log in screen will be blank. In subsequent runs, User Name and IIS Server will be populated with the values that were used in the previous run, so you need only enter your password and click OK.
-
Select the Turn Client Logging ON box to create a log of the internal calls that the utility will make to the IIS computer.
Note: You may be instructed by Customer Support to generate this log for troubleshooting purposes. This log of internal calls that the utility will make to the IIS computer will be located in the same directory as the DataExaminerImport.exe program, and it will be named ADEHttpCall.log. This log can grow very large, very quickly. You may want to select the Clear Existing Log History box to delete the contents of this log before this new ADE Import Tool session begins.
- Click OK.
- If you are currently logged on to Millennium, you will receive a message informing you to log out. Click OK, log out of Millennium and click OK on the log on screen to continue. Or click Cancel to end the utility.
- If your site does not have the appropriate licenses and correct registration keys necessary to use the Advanced Data Examiner, you will receive a message that instructs you to contact the Data Examiner Coordinator at Community Brands. Click OK and the utility will end.
-
Once you are logged on, you will receive a warning about using the same User Name to log on to Millennium while you are logged onto the ADE Import Tool. If you do not want to see this warning again, check Do Not Display This Warning Again and click OK. When your User ID and password are again used to log on to the utility from the same location, you will not see this warning message again.
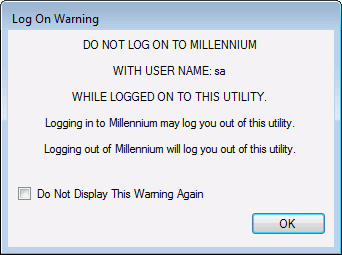
Note: You can re-display the warning message for your User Name and password by clicking on the ADE Import Tool Main Application Window.
- The Main Application Window displays after you have successfully logged on to the ADE Import Tool.
Create a New Millennium to Input File Mapping Plan
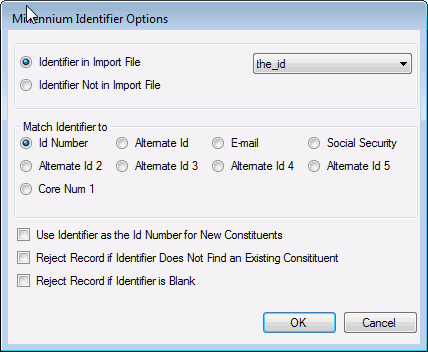
The Millennium Identifier
It is important to understand the concept of the Millennium Identifier before creating a mapping plan. The Millennium Identifier is a field in the input file. If you are importing information for existing constituents, the value of that field, for each input file record, should match one and only one existing Millennium constituent. If you are importing information for new constituents, the value of that field, for each input file record, can be used as the Millennium ID number for the new constituents.
When you create your new mapping plan,the first Millennium fields to map are the id number fields for all of the pending tables into which you will be importing records. This is done in one step on the Millennium Identifier Options window, in Step 8 below. (you do not map the id field separately for each pending table).
For existing constituents:
- The Millennium Identifier can be either the ID Number, one of the five Basic Data Alternate IDs, an unencrypted Social Security Number, the Basic Data Custom Number 1 field, or an email address. When the utility imports records, and if the Identifier is one of the Basic Data fields, it will try to match the value of the Identifier field with the relevant field in the Basic Data data table. Or if the Identifier is an email address, the utility will try to match it with existing email data records in the Internet Address and in the Phone table instead.
- If the Identifier does not match an existing constituent, you can select the option to either (1) import the input file record into the pending tables as a record that belongs, potentially, to a new constituent, or (2) reject the input file record and do not import it into the pending tables.
- If the Identifier matches more than one existing constituent, then the input file record will not be imported into the pending tables.
For new constituents:
- The Millennium Identifier will be the ID Number.
- When the utility imports input file records, it will verify, for every record, that the Identifier is not already used as an ID Number for an existing constituent. If it is already in use, then the input record will not be imported into the pending tables.
Your input file does not have to include a Millennium Identifier. If it does not, then all of the input file records will be imported as potential new constituents. When the imported pending data is processed through the Advanced Data Examiner, Millennium will assign the next available ID Number to the new constituents.
How will the utility know that you are importing data for existing constituents?
On the Millennium Identifier Options window:
- Choose the Identifier in Import File option.
- Select the name of the Identifier field from the list
 .
. - In the Match Identifier to option group, choose the Millennium field that you want to match the Identifier to.
- Do not select the Use Identifier as the ID Number for New Constituents box .
How will the utility know that you are importing new constituents, and that you want the value of a field in the input file to be the ID Number for the new constituents?
On the Millennium Identifier Options window:
- Choose the Identifier in Import File option.
- Select the name of the Identifier field from the list.
- In the Match Identifier to option group, select ID Number.
- Select the Use Identifier as the ID Number for New Constituents box .
How will the utility know that you are importing data for new constituents, and you want the system to assign the next available ID Number for the new constituents?
- On the Millennium Identifier Options window, choose the Identifier Not in Import File option.
Creating a New Mapping Plan
Complete the following to create a new Millennium to Input File Mapping Plan:
-
Log on to the ADE Import Tool. The Main Application window displays.
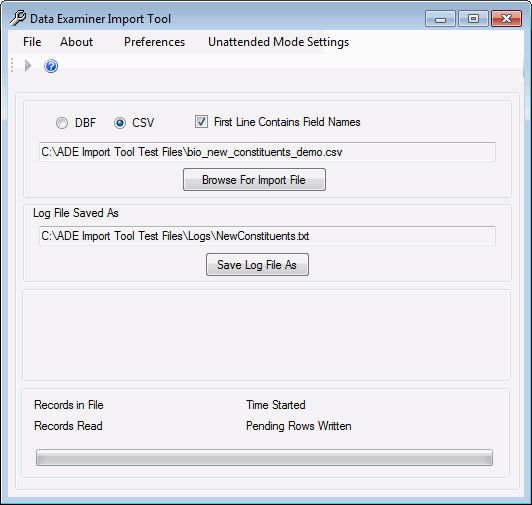
- If the input file is in dbf format, click DBF. If the input file is in CSV format, click CSV if it is not already selected.
- If your input file is in CSV format, and the first line names the fields and does not contain any data to import (it is the header), check the First Line Contains Field Names check box.
- Click Browse for Input File to search for and locate your input file. Once the file is identified, the text box directly above the Browse for Input File command will populate with its path and name.
- Click Save Log File As and navigate to the location where you want to save the Run Log file, as well as the other log and error files that are created when the import file will be imported into the pending tables.
-
Specify the name of the Run Log file and click Save. If a file already exists with that name, you will be asked if you want to overwrite it. The name of the run log file and its path will automatically be placed in the text box directly about the Save Log File As command.
Tip: If this is the first time you are running the import tool, the input file format defaults to CSV, the First Line Contains Field Names Option is Checked, the Input File text box is blank, the Log File text box defaults to the path of the location of the program file itself, and the name of the log file defaults to DataExaminerImportTool_Log.TXT. In subsequent runs, these options and paths will populate with the options and paths selected when the utility was previously run. To reset the Main Application Window back to these defaults, click on the File menu Reset All menu item.
- On the File menu, click Create a New Map.
-
The Millennium Identifier Options window displays.
- If the input file does not have a Millennium Identifier field, then click the Identifier Not in Import File option. All input records will be imported into the pending data tables as records that belong - potentially - to new constituents. When the records are reviewed through the Advanced Data Examiner, the next available Millennium ID Number will be assigned to them.
- If the input file does have a Millennium Identifier field, then click the Identifier in Import File option, and select the name of the field from the list .
- If you are importing information about new constituents and you want the value in the Identifier field to be the ID Number for the new constituents, then click ID Number (from the Match Identifier to options) and select the Use Identifier as the ID Number for New Constituents box.
- If you importing information about existing constituents, then choose the Identifier Type from the Match Identifier to options:
- If the identifier is the Millennium ID Number, click ID Number.
- If the identifier is one of the five Basic Data alternate ID numbers, click Alternate ID 1, Alternate ID 2, Alternate ID 3, Alternate ID 4 or Alternate ID 5.
- If the identifier is an email address, click E-mail.
- If the identifier is a social security number, click Social Security.
- If the identifier is a custom number (corenum1 from the Basic Data table), click Core Num 1.
- If the input file Identifier does not match an existing constituent, and you do not want to insert the pending table rows as belonging to a potential new constituent, then select the Reject Record if Identifier Does Not Find an Existing Constituent box.
- If you do not want to insert pending table rows for input records that have a blank Identifier field, then select the Reject Record if Identifier is Blank box.
Important! If you are importing data for existing constituents, then do not select the Use Identifier as the ID Number for New Constituents box .If you select Use Identifier as the ID Number for New Constituents, then the utility assumes that all of the input file records belong to new constituents; the utility will verify that the Identifier does not belong to an existing constituent. If it does, then the input file record will not be imported into the pending tables.
- Click OK.
- The Database Field Sort and Display Settings window displays.The mapping forms
that you will be working with will show a list, for each table, of all
of the Millennium fields that are available for mapping. You can
tell the import tool how you would like these fields to display. And,
the options you have chosen here will become your default sort and display
settings, so this window does not have to display each time that you create
a new mapping.
- To display the Millennium field names by the database field names, click Display Millennium Field Names by Column Name.
- To display the Millennium field names by the field alias names as they are stored in the fieldlst system table, click Display Millennium Field Names by Column Alias.
- To sort the Millennium fields in alphabetical order, click Sort Millennium Fields Alphabetically.
- To sort the Millennium fields by their ordinal position in the data tables, click Sort Millennium Fields by Position in the Data Tables.
Tip: If you do not want the Millennium Field Sort and Display Settings window to display every time you create a new mapping plan, select the Do Not Display These Options Again for this User box. When your User ID and password are again used to log on to the ADE Import Tool from the same location, the Field Sort and Display Settings window will not display, and the fields will be sorted and displayed using your previous settings. To change these settings, access the Field Sort and Display Settings window again by using the menu item on the Main Form.
- Click OK.
-
The Data Examiner Import Mapping Window displays. On this window, each Millennium data table with a corresponding pending table is represented by a tab. A mover
 is available so that you can scroll through
the tabs and display tabs that may be hidden. The Millennium Fields
list displays every Millennium field name that is available for mapping.
The Input Fields list displays the name of every input file field as well
as some other options. (If your input file is CSV formatted and the first
line does not contain field names, then the fields will be listed as field1,
field2, field3, and so on. ) Some of the table tabs will show Options
and Actions below the Millennium Fields
list and Input Fields list respectively. Using
the Options and Actions when creating a mapping plan are discussed in
Advanced
Mapping Features
below.
is available so that you can scroll through
the tabs and display tabs that may be hidden. The Millennium Fields
list displays every Millennium field name that is available for mapping.
The Input Fields list displays the name of every input file field as well
as some other options. (If your input file is CSV formatted and the first
line does not contain field names, then the fields will be listed as field1,
field2, field3, and so on. ) Some of the table tabs will show Options
and Actions below the Millennium Fields
list and Input Fields list respectively. Using
the Options and Actions when creating a mapping plan are discussed in
Advanced
Mapping Features
below.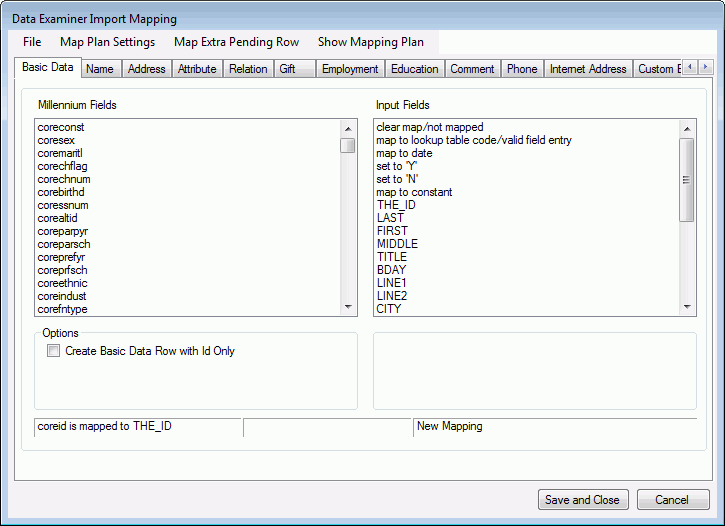
- Click the data table name of your choosing to begin.
- To map a Millennium field to a field in the input file, click the name of your choosing from the Millennium Fields list. Then, click the field name of your choosing from the Input Fields list.
- To map a lookup table-driven Millennium field to a lookup table code or value, click the name of your choosing from the Millennium Fields list. Then, click the map to lookup table code/valid field entry in the Input Fields list. On the Lookup Table entries form that displays, click the desired code/value from the list box of available, active lookups, click Add, and then click OK.
- To map a Millennium date field to a date constant, click the name of your choosing from the Millennium Fields list. Then, click the map to date item in the Input Fields list. To assign a date, use the date picker drop-down list to display a calendar, and to select the date of your choosing. To use the date the import is run, check the The Date the Import is Run check box and click OK.
- To map a Millennium flag field to 'Yes', click on the name of your choosing from the Millennium Fields list. Then, click on the set to 'Y' item in the Input Fields list. To map the flag field to 'No', click on the set to 'N' item in the Input Fields list instead.
- To map a Millennium field to a constant text string or constant number, click on the name of your choosing from the Millennium Fields list. Then click on the map to constant item in the Input Fields list. Enter your string or number in the input box that displays and click OK. Constant strings have a length limit of 255 characters and should only include alpha and numeric characters. Constant strings cannot begin with a '*' character, and cannot include tabs, line feeds or carriage returns.
- If you change your mind about how you have mapped a Millennium field, click on the name of the field from the Millennium Fields list. Then, click on the clear map/not mapped item from the Input Fields list.
- If you change your mind about how you have mapped the Millennium Identifier, on the Map Plan Settings menu, click on Millennium Identifier Settings. The Millennium Identifier window will re-display and offer you the opportunity to change your identifier settings.
- To map the fields for other Millennium data tables, click the table tab and repeat the steps above.
- To review your mapping plan while it is in progress, click on the Show Mapping Plan menu item. The Millennium Fields Mapping window displays and lists all Millennium fields that have been mapped so far, and the input file field names, lookup table values, dates and/or constants to which they are mapped. Click Close to return to the Main Mapping Window.
-
To save your mapping for the first time, click on the File menu, and click Save As. You will be prompted to supply a name for your mapping plan. When you enter the name (up to 100 characters long), the system your plan to the online_import_mapping system table. If you enter a name that is already in use, you will asked to confirm the overwrite. Once you have saved the mapping plan, you can then click on the File menu, and click Save to save further changes as you go along.
Note: When a mapping plan is saved, a log file is generated and located in the same directory as the ADE Import Tool application. The name of this log file is the same as the name of the mapping plan. This log will list the name of the mapping plan, the user who last saved the plan, the date the plan was last saved on, the name of the input file associated with the mapping plan when it was last saved, the Map Plan Settings/Options selections, and a summary of how the Millennium fields were mapped.
- To exit the Main Mapping window, click on Save and Close, or Cancel to cancel the process. After clicking Save and Close, you will be prompted to save any unsaved changes before the Main Mapping window closes.
- If you would like to create another mapping plan using the same input file, click the New Mapping item on the File menu instead of exiting the Main Mapping window. You will be prompted to first save any unsaved changes before the Main Mapping window is cleared and the Millennium Identifier Options window re-displays.
- Once you are returned to the Main Application window, you can configure the mapping plan so that when it is used to import data into pending tables, it will immediately launch the Advanced Data Examiner after the import process is complete. See Launching the Advanced Data Examiner in Automatic Update Mode After Import for details.
Note: If you want to create a new mapping plan with a different input file, you must first exit the Main Mapping window to return to the Main Application window. Choose a different input file, and then click the Create a New Map item from the Main Application window File menu.
Edit an Existing Millennium to Input File Mapping Plan
- Log on to the ADE Import Tool. The Main Application window displays.
- If the input file is in dbf format, click DBF. If the input file is in CSV format, click CSV if it is not already selected.
- If your input file is in CSV format, and the first line names the fields and does not contain any data to import (it is the header), check the First Line Contains Field Names check box.
- Click Browse for Input File to search for and locate your input file. Once the file is identified, the text box directly above the Browse for Input File command will populate with its path and name.
- Click Save Log File As and navigate to the location where you want to save the Run Log file, as well as the other log and error files that are created when the import file will be imported into the pending tables.
- Specify the name of the Run Log file and click Save. If a file already exists with that name, you will be asked if you want to overwrite it. The name of the run log file and its path will automatically be placed in the text box directly about the Save Log File As command.
- On the File menu, click the Select an Existing Map to Edit menu item. The Open Map Plan dialog box displays.
- Select the desired mapping plan from the drop-down list of available mapping plans. They will be listed in alphabetical order and you may choose any plan that has already been created even if you did not create it.
- If you would like to see how the Millennium fields are mapped before opening the mapping for editing, click View Plan. The Millennium Fields Mapping window displays and lists all Millennium fields and how they are mapped to input file field names, lookup table values, dates and/or constants. Click Close to return to the Open Map Plan dialog box.
- Select Open to Edit. The Main Mapping Window displays.
- Edit the mapping plan as you choose.
-
Click Save, or on the File menu click Save to save your changes. Or, if you would like to give this mapping plan, with its changes, a new name, click the Save As item on the File menu instead.
Important! If you are editing a mapping plan that was created by another user, you must save your changes with a different name.
-
If you would like to edit another mapping plan that uses the same input file, on the File menu, click the Open Mapping item on the File menu instead of exiting the Main Mapping window. The Open Map Plan dialog box will re-display. Select the desired mapping plan and click Open to Edit. The Map Application window will refresh to display the specifications of the chosen mapping plan.
Note: If you want to edit a mapping plan for a different input file, you must first exit the Main Mapping window to return to the Main Application Window. Choose a different input file, and then click on the Select an Existing Map to Edit item from the Main Application window File menu.
- Once you are returned to the Main Application Window, you can configure the mapping plan so that when it is used to import data into pending tables, it will immediately launch the Advanced Data Examiner after the import process is complete. See Launching the Advanced Data Examiner in Automatic Update Mode After Import for details.
Import Data into the Pending Tables
-
Log on to the ADE Import Tool. The Main Application window displays.
Note: You may also import data into the pending tables if you are already logged on to the ADE Import Tool and you have just created and saved, or edited and saved, a mapping plan. Once the Map Plan Name box holds the name of a mapping plan, the Run Import into Pending Tables item on the File menu and the
 icon
will be available for use. If this is the case, then skip to Step
11.
icon
will be available for use. If this is the case, then skip to Step
11. - If the input file is in dbf format, click DBF. If the input file is in CSV format, click CSV if it is not already selected.
- If your input file is in CSV format, and the first line names the fields and does not have any data to import (it is the header), check the First Line Contains Field Names check box.
- Click Browse for Input File to search for and locate your input file. Once the file is identified, the text box directly above the Browse for Input File command will populate with its path and name.
- Click Save Log File As and navigate to the location where you want to save the Run Log file, as well as the other log and error files that are created when the import file will be imported into the pending tables.
- Specify the name of the Run Log file and click Save. If a file already exists with that name, you will be asked if you want to overwrite it. The name of the run log file and its path will automatically be placed in the text box directly about the Save Log File As command. See More Information About Run Log and Error Log Files below.
- On the File menu, click the Select an Existing Map for Import menu item. The Open Map Plan dialog box displays.
- Select the desired mapping plan from the drop-down list of available mapping plans. They will be listed in alphabetical order and you may choose any plan that has already been created even if you did not create it.
- If you would like to see how the Millennium fields are mapped before importing the input data into the pending tables, click View Plan. The Millennium Fields Mapping window displays and lists all Millennium fields and how they are mapped to input file field names, lookup table values, dates and/or constants. Click Close to return to the Open Map Plan dialog box.
- Select Use To Import. The name of the mapping plan displays in the Map Plan Name box.
-
The Import Source drop list box lists all active entries in the ADE Source (ade_source) lookup table. If you want to assign a source to the pending data rows that you will be importing, then click on the desired entry. If you do not select an entry, and blank is an active entry in the lookup table, then the ADE source value will be blank.
Note: The next time that you import data into pending tables, the Import Source will default to the name that you have just selected, but you can then change it as desired.
- To run the import in debug mode; that is, validate the contents of the input file without actually importing rows into the pending tables, select the Verify Input File check box.
-
To launch the Advanced Data Examiner in Automatic Update mode immediately after the import process is complete, select the Run Examiner in Auto Update Mode after Import check box.
This may not yet be configured for the selected mapping plan. You can set this up now, before launching the import. See Launching the Advanced Data Examiner in Automatic Update Mode After Import for details.
- Click the icon or on the File menu, click the Run Import
Into Pending Tables menu item.
- The utility's Run Frame provides details about how many records are in the input file, the time that the import run started, the number of records that are read, and the total number of rows that are created in the pending tables.
- When the utility completes (either in debug or real mode) the Import Results window displays. Once you have reviewed it, click on Close to return to the Main Application window. See More Information about Import Results and Statistics below.
- On the File menu, click the Exit menu item to end the utility.
Import Data into Pending Tables in Unattended Mode
The ADE Import Tool can be set up to import data into the pending tables without user interaction.
Prerequisites include an already existing Millennium to Input File mapping plan. If it is desired that the Advanced Data Examiner be launched in Automatic Update Mode immediately after incoming data is imported into the pending tables, the selected mapping plan must already be configured to do so. See Launching the Advanced Data Examiner in Automatic Update Mode After Import for details.
The utility will not launch in unattended mode if the user is currently logged onto Millennium. The utility will not complete if the information that is necessary to run it is missing or incorrect.
- Log on to the ADE Import Tool.
-
Click the Unattended Mode Settings menu. The Unattended Mode Settings window displays.
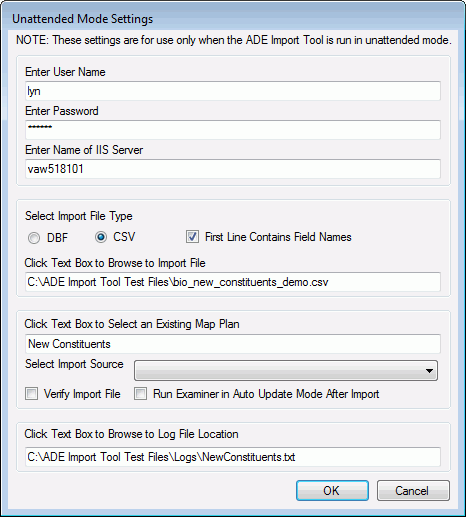
-
Enter the User Name (the Millennium User ID) and Password, and the name of the IIS server. The password will be encrypted before it is saved.
Important! If the user's password is changed by either the user or a system administrator, the new password must be entered in the Unattended Mode Settings window before the utility can be successfully executed in Unattended Mode again.
- Select the input file format. If the input file is in .CSV format, and the first line contains field names, check the First Line Contains Field Names check box.
- Click in the Browse to Input File text box to browse to the location of the input file.
- Click in the Existing Map Plan text box and select the name of the existing mapping plan that will be used to import the input file into the pending tables. The utility will verify that the mapping you choose matches the input file that you selected above.
- The Import Source drop list box lists all active entries in the ADE Source (ade_source) lookup table. If you want to assign a source to the pending data rows that you will be importing, then click on the desired entry. If you do not select an entry, and blank is an active entry in the lookup table, then the ADE source value will be blank.
- Check the Verify Input File check box and the utility will run in debug mode. No records will be written to the pending tables.
- Check the Run Examiner in Auto Update Mode After Import check box to launch the Advanced Data Examiner in Automatic Update mode after the import process is complete.
- Click in the Log File Location text box to browse to the location of the log file. Provide a name for the log file when you are prompted to do so. If you are overriding an existing log file, you will be asked to confirm.
- Click OK to save your settings to an initialization (INI) file. This file is located in the same directory as the ADE Import Tool application. Only one set of unattended settings information can be saved at any one time.
- Set DataExaminerImport.exe to launch at the time of your choosing. See More Information About Running the ADE Import Tool in Unattended Mode, below.
Delete an Existing Mapping Plan
- On the File menu, click Delete an Existing Map(s). The Select Map Plan(s) To Delete dialog displays.
-
Double-click the name of the mappings that you want to delete (this selects the box next to the name).
Note: If you are logged on as either 'sa' or 'MILLORA', you can delete any mapping plan that exists. If you are logged in as another user, you will only be able to delete the mapping plans that have been created by your User ID.
- Click OK.
- You will be asked to confirm the deletion. Click Yes to delete the mapping plans or click No to close the dialog without deleting the plans.
Launch the Advanced Data Examiner in Automatic Update Mode After Import
The ADE Import Tool can launch the Advanced Data Examiner (ADE) in Automatic Update mode immediately after it imports incoming data into the pending tables. This feature, if it is desired, must be individually configured for each mapping plan. It is possible to have one mapping plan that will launch the ADE after the importing data into the pending tables, and to have a different mapping plan that will not launch the ADE after the import process is complete.
Remember, when the ADE processes pending data in Automatic Update mode, there is no opportunity to review incoming data. You are accepting the incoming data 'as is'.
To configure a mapping plan to launch the ADE in Automatic Update mode after Import:
-
Use the Steps above to Create a new mapping plan, Edit an existing mapping plan, or Select a mapping plan for Import. Regardless of how you open a mapping plan, the name of the mapping plan must display in the Map Plan Name box on the Main Application window.

- Click Run Examiner in Auto Update Mode After Import.
-
Click Tables and Options. The Tables and Options form displays.
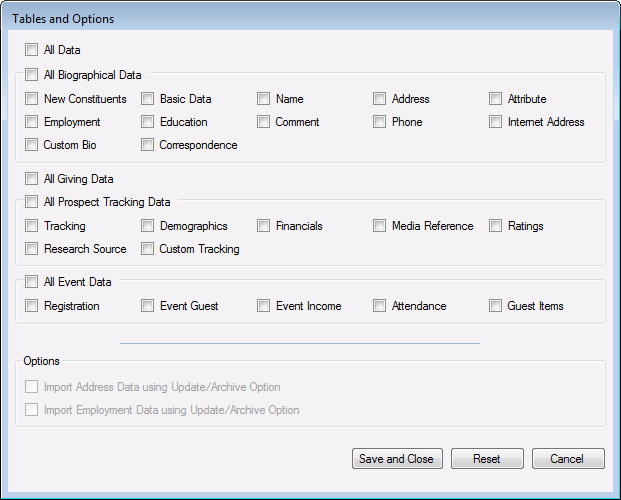
- The Tables and Options form has a check box to represent each data table that is available for Automatic Update in the ADE, as well as check boxes to Automatically Update All Data, All Biographical Data, All Giving Data, All Prospect Tracking Data, and All Event Data. Relations and Dues cannot be automatically updated in the ADE, so there will be no check boxes to represent those tables.
- Select each table that you want the ADE, when it is launched, to process in Automatic Update mode. Or, select one of the Automatically Update All options to tell the ADE to process more than one table at a time.
-
If you select Address, you can tell the ADE to process Address pending data in the Automatic Update/Archive instead of Automatic Update mode by checking Import Address Data using Update/Archive Option.
Similarly, if you select Employment, you can tell the ADE to process Employment pending data in the Automatic Update/Archive mode by checking Import Employment Data using Update/Archive Option.
Note: The ADE will process Address and Employment data if either Automatically Update All Data or Automatically Update Biographical Data is selected.
- Click Save and Close to save these settings with the mapping plan and to close the Tables and Options form.
- You can only configure the mapping plans that you own. If you want to use another user's mapping plan to import data and launch the ADE after the import, you must open the other user's mapping plan for Edit and then save it as your own.
- Even if a mapping plan has been configured to launch the ADE immediately after the import process is complete, you can run an import using that mapping plan without launching the ADE after. Uncheck the Run Examiner in Auto Update Mode After Import option before starting the import. Your Tables and Options settings for the mapping plan will persist, and will be available for the next time that you want to import data using this plan.
Advanced Mapping Features
Populate Pending Tables with ID Only
For each of the Biographical, Giving, Dues, and Prospect Tracking pending tables, a row can be written where only the id number field is populated. You might want to insert only id numbers into a pending table row if you have set Defined Defaults for all of the other relevant Millennium fields for that row. See the Advanced Data Examiner Setup, Defined Defaults topic for more details.
- On the Main Mapping window, click the data table tab of your choosing.
- Under Options, select the Create <table name> Row ID Only check box.
You will not be able to map any other fields for a pending table row if you have this option checked for that pending table.
You may choose this option for your mapping plan even if the input file does not contain a Millennium Identifier field.
Populate Pending Tables with ID and Type Only
For many of the pending tables, a row can be written where only the id number field and a 'type' field are populated. You might want to insert only these two fields into a pending table row if you have set up Defined Defaults for all of the other relevant Millennium fields for that pending table row. Or, you might deliberately choose to not select this option to prevent the insertion of 'blank' rows into a pending table.
Example: You have mapped Millennium address fields to fields in the input file, and you have either set a Defined Default for the value of the address type field, or mapped the address type field to a lookup table value, or mapped the address type field to a field in the input file. If all of the address information for a record in the input file is blank, and you checked Create Address Row with ID and Address Type, then the utility will create a row in the address_pending table with only the address type.
- On the Main Mapping window, click the data table tab of your choosing, that has this as an available option.
- Under Options, select the Create <table name> Row with ID and <name of type field> Only check box.
You will not be able to map any other fields for a row if you have this option checked for that pending table, and you must have mapped the 'type' field to a field in the input file or to a lookup table code in order to choose the option for a pending table.
You may choose this option for your mapping plan even if the input file does not contain a Millennium Identifier field.
This chart lists the pending tables that have this option available, and the type field that must be mapped.
| Pending Table | "Type" |
|---|---|
| Name | Name Type (nametype) |
| Address | Address Type (addrtype) |
| Attribute | Attribute Type (attrtype) |
| Relation | Rel Is A (relisa) and Rel Whose (relwhose) |
| Giving | Gift Type (gifttype) |
| Jobs (Employment) | Jobs Status (jobsstatus) |
| School (Education) | Institution (schlinstit) |
| Comment | Comment Type (commtype) |
| Phone | Phone Type (phntype) |
| Internet Address | Int. Address Type (inttype) |
| Correspondence | Correspondence Name (corrname) |
| Dues | Dues Type (duestype) |
| Demographic | Demographic Type (demotype) |
| Financial | Finance Type (fintype) |
| Media | Media Reference (mediaref) |
| Rating | Rating Campaign (ratecamp) |
| Research Source | Source of Research (resresourc) |
Match to Existing Data Records
For many of the pending tables, the utility can attempt to match an existing Millennium data row so that the input file information is inserted into the pending tables in a way that tells the Advanced Data Examiner to update the existing rows instead of inserting new rows. If a matching data row is found in Millennium, the ADE Import Tool will populate a field in the new pending table row (the suffix of the field name in the pending table will always be '_upkey') with the timekey of this matching record. If a matching row is not found, the utility will still create a new row in the pending table, but the '_upkey' will remain unpopulated.
- On the Main Mapping window, click the data table tab of your choosing, that has this as an available option.
- Under Options, select the Match to Existing Row by ID and <name of type field> check box.
- If the table name is Address, then select the 'type' to use from the list: Address Type or Address MC1 (addrmc1).
The option to match to existing data records is available only if the Millennium identifier is mapped to a field in the input file and if the appropriate selection 'type' field is mapped to either a field in the input file or to a value in a corresponding lookup table, or, if checking for an Address record match by Utilization, to either a field in the input file or to the Y/N flag.
If a matching data row is found in the database, and the incoming values of the mapped fields exactly match the values of those same fields in that matching data row, then a new row will not be created in the pending table. Only the non-system data fields that have been mapped will be considered when determining an ’exact match’. Information about all of the exact matches that are found will be written to a ’Duplicate Biographical Records’ log file.
Because only one Basic Data row and only one Tracking row can exist for a constituent, this option is not available for either of these tables. But the import tool will always attempt to match existing Basic Data and Donor Tracking records by the Millennium ID.
The import tool will not attempt to match a pending record to an existing relation record. However, the Advanced Data Examiner will attempt to match a pending spousal relationship to a spousal relationships that may already exist in Millennium.
There is no option to match existing event-related data table records. The ADE Import Tool will automatically attempt to match input file rows to existing Millennium event related rows. The import tool will look for matching Registration rows by id and event code, for matching constituent Event Guest rows by id and registration key, for matching Attendance rows for constituent guests by registration key, guest key and activity, and for matching Guest Item rows for constituent guests by registration key, guest key, activity key (if the item is linked to an activity rather than the event), and item. The import tool looks for matching event rows only to insure that duplicate rows will not be created. Event rows that match will not be updated with any new information.
This chart lists the pending tables that have the Match to Existing Row option available, the type field that will be matched, and the rules that the utility will follow when looking for a match.
| Pending Table | "Type" | Rule |
|---|---|---|
| Name | Name Type (nametype) | If more than one matching record is found, the one selected by the ADE Import Tool is the first one found. |
| Address | Address Type (addrtype) | If more than one matching record is found, the ADE Import Tool will select the address of that type that marked as preferred; if one is not marked as preferred, then the matching record selected is the first one of that type found. |
| Address | Address Utilization (addrmc1) | If more than one Millennium record matches, the addresses will be sorted in ascending order by address type, and the matching record selected by the ADE Import Tool is then the first address found. |
| Attribute | Attribute Type (attrtype) | If more than one matching record is found, the one selected by the ADE Import Tool is the first one found. |
| Jobs (Employment) | Jobs Status (jobsstatus) | If more than one matching record is found, the one selected by the ADE Import Tool is the first one found. |
| School (Education) | Institution (schlinstit) | If more than one matching record is found, the one selected by the ADE Import Tool is the first one found. |
| Comment | Comment Type (commtype) | If more than one matching record is found, the one selected by the ADE Import Tool is the first one found. |
| Phone | Phone Type (phntype) | If more than one Millennium record matches by Phone Type, the matching record selected is the first preferred phone of that type found; if one is not marked as preferred, then the matching record selected is the first one of that type found. |
| Internet Address | Int. Address Type (inttype) | If more than one Millennium record matches by Internet Address Type, the ADE Import Tool will select the first preferred internet address of that type found; if one is not marked as preferred, then the first internet address record of that type found will be the matching record selected. |
| Correspondence | Correspondence Name (corrname) |
If the Correspondence Sent Date (corrsentdt) field is also mapped, the one selected by the ADE Import Tool is the first one found that matches by Correspondence Name and Correspondence Sent Date.
If the Correspondence Sent Date field is not mapped, then the ADE Import Tool looks for all correspondence rows that match by Correspondence Name only, and selects the row with the latest Correspondence Sent Date. If is no Correspondence Sent Dates on any of the matching rows, then the ADE Import Tool will select the first row found. |
| Demographic | Demographic Type (demotype) | If more than one matching record is found, the one selected by the ADE Import Tool is the first one found. |
| Financial | Finance Type (fintype) | If more than one matching record is found, the one selected by the ADE Import Tool is the first one found. |
| Rating | Rating Campaign (ratecamp) | If more than one Millennium record matches by campaign, the ADE Import Tool will select the first active rating found from amongst the matches. |
Event Registration
The Registration table tab includes Actions to Map/Change an Event Guest and to Map/Change an Event Income row. These Actions are discussed in the ADE Import Tool and Events topic.
Check Date
You can instruct the ADE Import Tool to consider Millennium change dates when deciding to use new information from the input file to update matching existing Millennium data rows. If the matching data row was changed on or after the Check Date that you select, the utility will not write a pending row for the new information.
The change date on all matching data rows in all of the tables for which you are looking for matching rows will be compared to the Check Date that you set here.
Example: If you want to update the existing home address row and the existing home internet address (home email) row for a constituent and set the Check Date to 12/01/2014, the change date on the home address must be earlier than 12/01/2014 in order for it to be updated, and the change date on the home internet address must be earlier than 12/01/2014 in order for it to be updated as well.
You cannot set the Check Date for one type of data row only. You cannot select different Check Dates for different types of data rows.
Example: Continuing with the example above, you cannot compare the Change Date to the Check Date for the home address row only. You cannot set a Check Date for the home address and a different Check Date for the home internet address.
-
On the Main Mapping window, on the Mapping Plan Settings menu, click Set Check Date. The Pick Date window displays:

- Check Discard Input Record if Change Date is On or After check box to activate the date picker.
- Select the date from calendar that displays after clicking the Pick Date drop-down menu, and click OK.
Map More than One Row for a Pending Data Table
Your input file may contain information that can be used to create more than pending data row for the same table, in the same mapping plan. For example, each record in the input file has fields to create a home address and a business address. Or, each record in the input file has fields to create a preferred name, a nickname, and a maiden name.
- Map the fields that pertain to the first pending data row on the Main Mapping Window.
-
On the Map/Change Extra Pending Rows menu, click Map/Change Additional <table name>. The Extra Mapping form for <table name> displays.
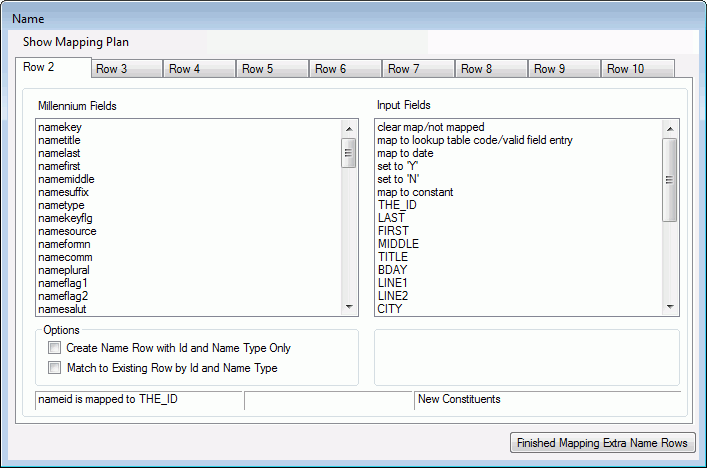
- Map the fields that pertain to the second data row on the first tab of the extra pending window.
- Click the second tab to map the fields that pertain to the third data row, if any.
- Continue until all of the fields for all of the pending data rows for that data table are mapped.
-
To review your plan while it is in progress, click on the Show Mapping Plan menu item. The Millennium Fields Mapping window displays and lists all Millennium fields that have been mapped so far, and the input file field names, lookup table values, dates and/or constants to which they are mapped. Click Finished Mapping Extra <table name> Rows to return to the Main Mapping Window.
The Finished Mapping Extra <table name> Rows in this example is Finished Mapping Extra Name Rows. This will vary depending on the table name.
- To return to the Main Mapping window, click Close.
The Millennium Fields and Input Fields that are listed are identical to the fields listed on the corresponding Main Mapping window table tab. If the table tab has the Create Row with ID and Type Only and the Match to Existing options available, then those options will be available on the Extra Mapping form as well. No Extra Mapping form will have the option to create a row with the ID Only.
Up to nine additional rows for each table can be mapped. You must map the fields for pending row 2 before you can map the fields for pending row 3, map to fields for pending row 3 before you can map the fields for pending row 4 and so forth.
The Map/Change Additional <table name> menu item is not available until you have mapped the fields for the first pending row on the Main Mapping window. And, you cannot entirely clear the mapping for first pending row if you have mapped additional pending rows (2, 3, and so forth).
Extra pending rows cannot be mapped for Basic Data, Tracking (donor), or Registration.
Map Correspondence Data
You can map input data to create and update Constituent and Non-Constituent Correspondence rows in Millennium. Map the Sent By (corrsentid) field to create and update Constituent Correspondence rows. Map the separate Sender name fields - Sender Title, First Name, Last Name, Middle Name and/or Sender Suffix to create and update Non-constituent Correspondence rows.
Additional Notes
Running the ADE Import Tool in Unattended Mode
There are a number of ways to launch the utility in an unattended mode. You might type this expression - DataExaminerImport.exe /u - into a Command Prompt or into a Windows Start/Run Command, or you might use a third party scheduling software. Whatever technique you choose, in addition to any appropriate navigation or path information required by whatever means that you are using to launch the utility, the file name for the utility must be entered as DataExaminerImport.exe /u Without the '/u' at the end of the expression, the utility will run in 'attended' mode.
A fatal error that occurs before the utility can open the sql error log file (for examples, the inability to read the initialization (INI) file, or an invalid output log file path) will be written to a text file located in the same directory as the utility, and named DataExaminerImport_UnattendedMode_Err_yymmdd_hhmmss.TXT, where yymmdd represents the day the utility is run, and hhmmss represents the time. A fatal error that occurs after the sql error log file is opened (for examples, incorrect log on credentials, or a mismatch between the input file and the mapping plan) will be written the sql error log file instead.
If the utility fails to run, the Run Log file will be empty, so it will be deleted.
When complete, the utility interface will automatically close. The user will need to check the log and error files to determine if the utility completed successfully. If completed successfully, Import Results and Statistics will be printed to the Run Log file.
Run Log and Error Log Files
The ADE Import Tool creates several log and error files as it runs. The Run Log file will list the date and time the import was run, the user who ran the import, the mapping plan used for the import, the path and file name of the input file that was imported, the number of records in the input file, the number of records in the input file that were processed, the number of records written to each of the pending tables, and the name and locations of any error files that may have been created during the import.
Two error files may also be created in the same directory as specified for the Run Log File. One error file will list any SQL errors that are generated. The naming convention of this file is "SQLERR_" + the date and time the import tool was run.
Example: "SQLERR_090312_100501AM.TXT" is a SQL error file generated by a run of the ADE Import Tool on March 12, 2009 at around 10 in the morning.
If the import tool has reason to reject any records in the input file, the second error file will list the first few characters of the record that was rejected, and the reason for the rejection. The naming convention of this file is <name of the input file> + "_REJECTERR_" + the date and time the import tool was run.
Example: "bio_new_constituents_demo_REJECTERR_090312100501AM.TXT" is a reject error file generated by a run of the ADE Import Tool run on March 12, 2009 at around 10 in the morning.
If the mapping used for the import is configured to match incoming data with existing Millennium data, a log file that lists the exact data matches that are found will also be created in the same directory as specified for the Run Log File. The naming convention of the Biographical Duplicate Records log is <name of the input file> +”_BIO_MATCHES_” + date and time the import tool was run.
If your site uses the Advanced Data Examiner's optional Events component, and existing registration, event_guest, attendance, and guest_items are found in Millennium, a log file listing the duplicate records will also be created in the same directory as specified for the Run Log File. The naming convention of the duplicate Events log is <name of input file> + "_EVENT_DUPLICATES_" + the date and time the import tool was run. Refer to the Advanced Data Examiner Import Tool - Events topic for more information on importing Event data using the ADE Import Tool.
When the utility is not run in debug mode, one additional file is created in the same directory as the Run Log file. This file will contain a copy of each input file record that was entirely rejected. If the input file type is .CSV, this file will be a CSV file with the naming convention of <name of input file>+ _REJECTRECORDS.csv. If the input file type is .dbf, this will be a .dbf file with the naming convention of R_ + the first 6 characters of the input files name.
The Data Examiner Import Tool Import Results (see More Information about Import Results and Statistics) form will display, alerting you of potential SQL errors or duplicated event records.
If no errors are encountered during the import, then both the error files and the file that was created to contain the copies of the rejected input file records will be deleted from the directory.
Import Results and Statistics
When the ADE Import tool is run to validate an input file or to import records into the pending tables, at its conclusion, the Import Results and Statistics screen displays. This screen will list the number of records in the input file, the total number of rows written to the pending tables and a breakdown of the number written to each pending table. If the import ran with no errors, this screen would display 'No Errors' beneath the summary statistics. If errors were encountered or duplicate data were found during the import, this screen would display the paths to the log and error files. You can navigate to the location of these log and error files by using Windows Explorer, or open each for viewing by selecting the corresponding button located beneath the Import Results display screen.
You can open and edit the file containing the records that were rejected by the utility by clicking View Rejected Records. You can view the contents of your input file by clicking View Input File, but you not edit the input file from this location.
You can also view SQL errors, duplicated event records, and logs.
In the event the Rejected Records file is opened first, it must be closed before the Input file is opened. If the Input file is opened first, it must be closed before the Rejected Records file can be opened.

Default Values for Pending Table Columns
For each entry in the pending tables, the user ID field will default to the user that is running the mapping utility, the change date will default to the date the utility is run, and the create date will default to the date the utility is run.
Pending Basic Data Records
Existing constituents will have a record in the Basic Data pending table only if there are updates to be made to their corebio information.
New constituents will always have a record in the Basic Data pending table and an ID number will be assigned from the pendingid system table. Their id numbers in all of the pending tables will be preceded by an *. But their id numbers, once created in Millennium, will not be preceded by this *.
Primary Keys
If a data table's primary key (for example, namekey) is mapped to a field in the input file, and the value in the input file is not blank and is not 0, the value must match an existing key in the corresponding data table. If it does not, then the input record will be rejected and an error message will print.
If the value in the input file is blank or 0, then the row in the corresponding pending table will go in as a new Millennium data row. If the value in the input file matches a key in the corresponding data table, then the row in the corresponding pending table will be inserted as an "update" row. The _upkey will be populated with this primary key and the pending table's id number field will be populated with the Millennium ID that is associated with this primary key. This will 'inform' the Advanced Data Examiner to load the pending row to the user as an update to the existing Millennium record instead of as a row to insert.
You can not map the primary key for the corebio or donor tables. The ADE Import Tool will always automatically look for existing Basic Data and Tracking rows by id number.
If your site uses the optional Events component, you can map the primary key field for Registration rows if you want to link new guest rows and/or new event income rows to an already-existing Millennium registration row. You may also map the primary key field for Event Guest rows if you want to link new attendance rows or item rows to a guest who has already been registered for an event. Finally, you may map the primary key for Activity Attendance rows if you want to link item rows to a specific activity a guest has been registered to attend. The Data Examiner will not update any Registration, Event Guest or Attendance rows. You do not have the option of mapping the primary keys for Event Income or for Guest Items.
ADE Import Tool Validation Rules
ID Number Fields
If an ID number field (for examples, relrelatid, coremtchid, but not the id number of the owner of the pending data row) is mapped to a field in the input file, the ID number must either belong to an existing constituent or be blank. If it is blank, then nothing will populate the field in the corresponding pending table row. If it is not blank and the ID does not belong to an existing Millennium constituent, then the input record will be rejected and an error message will print.
Lookup table data
Lookup table data will be validated. If it is not a valid lookup table entry (valid is defined as having an entry in the lookup table and that entry is active), the input record will be rejected and an error message will print.
Check Constraints
Fields that have a database check constraint will be validated. If this is not a value that is allowed in the database field, then the input record will be rejected and an error message will print.
Note: The ADE Import Tool will only allow N (for No) and E (for External) as valid values for ecomisrcpt (Issue Serialized Receipt) field.
Dates
Date data will be validated. If a data is not valid, then the input record will be rejected in its entirety and an error message will print.
A valid date has the format yyyymmdd, or mm/dd/yyyy or mm-dd-yyyy. The year must include the century.
Characters
Character (string) data will be validated as to length; if length exceeds the maximum allowable length, the input record will be rejected in its entirety and an error message will print. In order for the Data Examiner to function properly, the first character in a field cannot be the * character. If it is, the input record will be rejected in its entirety and an error message will print.
Numbers and Money
Number and money data will be validated as to proper format. Number and money formatting can not include $ (dollar) signs or , (commas). If alpha and other characters are entered instead of numbers, then the input record will be rejected and an error message will print.
Validation Rules for Relationships
If your import writes relation rows to the relation_pending table, these additional validation routines are performed.
- If one of the relationship type fields is mapped, then they both must be mapped That is to say, if the Rel Is A (relisa) field is mapped, then the Rel Whose (relwhose) must be mapped, and visa versa.
- If the relationship type fields are mapped, then they must both be mapped to fields in the input file, or they must both be mapped to lookup table codes. That is to say, if the Rel Is A (relisa) field is mapped to a code in the relationships lookup table, then the Rel Whose (relwhose) field must be mapped to a code in the relationships lookup table as well, and visa versa. And if the Rel Is A field is mapped to a field in the input file, then the Rel Whose field must also be mapped to a field in the input file.
- If the relationship type fields are mapped, then the relationship must be one that is allowed by the system (see Allowable Relationships).
- If both the Rel Is A ID field (relid) and Rel Whose ID field (relrelatid) are mapped, then the utility checks for duplicate spouses. The Rel Is A ID can own a constituent spousal relationship with the Rel Whose ID only. The Rel Is A ID can own a non-constituent spousal relationship as the Advanced Data Examiner will give you the opportunity to change this to a constituent relationship if you so choose. The Rel Whose ID can own a constituent spousal relationship with the Rel Is A ID only. However, the Rel Whose ID can not own a non-constituent spousal relationship.
Validation Rules for Giving and Dues
- If your import writes gift rows or dues rows to the ecommerce_pending table, these additional validation routines are performed.
- If you map any of the ecommerce_pending credit card related fields (see the Pending Tables topic for specific field names and details), and the input record does not have a tender of credit card ('cc') then the input record will be rejected and an error message will print.
- If you map any of the ecommerce_pending bank draft related fields, and the input record does not have a tender of bank draft ('bank'), then the input record will be rejected and an error message will print.
- Bank Routing numbers (ecomroute) will be validated if the tender is bank draft. If invalid, then the input record will be rejected and an error message will print.
- If you map any of the ecommerce_pending fields to the ecombaddr1 fields if the input record has a non-blank, valid value for this field, then the ecombaddr1 (ecomaddrl1 if tender = bank) field in the ecommerce_pending table will be populated with the value from the input record. If the input record has a blank value and other fields that are mapped contain data, then the ecombaddr1 (ecomaddrl1 if tender = bank)ecomguid field will be populated with ’~~’. The same is true for ecomguid, ecombaddr2, ecombcity, ecombstate, ecombzip, and ecombcntry.
- If your site subscribes to Paya Payment Solutions, the following additional validation checks are performed for Giving and Dues tendered by credit card or bank draft:
- If you are creating a mapping plan for existing constituents, and your constituents have a preferred name and preferred address on file, it is not necessary to map the required biographical related ecommerce fields unless you want to override the values that are already in Millennium for these fields. It is important to note that if you map just one of the ecommerce billing address fields, even one that is not required, then the ecommerce_pending address fields will no longer be populated with the constituents' preferred address, but instead will be populated with the mapped values. For example, your constituent has an address of 5 Buford Rd, Williamsburg, VA 23188 and you do not map any billing address field. The billing address line1 (ecombaddr1) field will hold the value 5 Buford Rd., the value of billing city (ecombcity) is Williamsburg, the value of billing state (ecombstate) is VA and the billing zip code (ecombzip) field will hold 23188. If you now decide to map billing address line 2 (ecombaddr2) to field in the input file, and do not map any of the other billing address fields, and for your constituent the billing address line 2 field has a value of PO Box 212, then the following would result: billing address line1, city, state and zip fields will be blank, and billing address line 2 will hold the value PO Box 212.
- If you are creating a mapping plan for new constituents, it is not necessary to map the required ecommerce billing name and address fields if you have mapped the name_pending fields to fields in the input file and the address_pending fields to fields in the input file. The ADE Import tool will use the values from the mappings on the first mapping tab for name_pending, and on the first mapping table for address_pending to populate the billing name and address fields. Again, it is important to note that if you map just one of the ecommerce billing address fields, even one that is not required, then the billing address fields will not be populated with the values from the address_pending table fields you have also mapped.