MIP Data Mapping Tool
The GiveSmart + MIP Integration allows organizations to transfer accounting and financial data from GiveSmart into MIP. Using the Data Mapping Tool, you can easily map your GiveSmart transactions to your general ledger in MIP.
Use the header menu at the top right corner of any page to view system notifications, access the online help, and review account information.
Notifications: Select the Notifications icon to view an audit log of the system. The log displays the latest sync notifications, warnings, and confirmations.
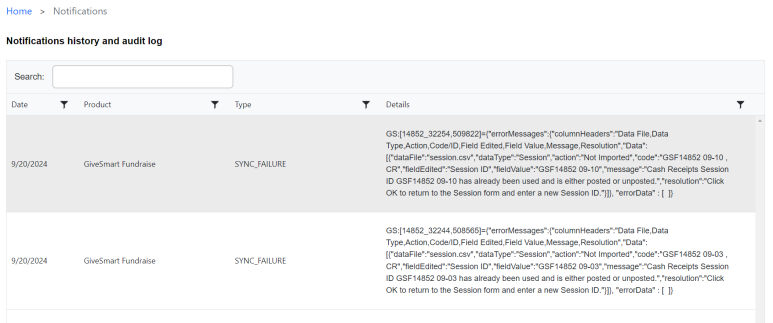
The notifications history and audit log provides a more detailed history of the system notifications.
Date: The date of the notification.
Product: The GiveSmart product associated with the notification.
Type: The type of notification. Possible values and definitions are listed below.
- SYNC_START - The sync process has started.
-
SYNC_END - The sync process has completed.
-
SYNC_ITEM_FAILURE - A transaction failed to transfer to MIP.
-
SYNC_ITEM_SUCCESS - A transaction successfully transferred to MIP.
-
SEND_TRANSACTIONS - The list of transactions has been sent for processing.
-
GS_TRANSACTION_SELECTION - The system determines which transactions have been mapped and which remain unmapped to MIP.
-
GS_MAPPING_SUMMARY - The system pulls the latest mapping information for each GiveSmart activity.
-
GS_MAPPING_DETAIL - The system pulls the latest mapping information for each GiveSmart transaction.
-
SOURCE_SIMPLIFIED - The system collects the needed information for transaction mapping.
-
SOURCE_COLLECTED - The system reads the information from GiveSmart.
Details: The details of the notification.
Help: Select the Help icon to take you to this online help page for the MIP Data Mapping Tool.
Account Information: The Account Information displays the email address of the user that's logged in as well as their organization. Select the drop-down to see more options for Account Information.
-
Email Options - Select to opt in and out of receiving automated status emails from the mapping tool. To opt out of specific emails, uncheck the emails that you do not want your organization to receive. To opt in to emails, check the emails that you wish to receive. Save Changes to save your edits.
-
Sign Out - Select to log out of the MIP Data Mapping Tool.
Follow the steps below to map your GiveSmart transactions into MIP:
1. Log in
If you have not already logged in, complete the steps below to sign in to the MIP Data Mapping Tool.
-
Navigate to the mapping tool login page.
-
Enter your Email Address, then select Send Mapping Tool URL. You will receive an email with a link to access the data mapping tool.
-
Follow the instructions in the email to proceed to the data mapping tool and sign in.
2. Select your Givesmart product
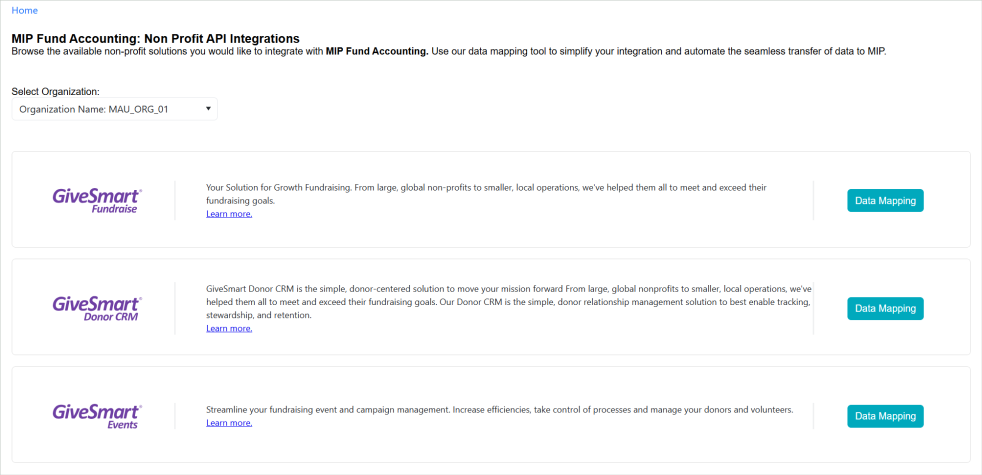
The landing page of the MIP Data Mapping Tool lists the available GiveSmart products for your organization.
-
Select Organization: To change your organization, select an organization from the drop-down menu. The GiveSmart products that display depend on the organization selected.
Note: If you are only part of one organization, this field will not be visible.
-
Data Mapping: Once you're ready to map your data, select Data Mapping to the right of your GiveSmart product.
3. Select a GiveSmart activity available for data mapping
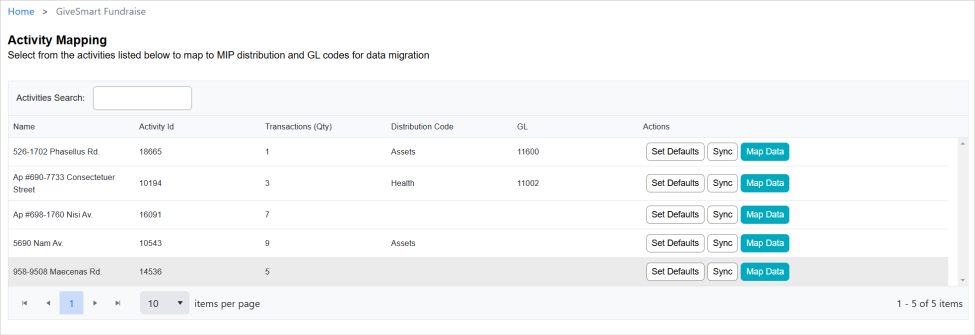
The grid displays information about each activity or campaign. This is where you can set default coding and select the activities to map data.
The "Actions" column contains the following options:
-
Set Defaults: You have the option to apply default codes to activities and their corresponding transactions. This allows you to apply coding to multiple transactions simultaneously. Select this option to set the default codes for an activity, then Save Changes to save your edits.
-
After setting default codes for an activity, you must then apply those defaults to the transactions on the next page.
-
-
Sync: Optionally, select Sync to initiate a manual sync of data between GiveSmart and MIP. An automatic data sync takes place overnight, but you can also select this option to sync data on command.
-
Map Data: Once you're ready to start mapping data for an activity, select Map Data.
4. Apply your distribution and GL codes to the transactions
![]()
The grid displays all of the transactions available for data mapping. This is where you'll apply your MIP distribution and GL codes to the items listed. You can either apply codes to transactions individually using the drop-down fields, or apply codes to transactions simultaneously using the default values.
Applying codes to transactions individually:
-
To apply codes to each transaction manually, select the drop-down fields in the "Distribution Code" and "GL" columns to select a code for the transaction.
-
A green arrow in the "Map To" column indicates that the transaction has been successfully mapped, while a gray arrow signifies that a selection needs to be made.
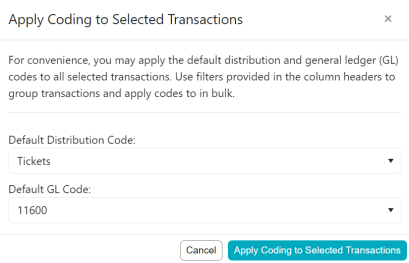
Applying codes to transactions simultaneously:
-
To apply codes to multiple transactions using your default values, select the checkbox next to one or more activities, then select Apply Codes to Selected.
-
In the pop-up window, each code will default to the selection that you made on the previous page, but can be overwritten at any time. To apply the codes, select Apply Coding to Selected Transactions.
-
Your new coding will now be populated in the "Distribution Code" and "GL" columns in the grid.
Other actions:
-
Get Latest Coding from MIP: Select to retrieve the most up-to-date coding from your MIP account.
-
Sync Now: Select to initiate a manual sync of data between GiveSmart and MIP.
5. Save your changes
Once you've made your mapping selections, Save Changes to save your edits.
The data will automatically sync overnight. Optionally, select Sync Now to initiate a manual sync of data.
FAQs
The GiveSmart + MIP integration is tailored to your organization's needs but typically includes settled GiveSmart transactions, such as:
-
Donations
-
Ticket sales
-
Auction revenue
-
Event purchases
A platform is configured to establish a connection between GiveSmart and MIP. Using the mapping tool, GiveSmart transactions are aligned with the MIP general ledger by utilizing MIP distribution and GL codes. Each GiveSmart module has its own mapping, and the data is synced via API.
Yes, the GiveSmart + MIP integration can be customized based on your organization’s needs, allowing for tailored data mapping and configurations that best suit your specific operational requirements.
The data sync takes place nightly at a predetermined time, ensuring that financial reports are always up-to-date without manual intervention.