Edit Budget Worksheets
Use the budget spreadsheet to define the data and properties of your budget worksheet.
Select a tab below to learn more about the details in each section.
- Status
- Configuration
- Notes
- Attachments
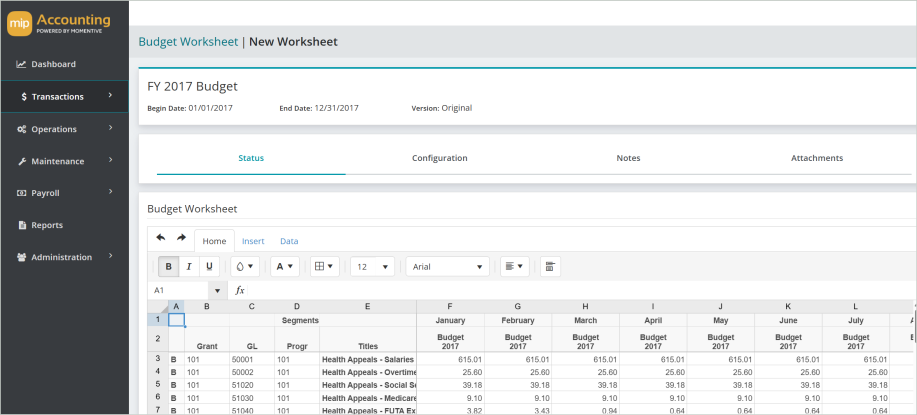
The Status tab displays the following worksheet information.
Last Modified Date: The last date the worksheet was modified
Modified By: The user who last modified the worksheet
Transfer Date: The worksheet transfer date
Transferred By: The user who last transferred the worksheet
Posted Date: The posted date
Posted By: The user who last posted the worksheet
The Configuration tab shows the selected account types to validate: Expense Accounts, Revenue Accounts, both account types, or all available account types.
Use the Notes tab displays any notes recorded on this budget worksheet.
Use the Attachments tab to add any associated documentation to the worksheet.
Budget Worksheet
Use the spreadsheet to create and modify your budget worksheet. See Keyboard Shortcuts for more information on working with tables of data.
![]()
The top row of the worksheet toolbar has a pair of Undo/Redo buttons and the following tabs:
Home: The Home tab is a toolbar providing spreadsheet formatting options for text and cell entries. Formatting options are not available for transferred worksheets.
Insert: The Insert tab is a toolbar providing options to insert and delete spreadsheet rows. Inserting spreadsheet rows is not available for transferred worksheets.
Note: Exceeding the cell count limit for a worksheet displays the worksheet cell count limitation message.
Beginning with a spreadsheet containing 2642 rows covering 16 months:
- The budget entry cells = 42,272 cells
- The additional minimum columns of data within the worksheet of the rows listed below = 15,852 cells
- GL Code
- Titles
- Totals
- Spread Totals
- Description
- Status
Grand total = 58,124 cells.
Adding a column with the same number of rows while increasing the months covered from 16 to 17 would increase the cell count total to 60,766 causing the worksheet cell count limitation message to display.
Data: The Data tab is a toolbar providing these worksheet data options:
Import: Select Import to import an external worksheet into MIP Cloud. Import is not available for transferred worksheets.
Export: Select Export to download a copy of the worksheet to a local drive. Export is not available for transferred worksheets.
File name: Enter a file name for the exported file. The default file name is Workbook.
Save as type: Select the drop-down toggle to select to save the file type as:
-
Excel Workbook (.xlsx) (Default)
-
Portable Document Format (.pdf)
Copy Worksheet: Select Copy Worksheet to create a copy of the worksheet.
Budget Item/Comment Line: By default, column A contains the letter "B", indicating that the row is a budget item and is included in Validate Worksheet and/or Transfer Budget Worksheet . Click to remove a line from the budget without deleting the information. The "B" disappears, and the row is now a Comment Line. A comment line is not included in validations and/or transfers and extra comment lines are useful to indicate subtotals and clarifications. Conversely, click on a blank cell in column A to select that row for validations/transfers and the 'B' displays. Budget Item/Comment Line is not available for transferred worksheets.
Filter: Select Filter to sort and filter worksheet content.
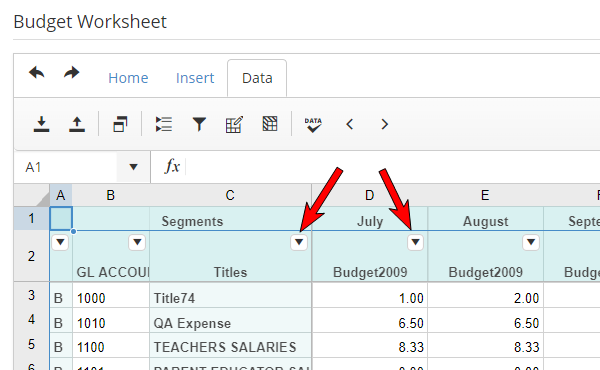
Sort and Filter
Sort range A to Z: Select to sort the column data from A to Z.
Sort range Z to A: Select to sort the column data from Z to A.
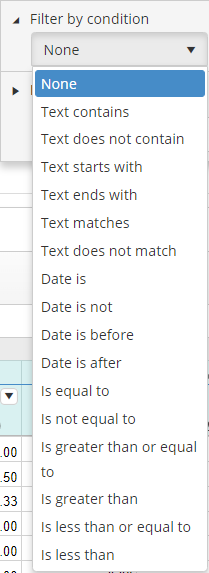
Filter by condition: Select the arrow next to Filter by Condition and select the required condition from the drop-down list.
Filter by value: Filter by value displays by default when clicking a filter worksheet arrow. Use Search (optionally) to narrow the filter list and select the required filter or filters from the list.
Select Apply to apply the sort and filter criteria to the budget worksheet or Clear to discard the sort and filter criteria.
Modify Selected Items: Select to make changes to highlighted items on the worksheet. Modify Selected Items is not available for transferred worksheets.
Note: This form is a convenient way to edit a group of budget items; sometimes, however, it is easier to just perform budget item edits by typing in the new information on the budget worksheet.
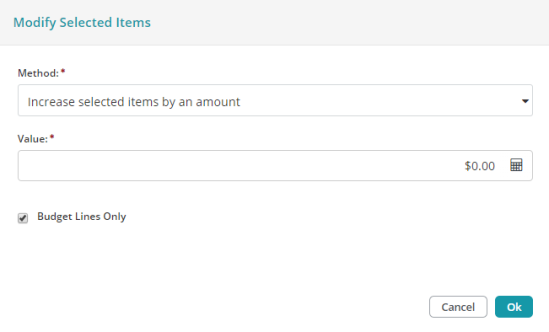
Method: Select one of the following methods:
- Increase selected items by an amount: Use this method to add the amount entered in the Value box to every selected cell in a budget entry column.
- Decrease selected items by an amount: Use this method to subtract the amount entered in the Value box from every selected cell in a budget entry column.
- Increase selected items by %: Use this method to increase every selected cell in a budget entry column by the percentage entered in the Value box.
- Decrease selected items by %: Use this method to decrease every selected cell in a budget entry column by the percentage entered in the Value box.
- Allocate fixed increase among selected items: Use this method to evenly distribute the amount entered in the Value box among the selected cells in a budget entry column.
- Allocate fixed decrease among selected items: Use this method to evenly reduce the amounts selected in a budget entry column by the amount entered in the Value box.
- Set each selected item to an amount: Use this method to replace the amounts selected in a budget entry column with the amount entered in the Value box.
- Set each selected item to zero: Use this method to replace the amounts selected in a budget entry column with zero.
Value: Enter the monetary amount or percentage to modify the selected cells. "Set each selected item to zero" does not need an amount entered. When entering percentages in the system, do not include a decimal point. For fractional percentages, the leading zeros must be entered. For example, enter the following numbers to indicate the percentages.
-
0005 = .5%
-
005, 05, or 5 = 5%
-
50 = 50%
Budget Lines Only: Check the box to apply the criteria only to budget lines. Leave unchecked to apply to both budget and comment lines.
Freeze/Unfreeze Columns: Use this button to view all columns or to keep column labels to the left of the "Title" column visible, as you scroll when viewing the worksheet.
Validate Worksheet: Use this button to validate all budget items in the worksheet. (A budget item is any row that has the letter "B" in Column A.) Use the Previous Error and Next Error arrows to navigate errors found in the worksheet. Validate Worksheet (and the arrows) are not available for transferred worksheets.
Actions
Cancel: Select to discard the worksheet entries and return to your Budget Worksheets.
Transfer: Select to transfer the worksheet. Transfer is not available for transferred worksheets.
![]()
Session ID: Enter a session ID.
Beginning Document ID: Enter a beginning document ID.
Document Date: Enter a valid date for this session. The system defaults to the current date when a new session is created. However, you can enter any date, such as the date the session was created, the date the session was or will be posted, or the date of the transactions. The session date also serves as the default document date for each transaction in the session.
Save the worksheet when you’re finished with your edits. You have three save options:
-
Save - Saves the current document and keeps it open for further editing.
-
Save & Copy - Saves the current document and allows you to copy the worksheet.
-
Save & Close - Saves the current document and returns you to your list of worksheets
Copy / Close - Select to save the current worksheet. Copy / Close is not available for non-transferred worksheets. There are two variations of this button's functionality:
Copy - Saves the current document and allows you to copy the worksheet.