Automatic Reconciliation
Automatic Reconciliation lets you connect a financial institution to MIP so you can bring in bank activity and reconcile it with less manual effort. During reconciliation, your bank feed flows into MIP so you can review unmatched withdrawals and deposits, verify matched transactions, and resolve differences using suspense items.
Before you get started, make sure you've set up a bank connection under Module Setup > Connect to Financial Institution. This links your bank account to the appropriate general ledger code.
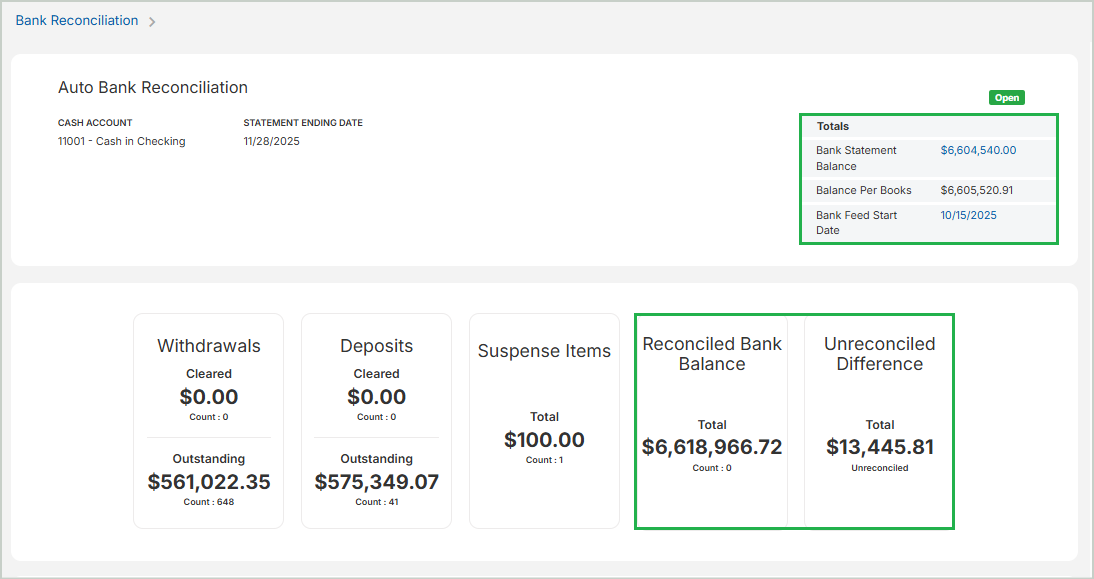
Bank Reconciliation Summary
The top section displays a summary of the totals included in the reconciliation.
-
Bank Statement Balance: The ending balance you entered from your bank statement when you added a new reconciliation. MIP uses this amount to calculate the Unreconciled Difference. You can update this value by selecting the balance and entering a new amount. Note that balances in locked reconciliations cannot be edited.
-
Balance Per Books: A system-generated value - MIP calculates the cash account's general ledger balance automatically as of the Statement Ending Date.
-
Bank Feed Start Date: The starting date for cleared transactions to pull in from the bank connection. These transactions will be compared to uncleared transactions in MIP to assist with the bank reconciliation process. You can update this value by selecting the start date and entering a new one. Note that dates in locked reconciliations cannot be edited.
-
Reconciled Bank Balance: The bank balance after accounting for all cleared items during the reconciliation process. This total updates automatically as you clear items. When all items are properly cleared, this should match the Bank Statement Balance.
-
Unreconciled Difference: The difference between the Reconciled Bank Balance and the Balance Per Books. This total automatically updates as you clear items. Your cash account is fully reconciled when the Unreconciled Difference is $0.00. A large difference indicates that items may be missing, incorrectly recorded, or not yet cleared.
Reconcile Items
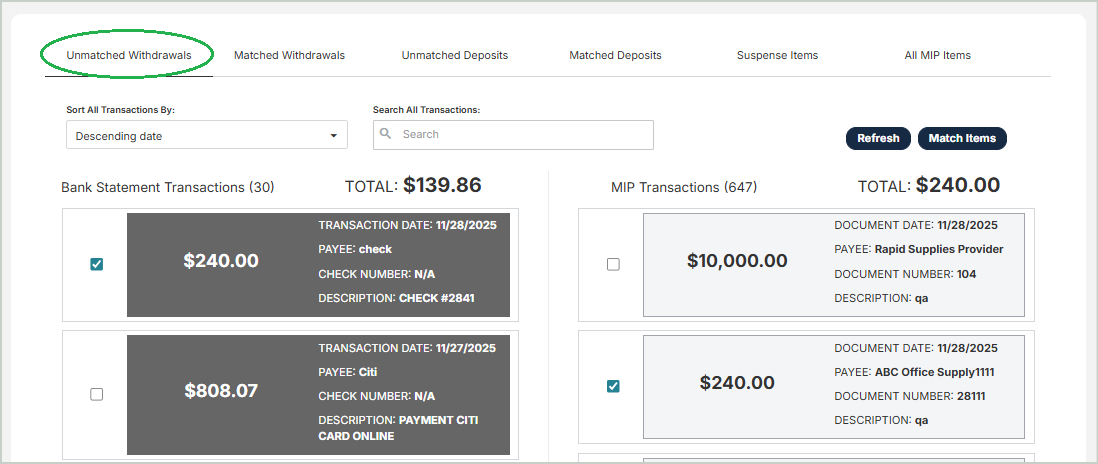
Use the following tabs to match the activity on your bank statement to transactions in MIP.
- Unmatched Withdrawals
- Matched Withdrawals
- Unmatched Deposits
- Matched Deposits
- Suspense Items
- All MIP Items
The Unmatched Withdrawals tab displays withdrawals within the selected bank reconciliation date range that could not be automatically matched. From this tab, you can manually match withdrawals. Once a withdrawal is matched, it moves to the Matched Withdrawals tab to be reviewed and cleared.
The goal is to find an exact amount match between the bank transaction and the MIP item. If multiple items share the same amount, you can use additional attributes - such as the transaction date - to determine the correct match.
Note: Bank statement transactions are added to MIP directly from your organization’s connected bank and account. Because weekends and bank holidays are included, the Transaction Date may differ from the Document Date.
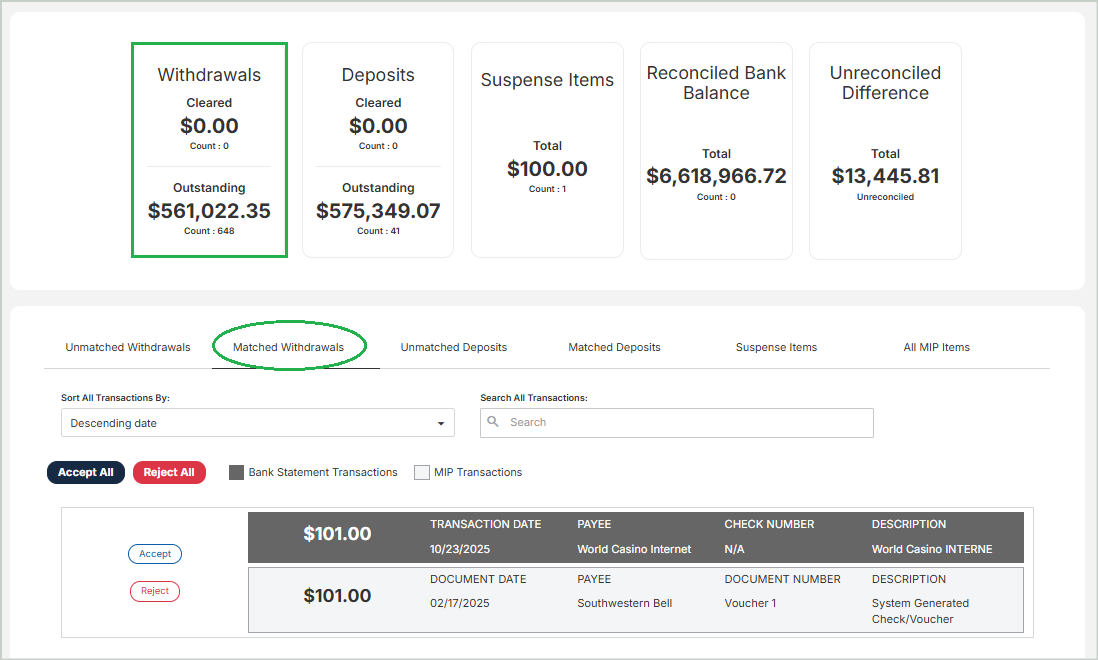
The Matched Withdrawals tab displays withdrawals within the selected date range that were either automatically matched or manually matched from the Unmatched Withdrawals tab.
From this tab, you can review and finalize matches:
-
Accept - Confirms the match and clears the item from the bank reconciliation.
-
Reject - Rejects the match and returns the item to the Unmatched Withdrawals tab for further review.
Note: Bank statement transactions are added to MIP directly from your organization’s connected bank and account. Because weekends and bank holidays are included, the Transaction Date may differ from the Document Date.
The Unmatched Deposits tab displays deposits within the selected bank reconciliation date range that could not be automatically matched. From this tab, you can manually match deposits. Once a deposit is matched, it moves to the Matched Deposits tab to be reviewed and cleared.
The goal is to find an exact amount match between the bank transaction and the MIP item. If multiple items share the same amount, you can use additional attributes - such as the transaction date - to determine the correct match.
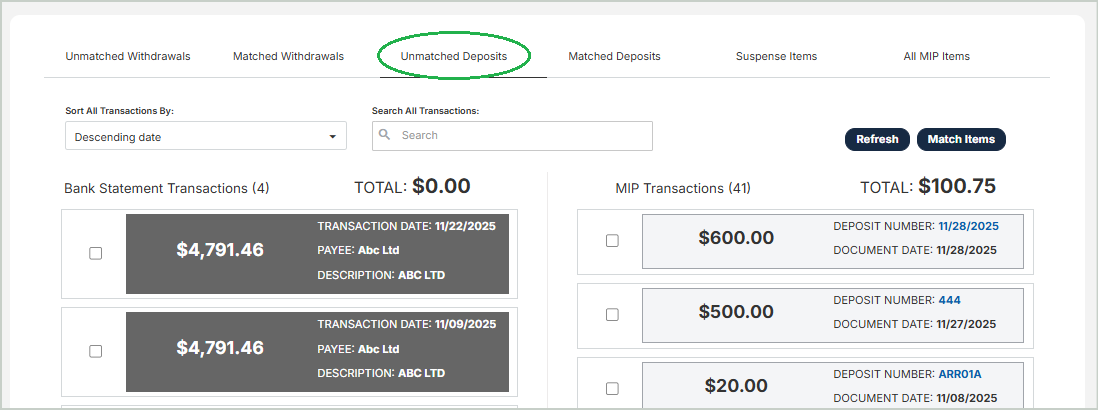
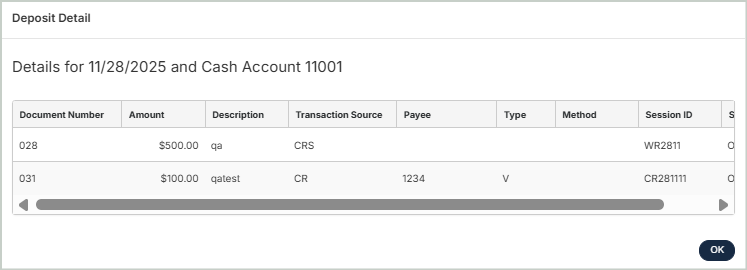
Select a Deposit Number to view specific details for the deposit.
Document Number: The document number entered during transaction entry
Amount: The amount of the deposit entered during transaction entry
Description: A description of the deposit
Transaction Source: The source of the deposit, such as Customer (C). Note that no source is identified for General Ledger type deposits.
Payee: The name of the recipient of the payment
Type: The deposit type (Cash Disbursement (CD), Cash Receipts (CR), Accounts Receivable Receipts (ARC))
Method: The payment method
Session ID: The session ID assigned to this batch of deposits
Status: The status of the deposit (Outstanding (OS) or Cleared (CL))
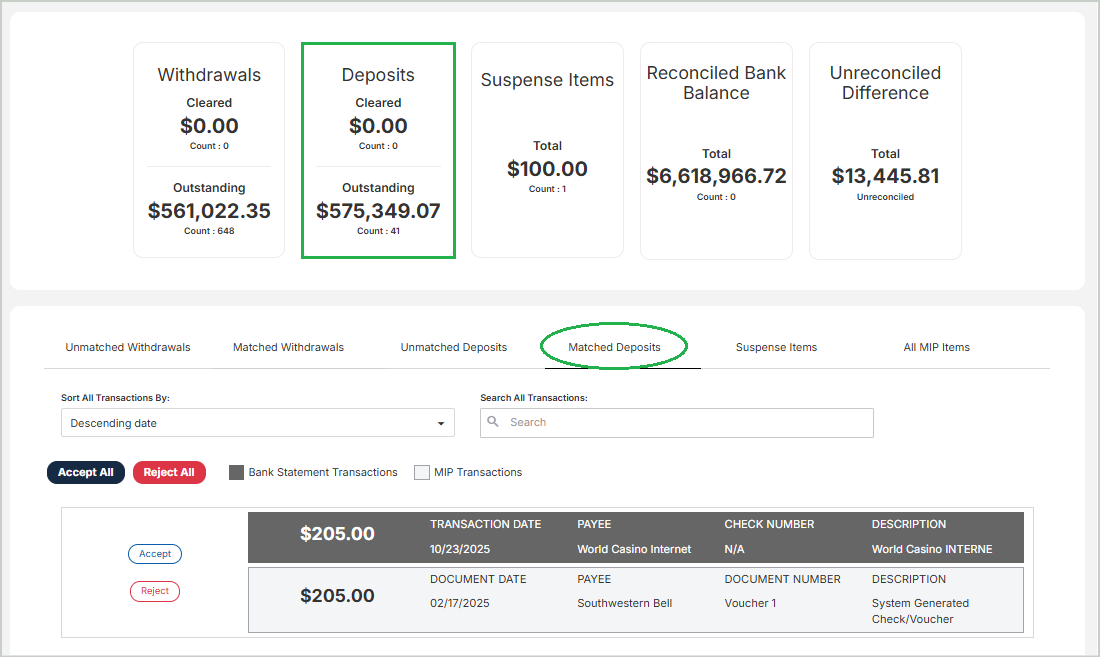
The Matched Deposits tab displays deposits within the selected date range that were either automatically matched or manually matched from the Unmatched Deposits tab.
From this tab, you can review and finalize matches:
-
Accept - Confirms the match and clears the item from the bank reconciliation.
-
Reject - Rejects the match and returns the item to the Unmatched Deposits tab for further review.
Select a Deposit Number to view specific details for the deposit.
Document Number: The document number entered during transaction entry
Amount: The amount of the deposit entered during transaction entry
Description: A description of the deposit
Transaction Source: The source of the deposit, such as Customer (C). Note that no source is identified for General Ledger type deposits.
Payee: The name of the recipient of the payment
Type: The deposit type (Cash Disbursement (CD), Cash Receipts (CR), Accounts Receivable Receipts (ARC))
Method: The payment method
Session ID: The session ID assigned to this batch of deposits
Status: The status of the deposit (Outstanding (OS) or Cleared (CL))
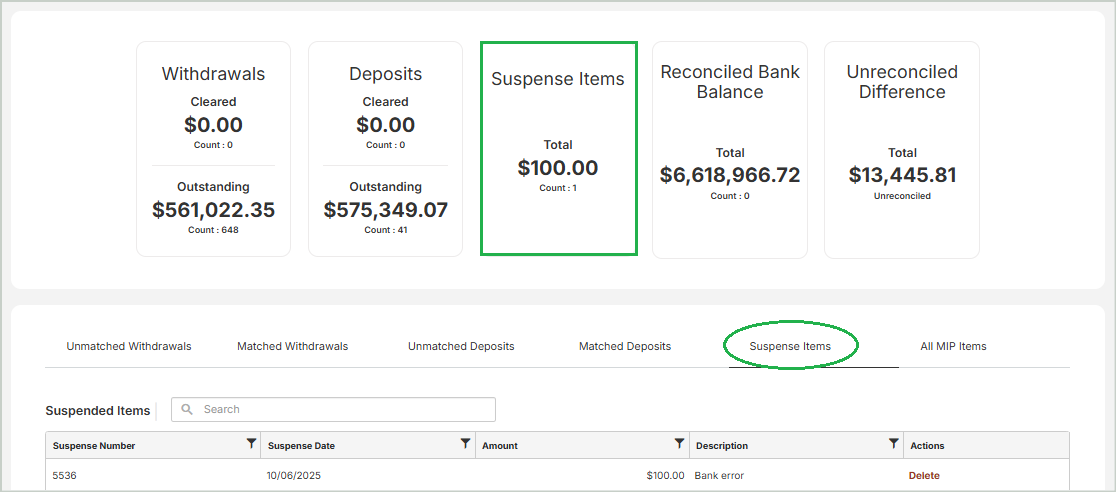
Use the Suspense Items tab to manually add or delete suspense items. These are reconciling items that typically aren’t recorded as transactions - for example, a bank error. Since these items affect reconciliation but not your general ledger, they should only be entered here, not as actual transactions.
Once the issue is resolved in a future reconciliation period and the item is no longer causing a difference, you can manually delete it from this tab.
Note: A suspense item cannot be entered or deleted under a locked reconciliation. You must first unlock the associated Reconciliation ID.
The Suspense Items grid includes the following columns:
Suspense Number: Enter a unique number for the suspense item for tracking purposes.
Suspense Date: Enter a unique date for the suspense item for tracking purposes.
Amount: Enter the amount of the suspense item (positive or negative).
Description: Enter a description of the suspense item.
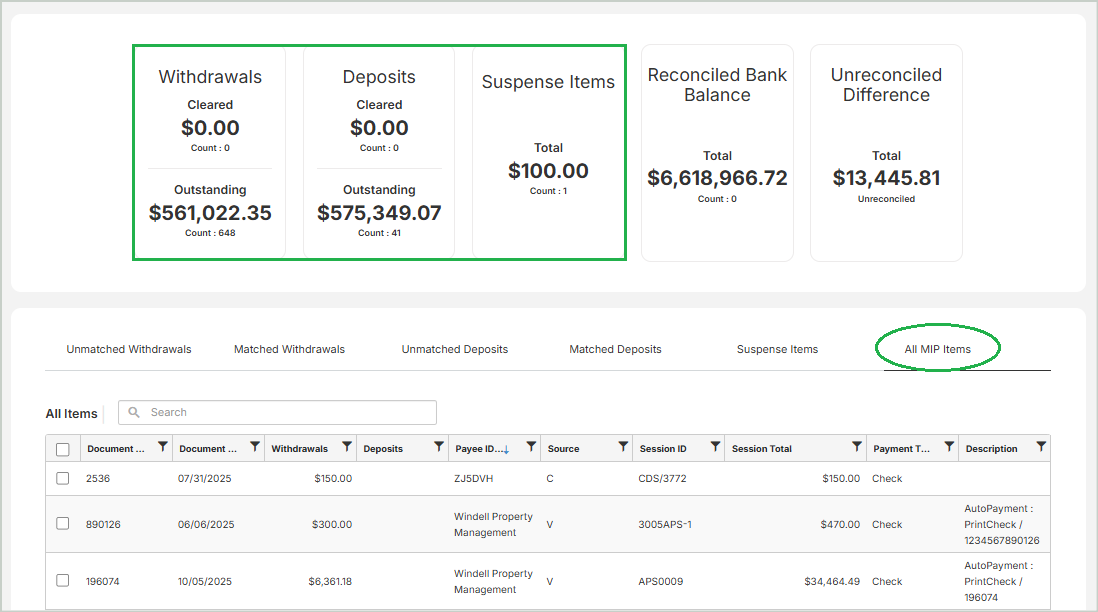
The All MIP Items tab consolidates all transactions from each individual tab, allowing you to view a complete list in one place.
The All MIP Items grid includes the following columns:
Document Number: The document number
Document Date: The date of the document
Withdrawals: The amount of withdrawals associated to the document
Deposits: The amount of deposits associated to the document
Payee ID: The unique ID that is assigned to this Payee
Source: The source of the disbursement, such as Employee (E) or Vendor (V). Employee originates from Payroll and Vendor from Accounts Payable. Note that no source is identified for General Ledger type checks.
Type: The type of document, such as a Cash Disbursement (CD) or Voided Check (V). CD represents all posted checks and vouchers and could have been created using the Enter Cash Disbursements, Enter Manual AP Checks, Write Checks, or Pay Selected AP Invoices forms. CD could also represent a check created in the Payroll module. Keep in mind that once a cash disbursement is voided, its type changes from CD to V.
Payment Type: The payment type - either Check or Voucher
Description: The description of the check or voucher
Run Your Report
Select Run Report to export the Reconciliation Report. You can choose to run either a Detail Report or a Summary Report based on the reconciliation data. This report serves as your historical record of the reconciliation.
When you run the report, it is added to the Report Queue at the bottom of the MIP window. You can continue working in other areas of MIP while the report generates. Once complete, the report is available as a downloadable file.
Best Practices
If additional activity is entered after a reconciliation period is completed - and the reconciliation is not locked - the reconciliation results can change. This means the original reconciliation trail may be lost.
To preserve an audit trail and demonstrate that the account was reconciled at a specific point in time, we recommend the following best practices:
-
Run and save the Reconciliation Report (print or store a copy)
-
Lock the reconciliation once it is complete
-
Update entry date restrictions to prevent posting activity into the reconciled period (Organization Settings > Preferences > Entry Dates > Prohibit)
-
Locking the reconciliation protects it from changes and provides evidence that the account was reconciled accurately at that time